What is Helm?
Helm is the package manager for Kubernetes. It helps you manage Kubernetes applications by defining Helm Charts. Helm Charts help you define, install, and upgrade even the most complex Kubernetes applications.
Basically, it is a tool designed to organize Kubernetes resources easily. You may define your own helm chart to do so, or you can use an already-defined helm chart. For checking the available helm charts, check this website: https://artifacthub.io/.
Why use Helm?
Depending on your organization, there might be a variety of reasons why you would like to use Helm, as;
- it simplifies the managing and scaling of your application since you can parameterize any value inside your Kubernetes resources and manage those from one file,
- reduces the complexity of deploying and/or rolling back since you can install and delete an entire package with one cli,
- gives more control and advantage in CI/CD and even cloud applications, and therefore,
- boosts productivity
One of the most common use cases of the helm is to use it for deploying your application to different environments. Imagine your company has different environments, such as dev, qa, and prod. These environments all have different requirements.
For instance, in prod, you would like to run three instances of database and have more memory for your backend application, but in qa you don’t need those. If you are not using Helm, changing these variables each time is time-consuming and frustrating. But with helm, you can use predefined variables for each environment and run it with a single command.
If you are convinced about using Helm, let’s move on to how we can install it.
Helm Installation
Before installing helm, please note that helm requires:
- An already existing kubernetes cluster
- Kubectl
There are multiple ways of installing `helm`, depending on your choice and os.
From binary release: You may download and install the binary release for your operating system.
With a package manager: You may install helm with the help of various package managers such as;
Homebrew: `brew install helm`
Chocolatey: `choco install kubernetes-helm`
Scoop: `scoop install helm`
GoFish: `gofish install helm`
Snap: `sudo snap install helm –classic`
After installing the helm, we can move on to creating our first helm chart. But first;
What is Helm Chart?
Helm Chart is a package that contains your application’s Kubernetes templates and helm-specific files that operate those Kubernetes files.
A simple chart can be used for a single pod to full stack application.
To understand the helm chart better, let’s investigate the folder structure of the helm chart, and to do so let’s create our first chart by typing:
helm create example-chart
This will create a folder called example-chart:
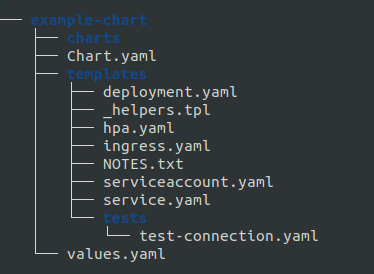
charts: Any external chart that depends on our chart goes here, empty by default.
Chart.yaml: Contains information about the chart, like; name, version, description etc.
templates: Kubernetes files of your applications go inside here.
templates/_helpers.tpl: A place to put template helpers that you can re-use throughout the chart.
templates/NOTES.txt: Help text for the chart. When users run “helm install”, they will be prompted what you typed in this file.
templates/tests: Tests to validate if the helm chart works expected, optional.
values.yaml: Values of the variables inside the Kubernetes templates.
Using Helm Charts
Finding
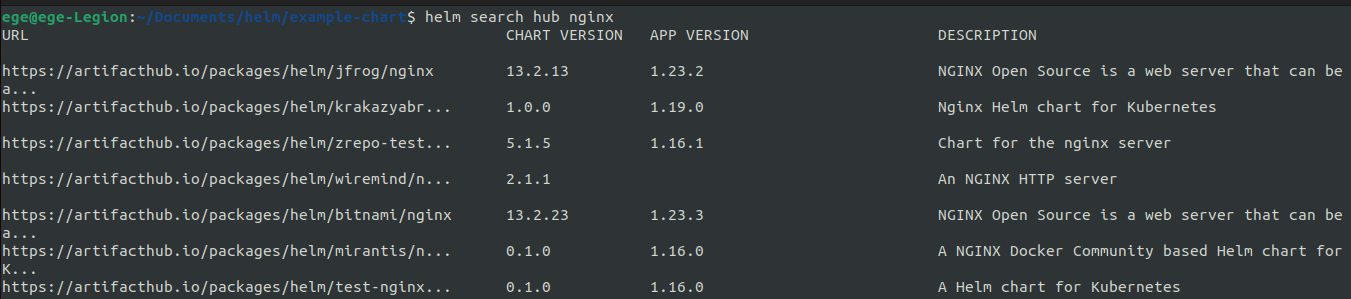
As mentioned above, there is a repository where all the charts are collected. If we want to search for a helm chart on the Artifact Hub, we basically type;
helm search hub
e.g: helm search hub nginx would give you the results for nginx packages in the Artifact Hub.
If we want to search in our local repository, this time we type;
helm search repo {local-repo-name}
Adding
If you have a local chart package and would like to add it to your local repo:
helm add repo your-local-chart
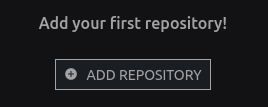
If you would like to publish your chart to the Artifact Hub, and add the helm chart to your GitHub you basically need to Sign Up ( if you haven’t already ) to Artifact Hub, after logging in, go to “Control Panel” and click on “Add Repository”.
Installing
If we want to install a package, first, you need to add the provider’s charts to your local repo. Then you need to use the `install` command, which takes two parameters; release name and name of the chart.
helm repo add {repo-name} {charts-provider-url}
helm install {release-name} {artifact-name}
Please mind the release name here, anything that you choose. If you want a random name generated by helm, you may use `–generate-name`.
helm install {artifact-name} –generate-name
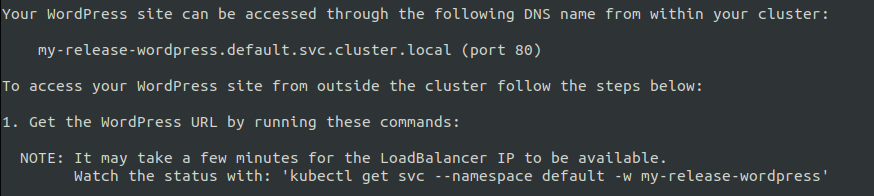
Let’s follow the example in the documentation and install wordpress:
helm repo add bitnami https://charts.bitnami.com/bitnami
![]()
And before moving on to installing the chart, let’s search our local repo called ‘bitnami’ ( I named ‘bitnami’ for ease of use, we could have named anything )
helm search repo bitnami

You’ll see a long list of charts provided by bitnami. Then let’s install WordPress.
helm install my-release bitnami/wordpress

Below this information, you’ll find instructions on how to use it.
Let’s see if it gets created by using kubectl commands:

As you can see, it uses the release name as a prefix.
Now, let’s create one more chart with a random release name.
helm install bitnami/wordpress –generate-name
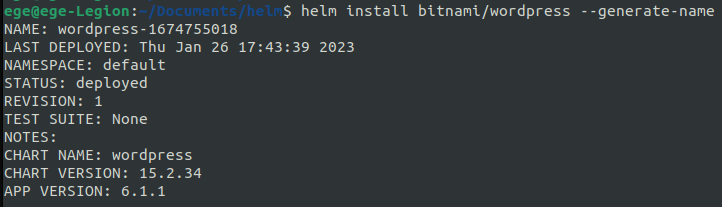
Now the release name is randomized to wordpress-1674755018.
Deleting
To delete the install helm chart, we are using the below command:
helm delete {release-name}
Let’s delete the wordpress chart we’ve installed on previous step:

We’ve deleted the release called ‘my-release’ and no pods, or any other resources are active now!
Since we learned the basics, now let’s create our own chart and parameterize it!
Create a New Helm Chart
In this article, we will create and parameterize a nginx application that runs in kubernetes. You may check this article, and find under Deployment the yaml file necessary for the application.
Let’s start by creating an empty chart, I’ll name it as ‘nginx-example’:
helm create nginx-example
![]()
We can remove the contents of the templates folder as we will deploy a simple nginx for learning purposes.
rm -r templates/*
Then, let’s first edit Chart.yaml.
To begin with, delete all the comments.
apiVersion should be v2, if we want intended users of our chart using at least helm 3. To support previous versions, you need to change the version to ‘v1’.
name is the name of our chart. It’ll stay the same.
description is the description of our chart. It is optional, and should explain the chart if it exists. I’ll edit it as: “A Helm chart for Nginx Application”.
type, is another optional field that can be either application or library. Our application is obviously an application.
version is the version of our chart. It is required, and should be a SemVer 2 version.
appVersion is the version of the application running in our chart. It is only informative and optional. We are using nginx:1.14.2; therefore, I’ll update it accordingly.
The final form of our Chart.yaml would be like:
apiVersion: v2
name: nginx-example
description: A Helm chart for Nginx Application
type: application
version: 0.1.0
appVersion: "1.14.2"
Now it is time to add the nginx deployment that we will parameterize.
Create a new `deployment.yaml` under templates and paste the nginx deployment.
templates/deployment.yaml
apiVersion: apps/v1
kind: Deployment
metadata:
  name: nginx-deployment
  labels:
    app: nginx
spec:
  replicas: 3
  selector:
    matchLabels:
      app: nginx
  template:
    metadata:
      labels:
        app: nginx
    spec:
      containers:
      - name: nginx
        image: nginx:1.14.2
        ports:
        - containerPort: 80
Now it is time to consider the values we’d like to parameterize. As a best practice, we do not want to parameterize things that won’t change, like apiVersion, kind, etc.
This is, of course, a simple deployment for demo purposes, but which values would you think we are most likely to update at some point?
For this application, I’d parameterize the following;
- Replicas, as I might want to increase or decrease
- Image, as I might want to use a newer version
- Port, as another application I use, might have the same port
We will put those 3 values in `values.yaml`, therefore our object will be “Values”. Remember, we can get the values from other files as well, like Chart.yaml.
To parameterize in helm, Go templates are used. So the values will be in double curly brackets, {{ }}.
So our parameters will be:
– {{ .Values.replicas }}.
– {{ .Values.image.name }}: {{ .Values.image.tag }}
– {{ .Values.port }}
And new deployment.yaml:
apiVersion: apps/v1
kind: Deployment
metadata:
  name: nginx-deployment
  labels:
    app: nginx
spec:
  replicas: {{ .Values.replicas }}
  selector:
    matchLabels:
      app: nginx
  template:
    metadata:
      labels:
        app: nginx
    spec:
      containers:
      - name: nginx
        image: {{ .Values.image.name}}:{{ .Values.image.tag }}
        ports:
        - containerPort: {{ .Values.port }}
Let’s add these values to our `values.yaml`. Delete everything inside `values.yaml`, and add the following:
replicas: 3
image:
  name: nginx
  tag: 1.14.2
port: 80
Now let’s install the chart, from the root folder;
helm install new-nginx-release

And check if it has been installed.
helm list

And let’s check the pods:
kubectl get pods

Let’s try updating values and see if it works.
First, let’s uninstall the release.
helm uninstall new-nginx-release
![]()
And then decrease the replicas from 3 to 2 in `values.yaml` and reinstall.
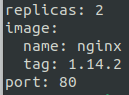
This time we will only see 2 nginx pods up and running.

We successfully installed our first chart!

Holding a BSc in Mechatronics, Ege loves to automate. He is now working as a Software Development Engineer In Test at XebiaLabs, Amsterdam.