In this article, I would like to talk about kubectl usage. “kubectl” as we have mentioned is the CLI tool for Kubernetes which is a secure way to communicate with the Kube API server.
That means I can create, list, delete and update the Kubernetes resources using “kubectl”. So in other words, we can apply HTTP methods over the Rest API against the kube-api server in a secure and easy way!
I will start with the basics to advanced usage. A great command list is available here: https://kubernetes.io/docs/reference/generated/kubectl/kubectl-commands
Kubectl Create – Kubectl Apply – Kubectl Run
Let’s start with creating a resource:
kubectl create <resourceKind> <resourceName>
e.g:
kubectl create deployments sample-deployment --image=nginx

We can create it from a YAML file:
kubectl create -f samplek8sresource.yaml

We may also use the “apply” command when we are creating from a YAML file:
kubectl apply -f samplek8sresource.yaml

Important Note: The difference between “create” and “apply” is that “create” can only create a resource but “apply” can create and update a resource. For instance, if the resource is already up and running and you made changes in the YAML “create” command will fail but “apply” will update the resource.
The sole exception for creating a resource is Pod, for Pod we directly run it:
kubectl run <podName> --image=<imageName>
e.g:
kubectl run nginx --image=nginx

Listing Resources with Kubectl
For listing any resource, we use “get”:
kubectl get <resourceKind>
e.g:
kubectl get deployments

This will get all deployments available in the default namespace. For a specific namespace, we need to add the “–namespace” or “-n” parameter and specify the namespace name.
kubectl get pods -n sample-namespace

To list the pods in all namespaces:
kubectl get pods --all-namespaces

To list all development-related resources available in you may use:
kubectl get all
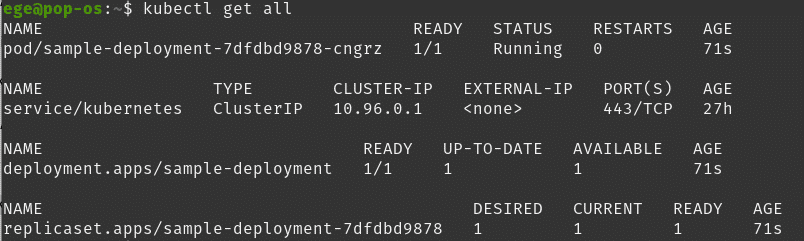
This will give you most of the resources but except a few types like secrets etc.
We can get a specific resource:
kubectl get <resourceKind> <resourceName>
For more options please refer here.
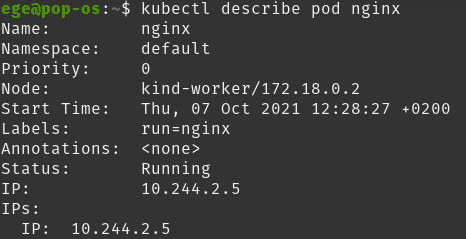
To get more information on a resource, we can describe it:
kubectl describe <resourceKind> <resourceName>
e.g:
kubectl describe pod nginx
Advanced Kubectl Usage
As we mentioned during the tutorials, kubectl is sending an HTTP request under the hood and receives an HTTP response which is in JSON format. Kubectl beautifies that response and gives us an understandable output in a different format.
There are few different output options that you may use with the “-o” flag.
For instance:
kubectl get pods -o wide

This will as you can see will give you the node and IP information as well.
If we want to see the JSON output
kubectl get pods -o json
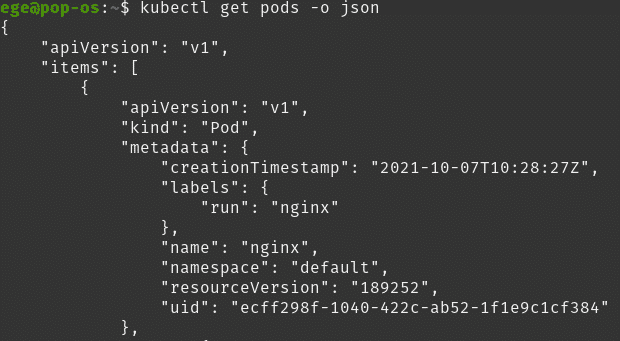
Since we have JSON output we can get the specific information on this by using jsonpath.
kubectl get <resourceKind> -o jsonpath=’{jsonpath.to.the.information}’
e.g:
kubectl get pods -o jsonpath=’{.items[*].metadata.name}’
This will return the names of the pods.

Another great option is “custom-columns”. Using this flag, we can beautify the output that we want. As the name suggests, we create our custom columns and add the info that corresponds to them.
kubectl get <resourceKind> -o custom-columns=’<TITLE1>:<jsonpath>,<TITLE2>:<jsonpath>, …’
Important Note: When you are using jsonpath you have to mention the first element ( i.e .items[] ) because you are providing jsonpath. But when you are using custom columns you skip the first element.
e.g:
kubectl get pods -o custom-columns=’NAME:.metadata.name’

Or with multiple columns:
kubectl get pods -o custom-columns='NAME:.metadata.name,NODE:.spec.name'

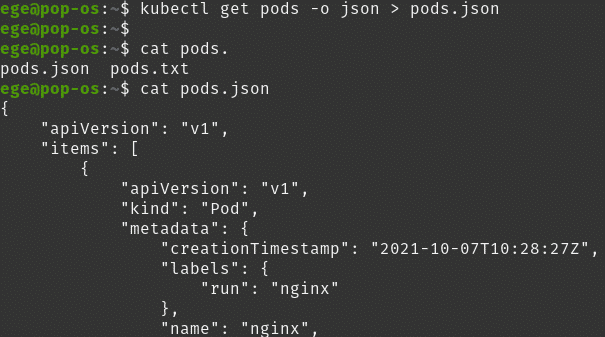
We can save the output in the format of our choice by adding “> <fileName>.<fileType>”:
kubectl get pods -o wide > pods.txt

or
kubectl get pods -o json > pods.json
or even the custom columns:
kubectl get pods -o custom-columns=’NAME:.metadata.name,STATUS:.status.phase’ > podstatus.txt

This is all for now. We will be using the kubectl throughout the tutorial where we will see different commands. See you in the next episode!
Kubernetes Series
- Episode 1: Introduction to Kubernetes
- Episode 2: How to Create a Kubernetes Cluster
- Episode 3: Kubectl
- Episode 4.1: Kubernetes Objects
- Episode 4.2: Kubernetes Workloads
- Episode 4.3: Kubernetes Services
- Episode 4.4: Kubernetes Storage
- Episode 4.5: Kubernetes Configuration Objects
- Episode 5: Scheduling in Kubernetes
- Episode 6: Kubernetes Upgrade and Deployment Strategies
- Episode 7: Kubernetes Security
- Episode 8: Deploy a Full Stack Application in Kubernetes
Thanks for reading,
Ege Aksoz

Holding a BSc in Mechatronics, Ege loves to automate. He is now working as a Software Development Engineer In Test at XebiaLabs, Amsterdam.