XPath in Selenium tactics will help you how to write dynamic XPath in Selenium Webdriver projects. Generally, test automation engineers struggle to write dynamic XPath at the beginning of their test automation journeys. To address this pain, I prepared this tutorial for writing an effective XPath in Selenium. Let’s start to learn all tricks in this XPath tutorial.
I shared all my tactics, such as XPath contains text, sibling, ancestor, child, preceding, descendant, parent, and so on. I hope this article will help you to write smart and non-brittle selenium find by statements in your projects.
XPath in Selenium Table of Contents
How to Write Dynamic XPath in Selenium Projects for Web Elements
In our test automation projects, we generally prefer to use id, name, class, etc., these locators. However, sometimes we could not find any of them in the DOM, and also sometimes locators of some elements change dynamically in the DOM. In these kinds of situations, we need to use dynamic XPath locators. These locators must be capable of locating complex and dynamically changing web elements. In the below sections, I will share with you 15 Tactics to Write Effective XPath Locators.
XPath Selenium Locators Strategies
We can find the location of any element on a web page using XML path expressions. The basic syntax for XPath is shown below:
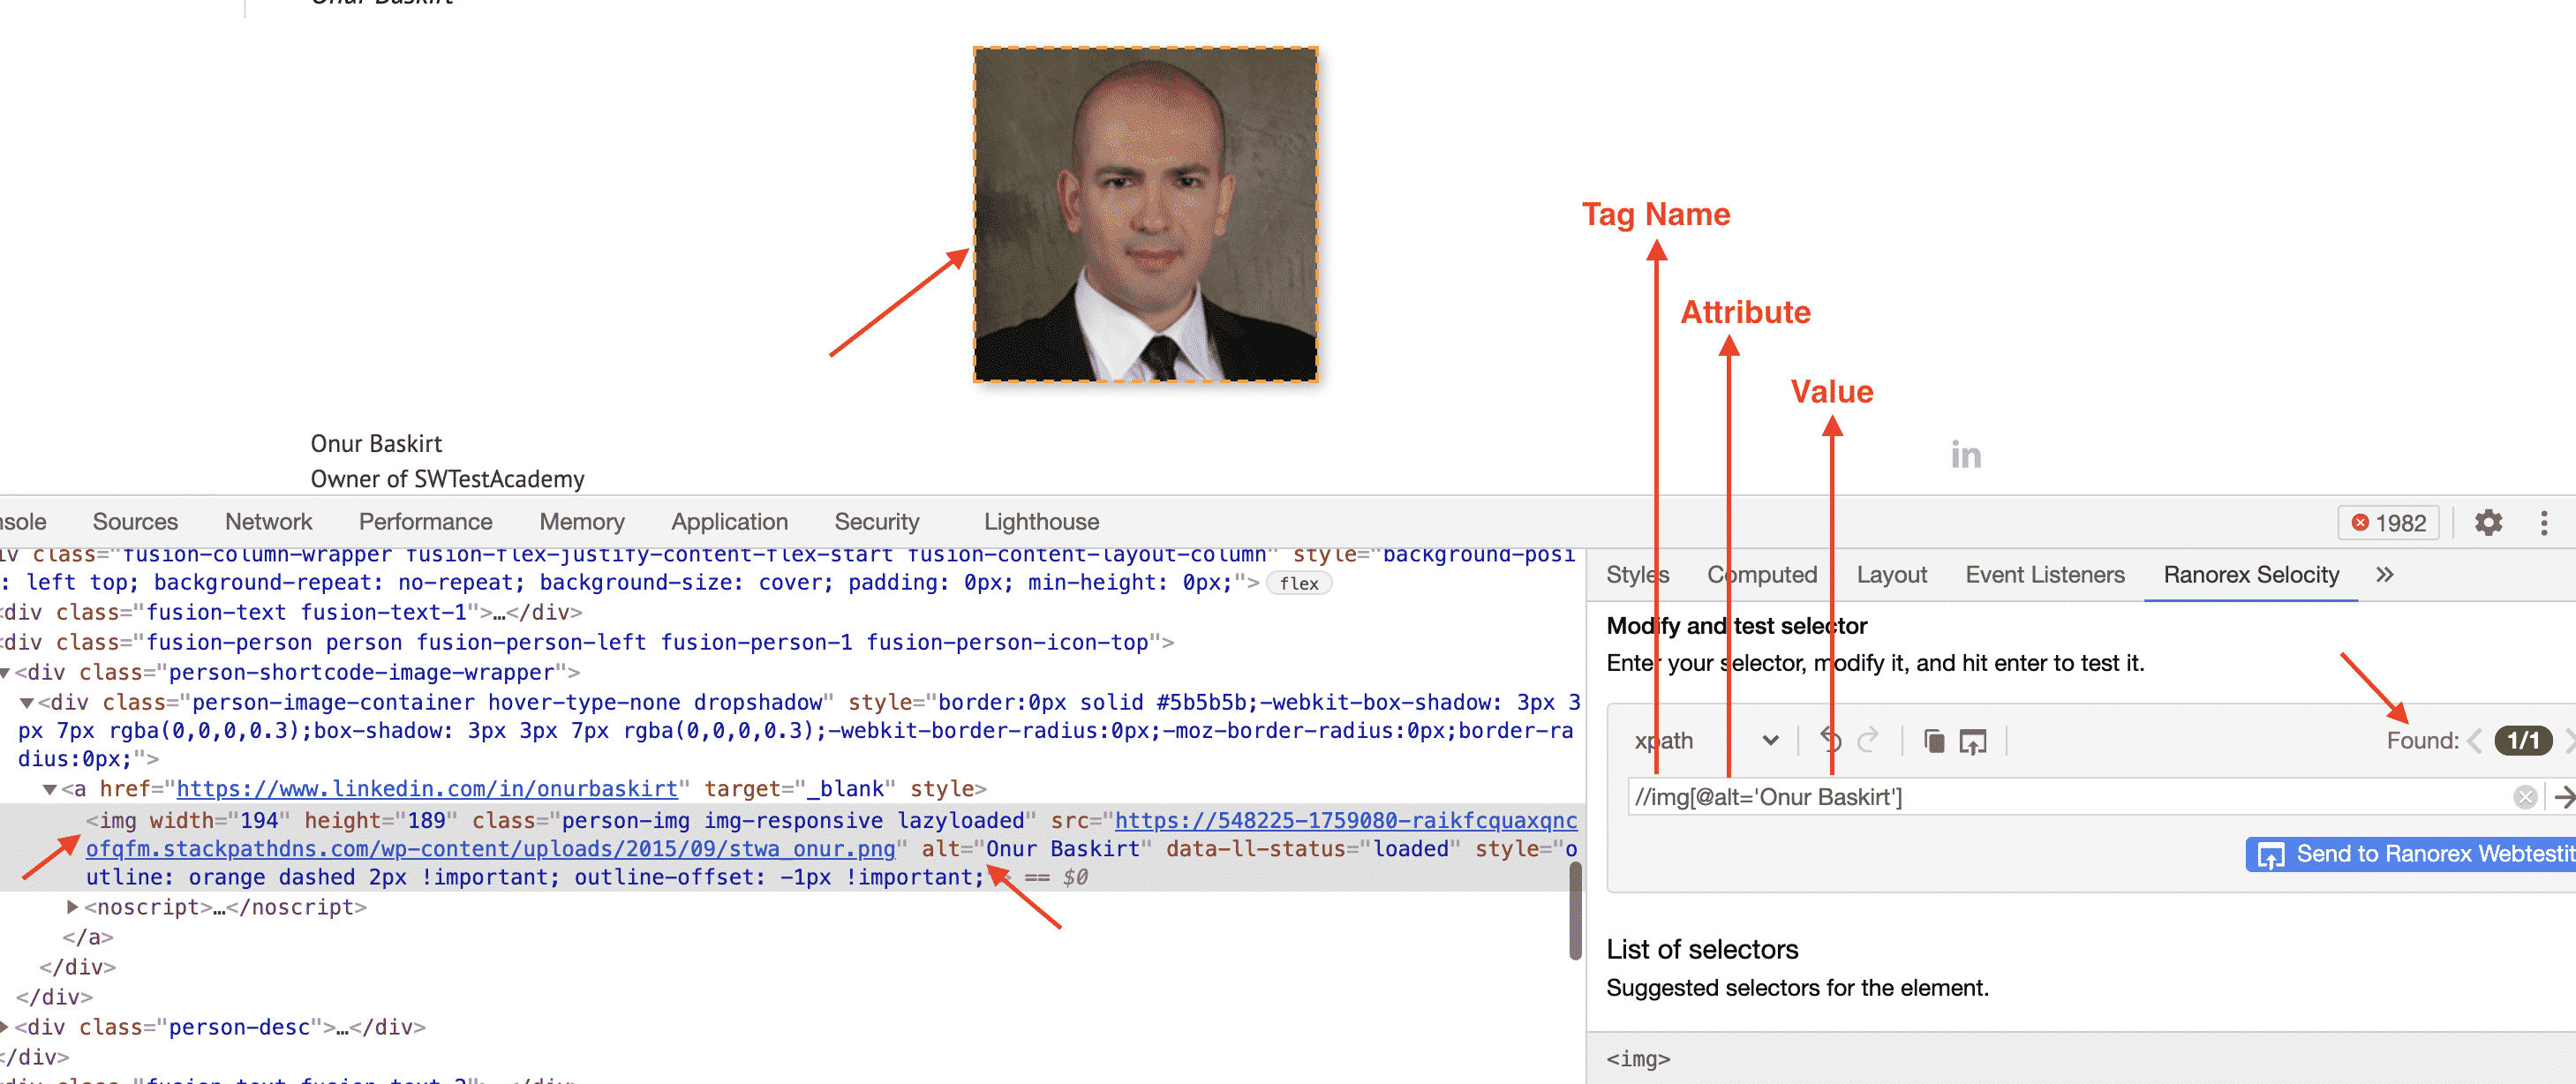
Syntax = //tagname[@attribute=’Value‘]
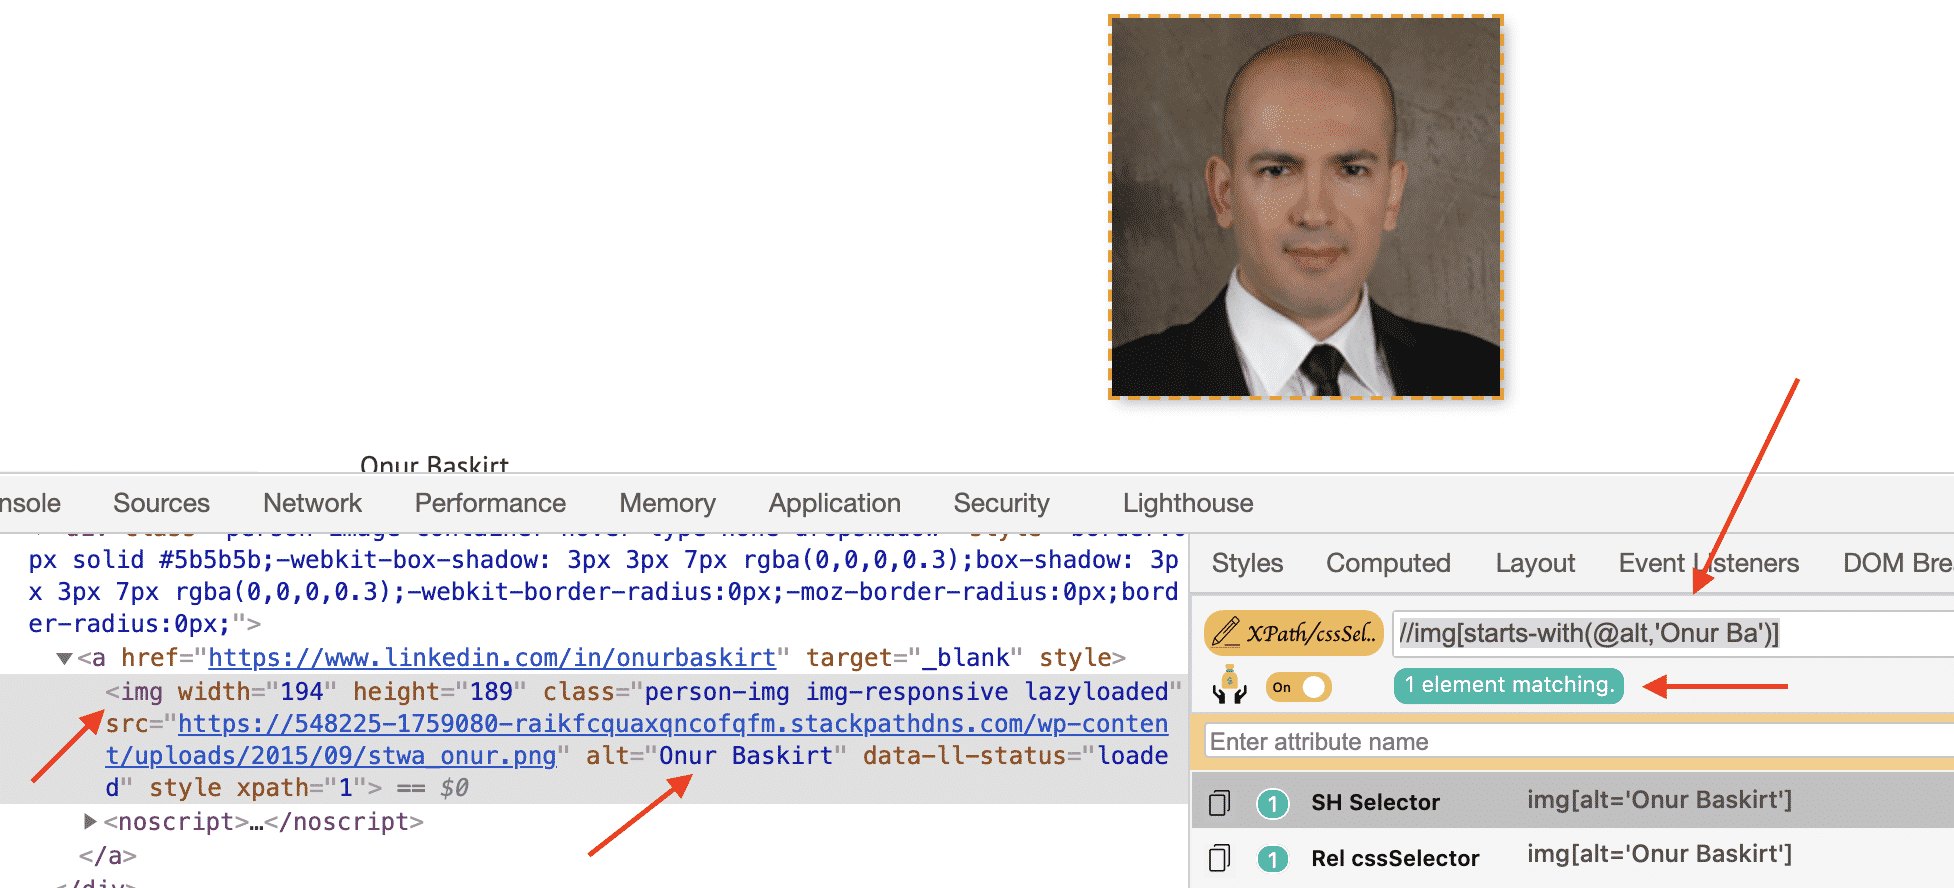
Example = //img[@alt=’Onur Baskirt‘]
You can also use class, and src attributes to locate an element with XPath, as shown above, but always check that only one element has been found!
Absolute XPath and Relative XPath in Selenium
Generally, in some test automation engineer interviews, I asked about the difference between absolute and relative XPath. The answer is very easy.
Absolute XPath in Selenium
- It is a direct way to locate an element.
- It is very brittle.
- It starts with a single slash “/” which means starting to search from the root.
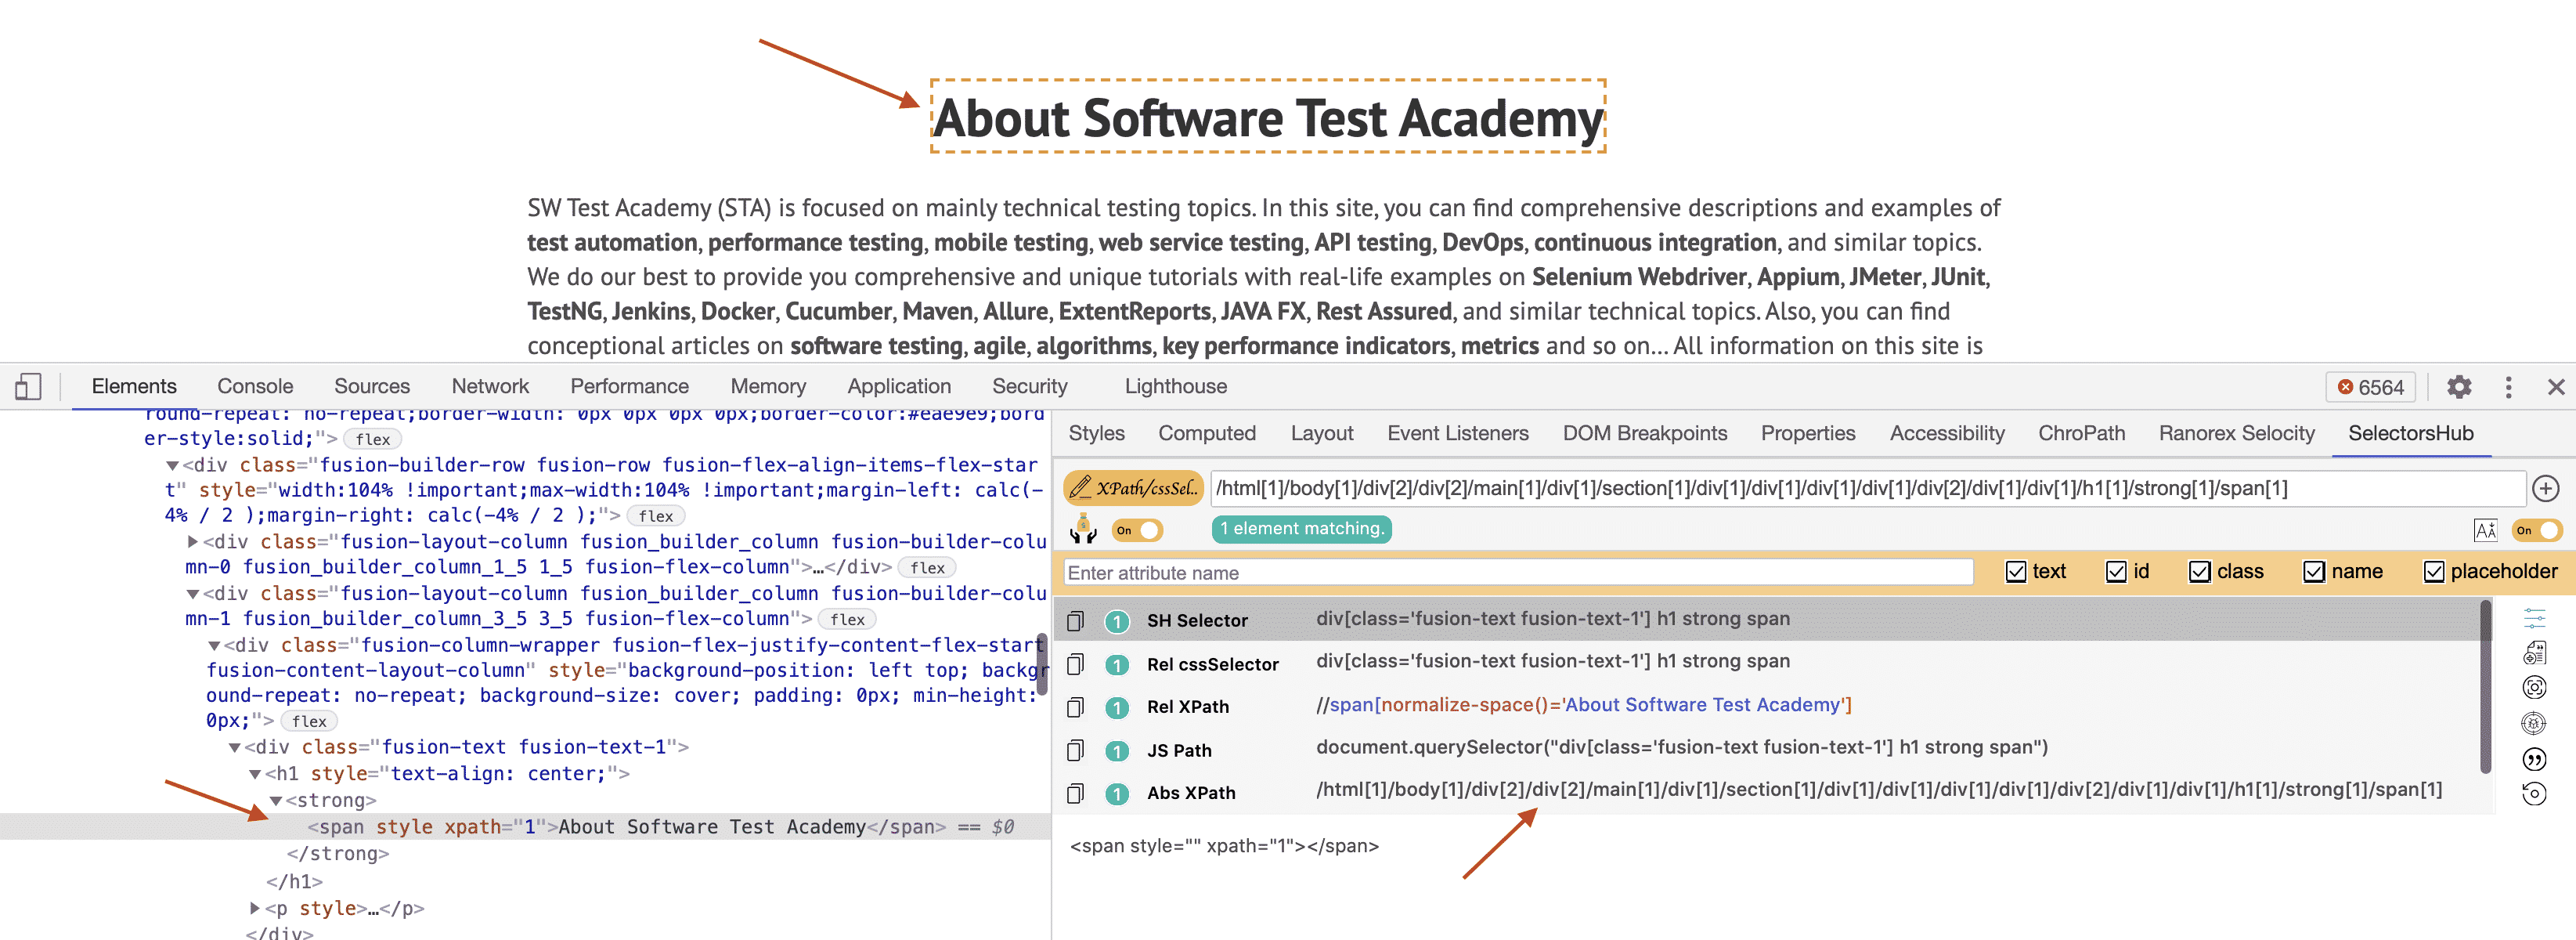
Example: /html[1]/body[1]/div[2]/div[2]/main[1]/div[1]/section[1]/div[1]/div[1]/div[1]/div[1]/div[2]/div[1]/div[1]/h1[1]/strong[1]/span[1]
Relative XPath in Selenium
- Starts from the middle of the HTML DOM.
- Starts with a double slash “//” which means it can start to search anywhere in the DOM structure.
- Shorter than Absolute XPath.
- Less fragile.
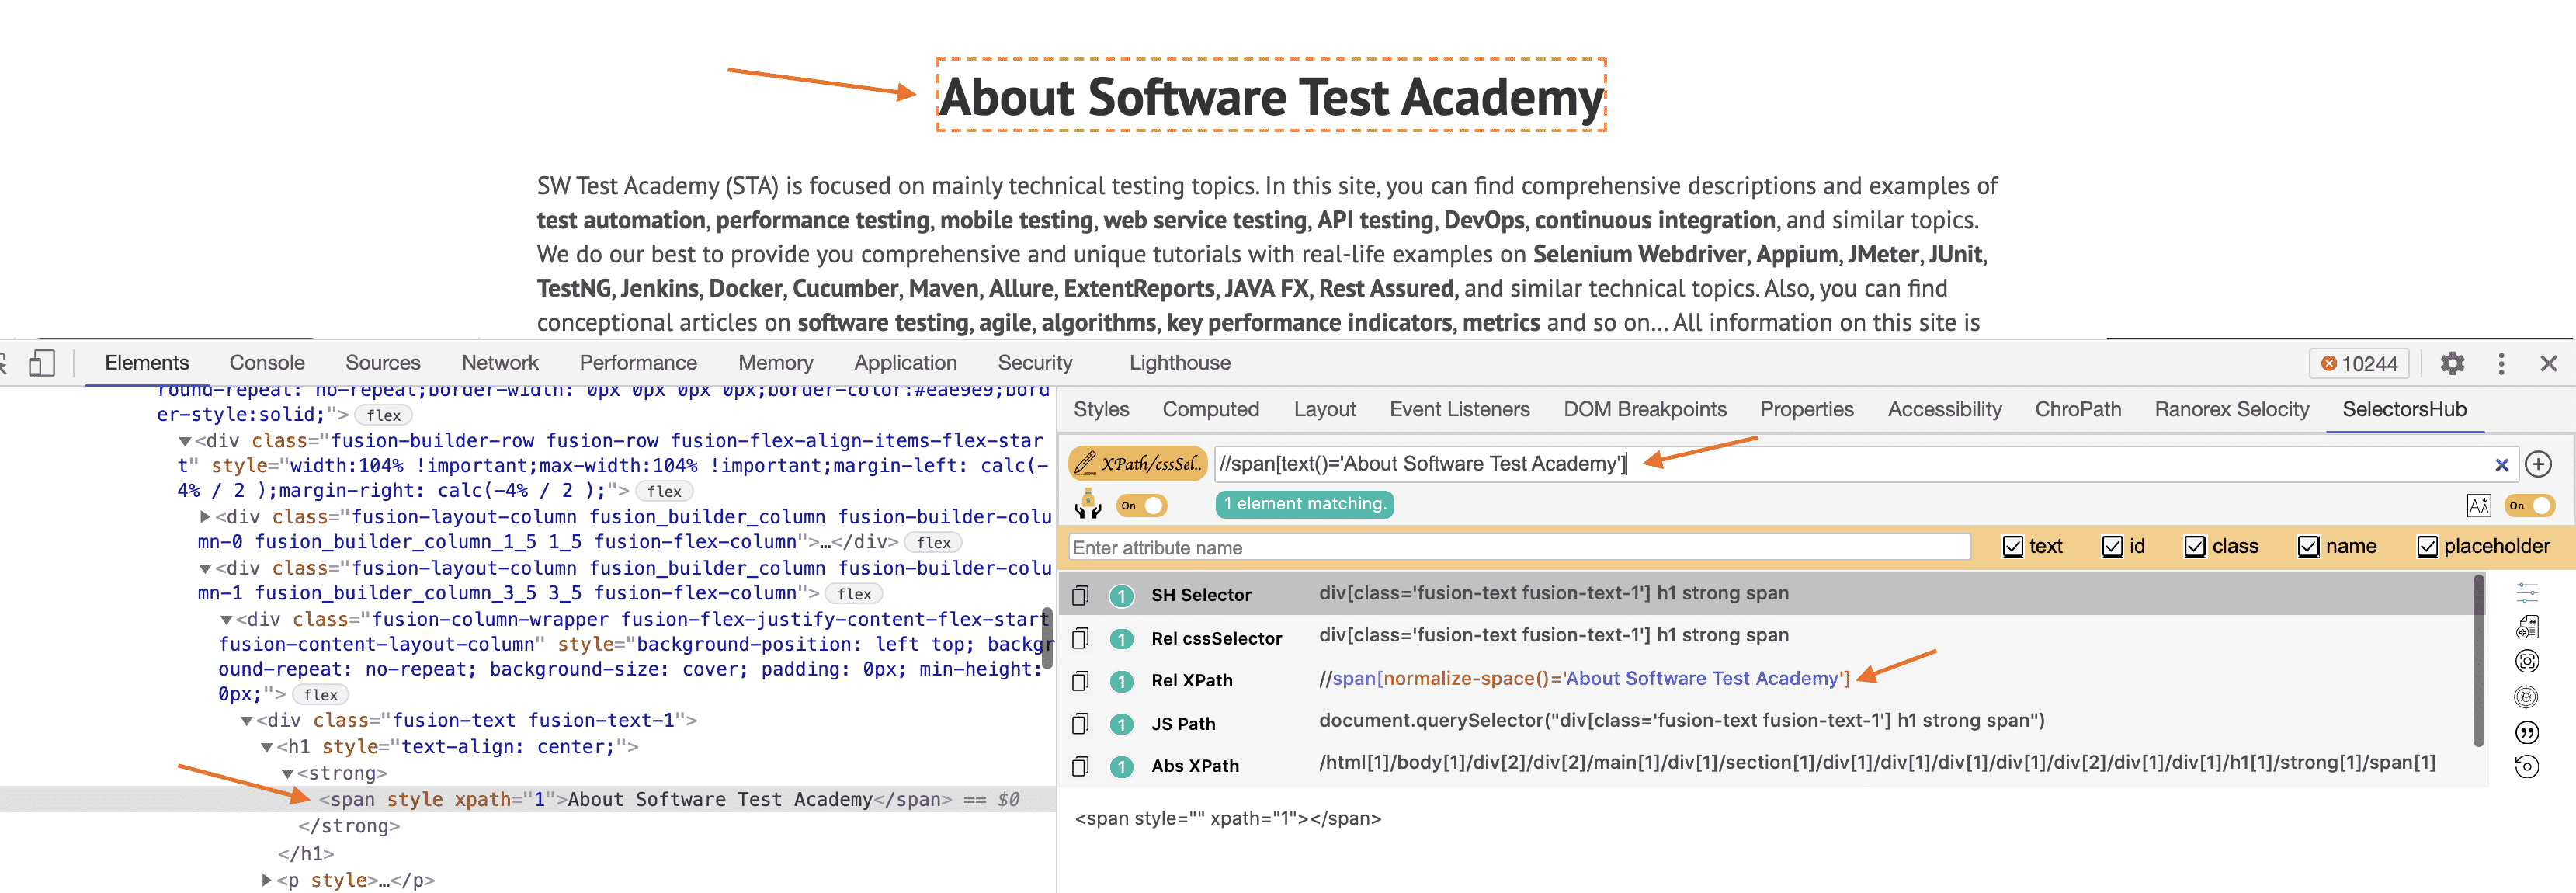
Example://span[text()=’About Software Test Academy’]
In the above screenshot, SelectorsHub add-on finds a bit different result like: //span[normalize-space()=’About Software Test Academy’], but I also used my tactic, which is finding Xpath with text: //span[text()=’About Software Test Academy’]
In the next section, you will also learn how to find an element with text by XPath in Selenium.
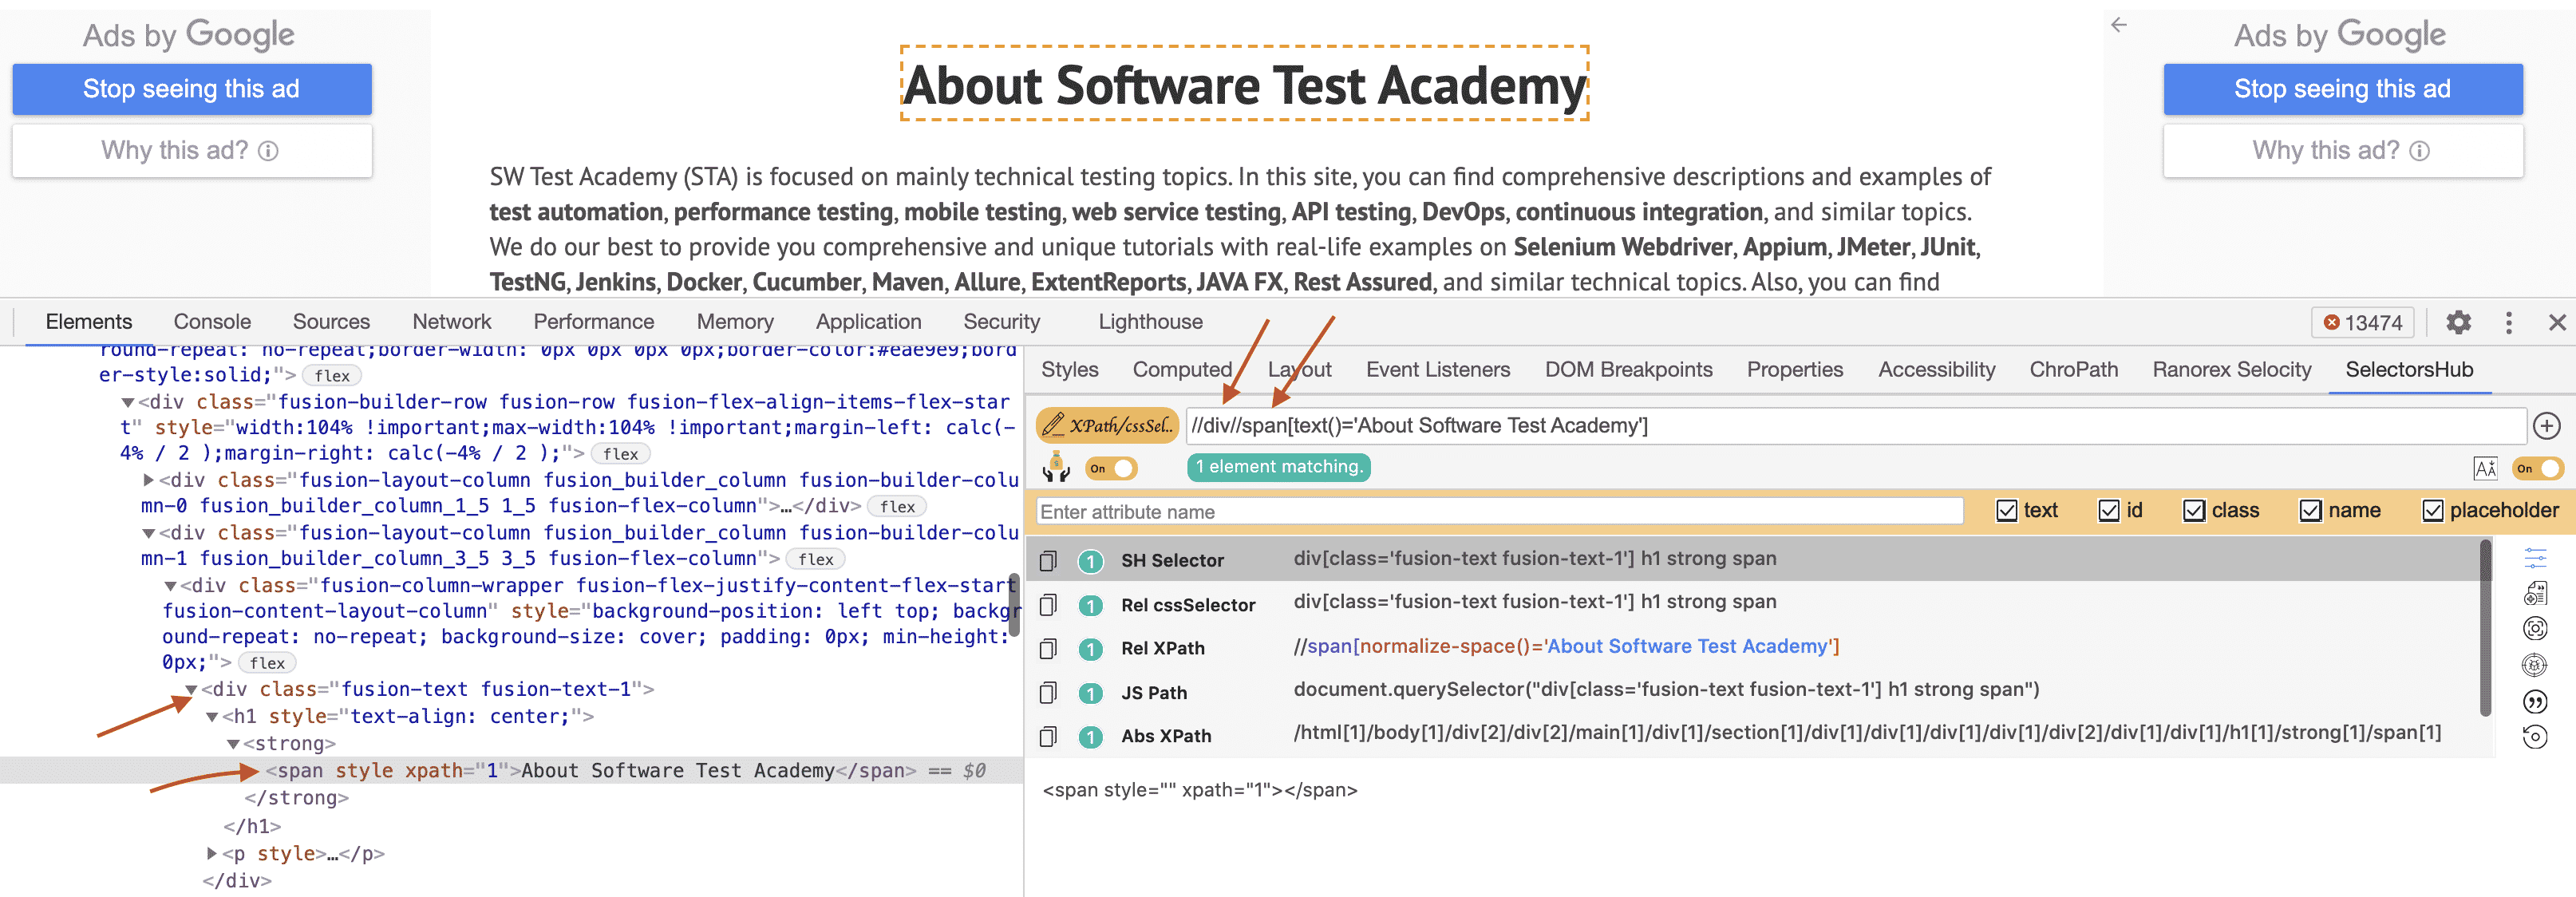
We can also use trailing “//” to continue our XPath search. I will show this in the same example. As you see below screenshot, I started with “//div”, then I bypassed h1 and strong tags, continued my search with the second “//” and then found the element in the span tag. Finally, the statement is finalized, as shown below.
Example: //div//span[text()=’About Software Test Academy’]
By the way, I used the SelectorsHub add-on, but you can also use ChroPath or Ranorex Selocity.
Writing Smart XPaths for Complex and Dynamic Elements
Tag – Attribute – Value Trio
Syntax: //tag[@attribute=’value‘]
Example = //img[@alt=’Onur Baskirt‘]
Examples:
//input[@type='send text']

//label[@id='clkBtn']

//input[@value='SEND']

//*[@class='swtestacademy'] --> "*" means, search "swtestacademy" class for all tags.

//a[@href='http://www.swtestacademy.com/']

//img[@src='cdn.medianova.com/images/img_59c4334feaa6d.png']
Contains XPath in Selenium
It is a very handy XPath Selenium locator, and sometimes it saves the life of a test automation engineer. When an attribute of an element is dynamic, you can use contains() for the constant part of the web element but also use contains() in any condition when you need.
Syntax: //tag[contains(@attribute, ‘value‘)]
Example: //img[contains(@alt,’Baskirt’)]
Examples:
//*[contains(@name,'btnClk')] --> It searches "btnClk" for all name attributes in the DOM.

//*[contains(text(),'here')] --> It searches the text "here" in the DOM.

//*[contains(@href,'swtestacademy.com')] --> It searches "swtestacademy.com" link in the DOM.
Starts-with Xpath Examples
This method checks the starting text of an attribute. It is very handy when the attribute value changes dynamically, but you can also use this method for non-changing attribute values.
Syntax: //tag[starts-with(@attribute, ‘value‘)]
Example: //img[starts-with(@alt,’Onur Ba’)]
Chained Declarations XPath in Selenium
We can chain multiple relative XPath declarations with “//” double slash to find an element location, as shown below. We chained “//div” with “//span[text()=’About Software Test Academy’]’ in the below example.
Example: //div//span[text()=’About Software Test Academy’]
Operator “or” in Xpath Selenium
In this method, we use two interrogation conditions such as A and B, and return a result-set as shown below:
| A | B | Result |
| False | False | No Element |
| True | False | Returns A |
| False | True | Returns B |
| True | True | Returns Both |
“or” is case-sensitive, you should not use a capital “OR”.
Syntax: //tag[XPath Statement-1 or XPath Statement-2]
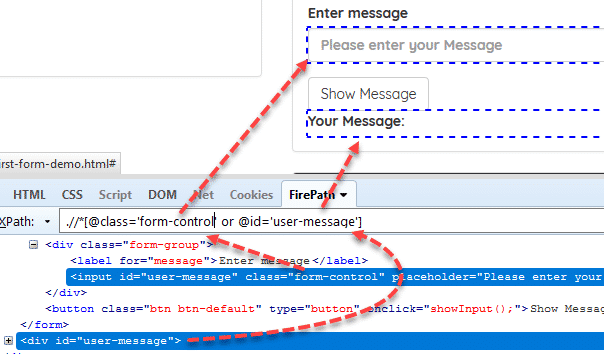
Example: //*[@id=’user-message’ or @class=’form-control’]
Operator “and” in Xpath Selenium
In this method, we use two interrogation conditions such as A and B, and return a result-set as shown below:
| A | B | Result |
| False | False | No Element |
| True | False | No Element |
| False | True | No Element |
| True | True | Returns Both |
“and” is case-sensitive, you should not use the capital “AND”.
Syntax: //tag[XPath Statement-1 and XPath Statement-2]
Example: //*[@id=’user-message’ and @class=’form-control’]
How to find XPath by Text
We can find an element with its exact text.
Syntax: //tag[text()=’text value‘]
Example://span[text()=’About Software Test Academy’]
Ancestor Xpath Examples
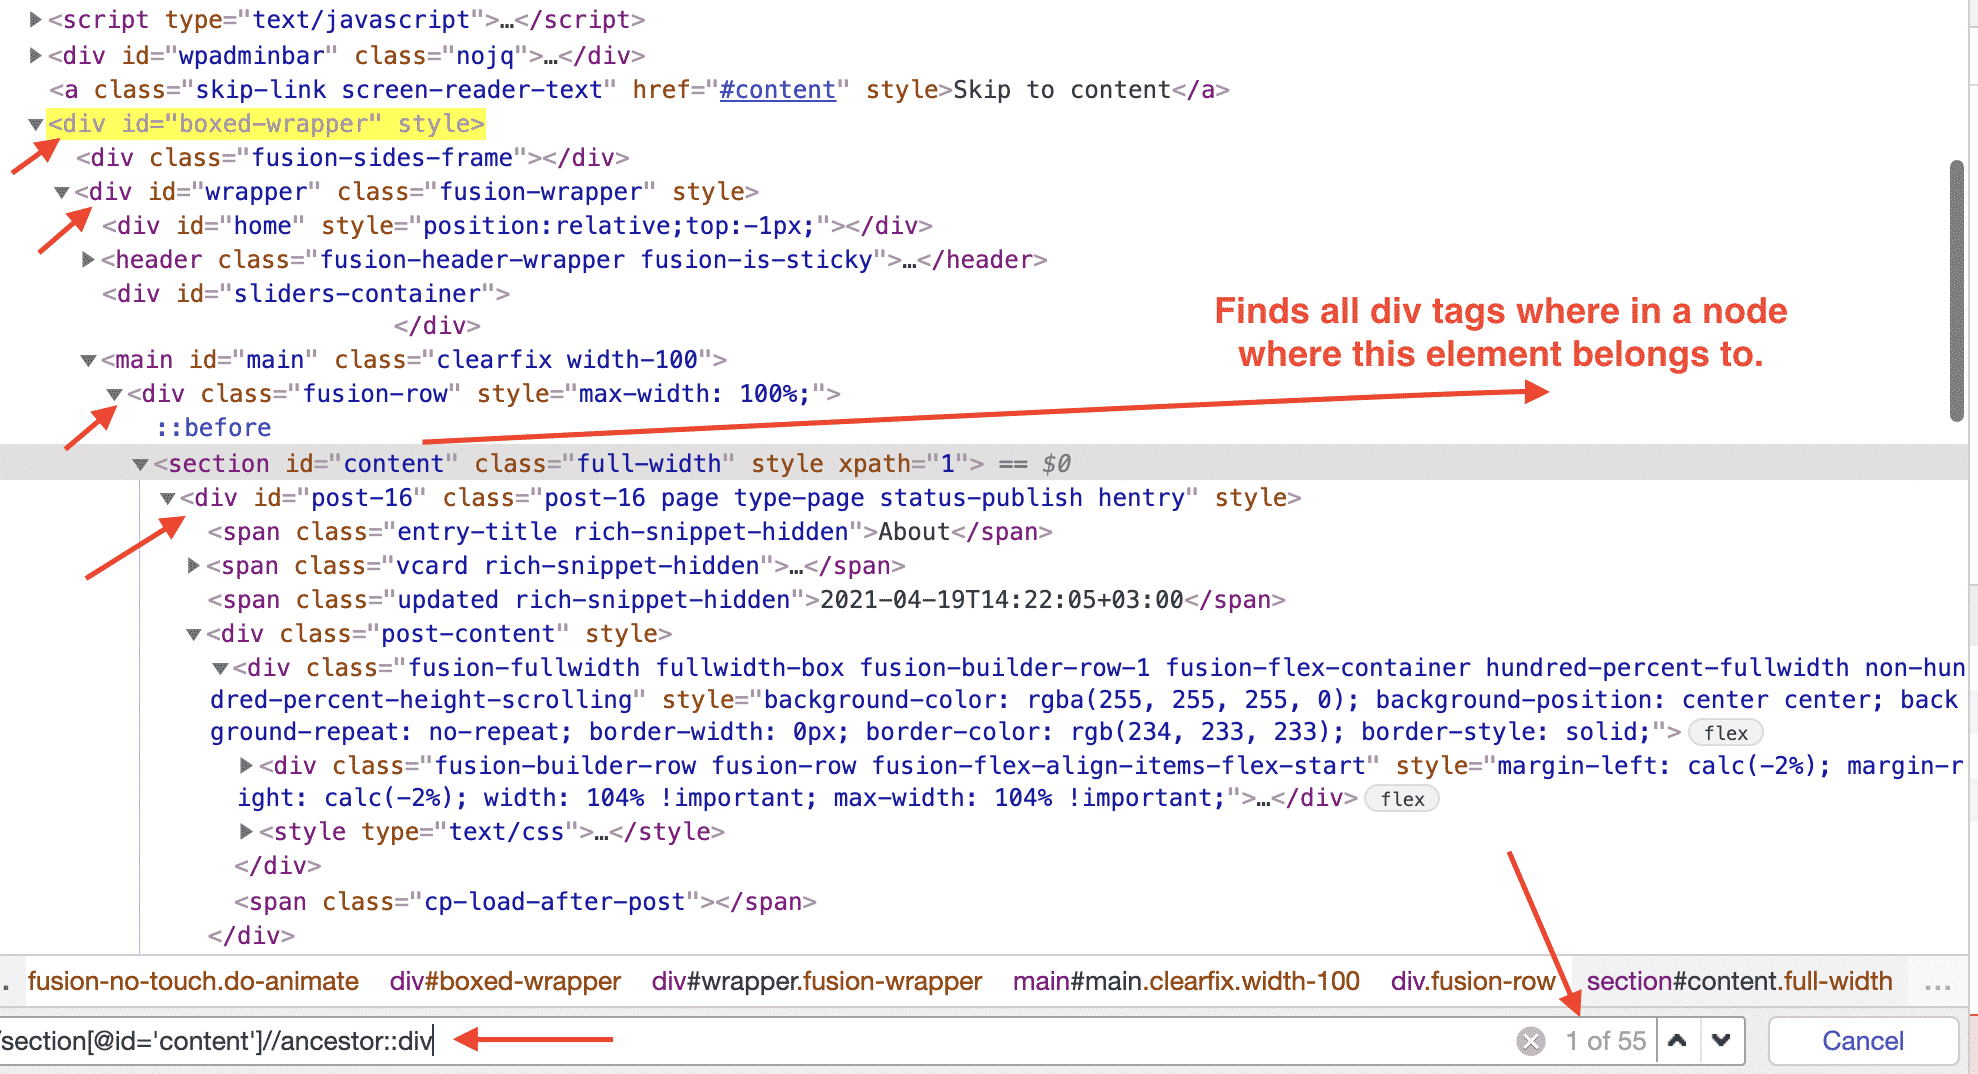
It finds the element before the ancestor statement, sets it as a top node, and then starts finding elements in that node. In the below example,
1- First, it finds the element whose XPath is //section[@id=’content’]
2- Then, it starts to find all div elements in the node to which the above XPath belongs.
Example: //section[@id=’content’]//ancestor::div
You can select specific div groups by changing div depths as shown below.
//section[@id=’content’]//ancestor::div[1] – Returns 53 nodes
//section[@id=’content’]//ancestor::div[2]- Returns 33 nodes
//section[@id=’content’]//ancestor::div[3] – Returns 24 nodes
//section[@id=’content’]//ancestor::div[4]- Returns 19 nodes
this goes like this. I think you got the idea if not, please write a comment, and I will clarify your questions.
Following Xpath Selenium Examples
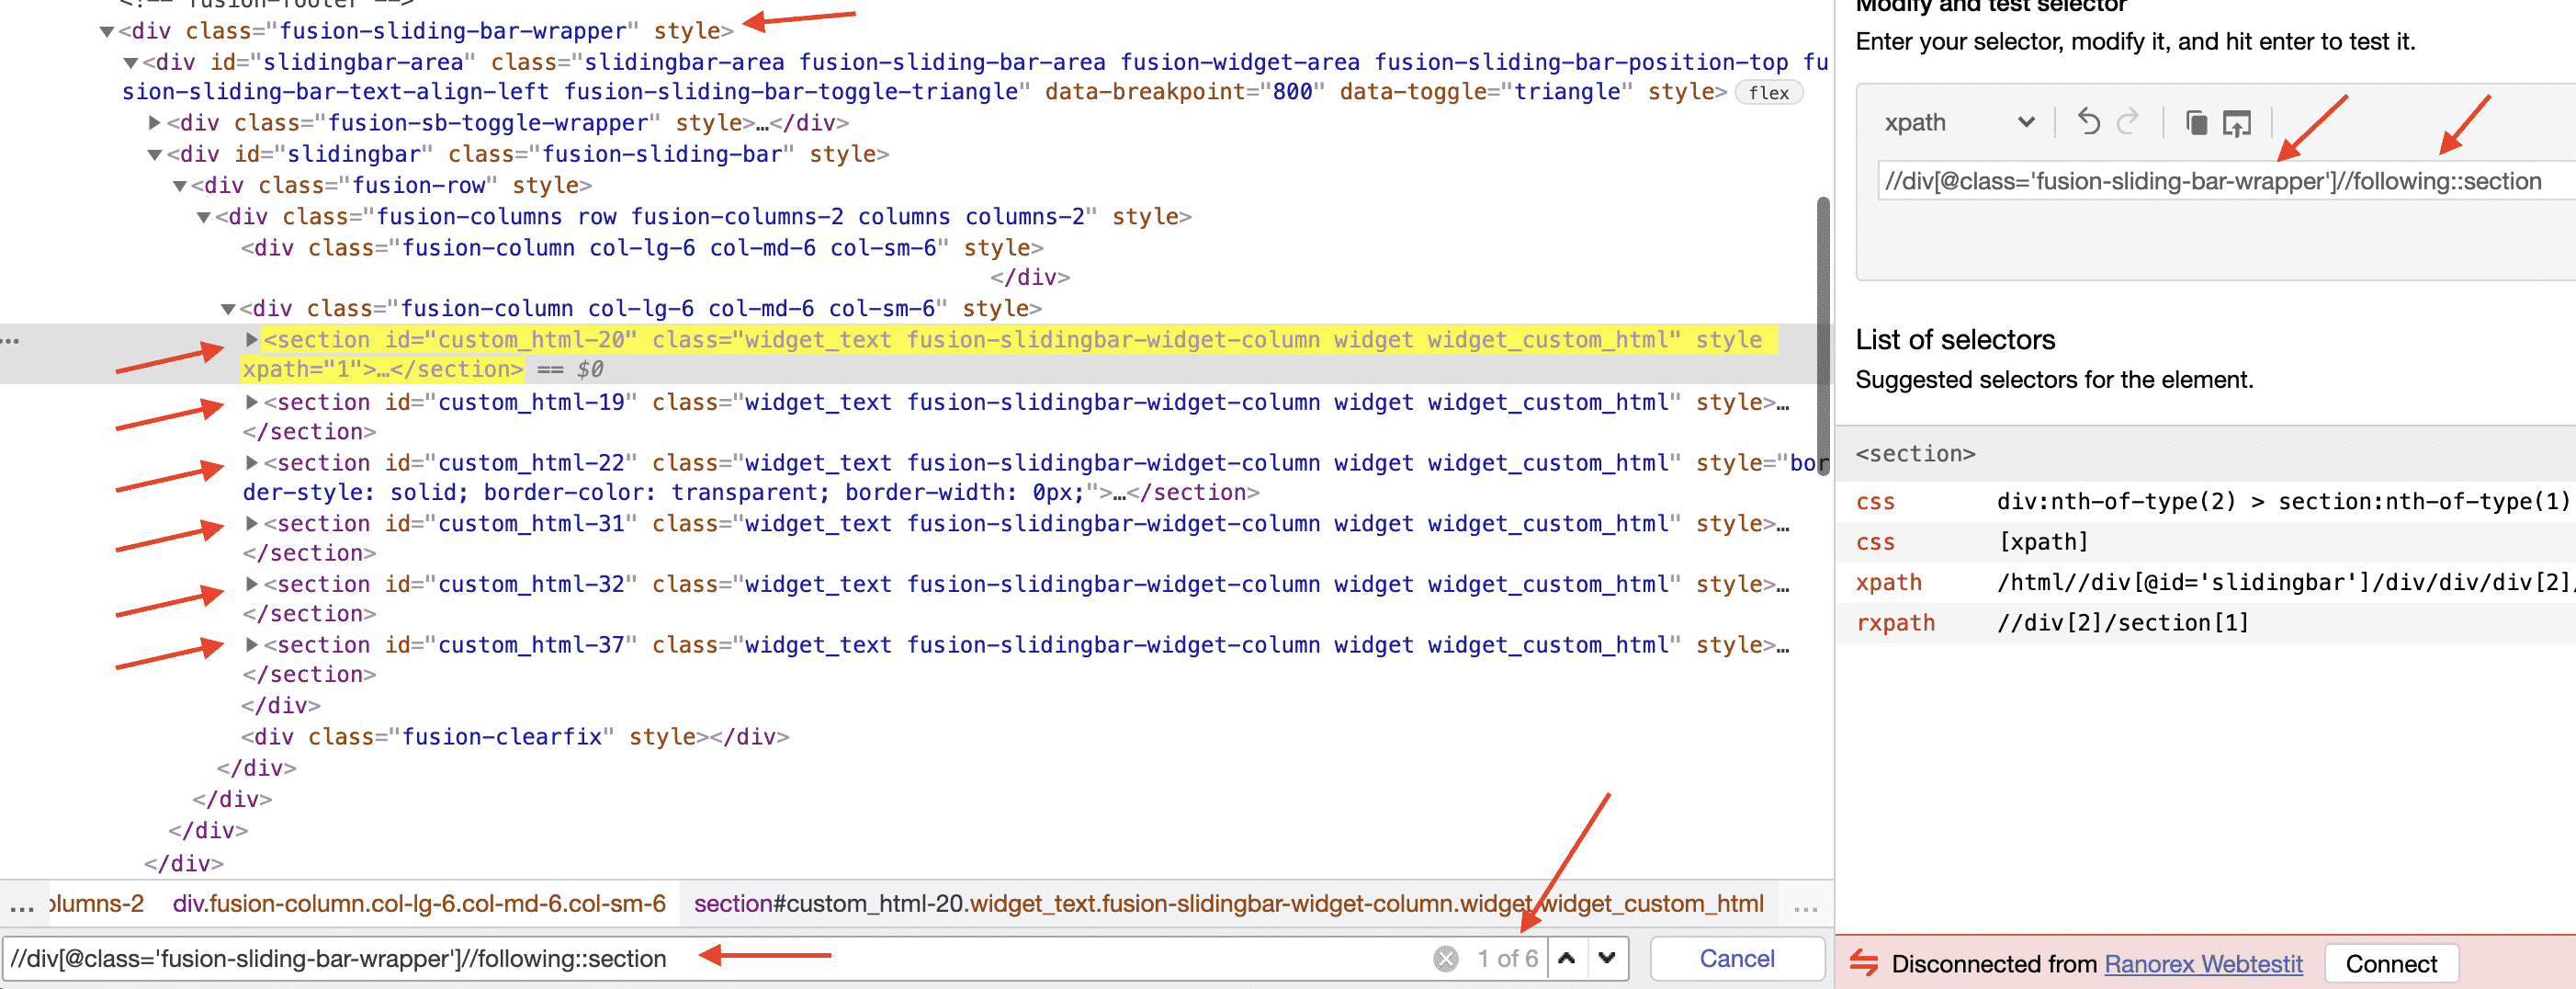
It starts to locate elements after the given parent node. It finds the element before the following statement and sets it as the top node, and then starts to find all elements after that node. In the below example,
1- First, it finds this XPath with class attribute: //div[@class=’fusion-sliding-bar-wrapper’]
2- Then, it starts to find all section elements after that node.
Example: //div[@class=’fusion-sliding-bar-wrapper’]//following::section
Child XPath in Selenium Examples
Selects all children elements of the current node.
Example: //nav[@class=’fusion-main-menu’]//ul[@id=’menu-main’]/child::li
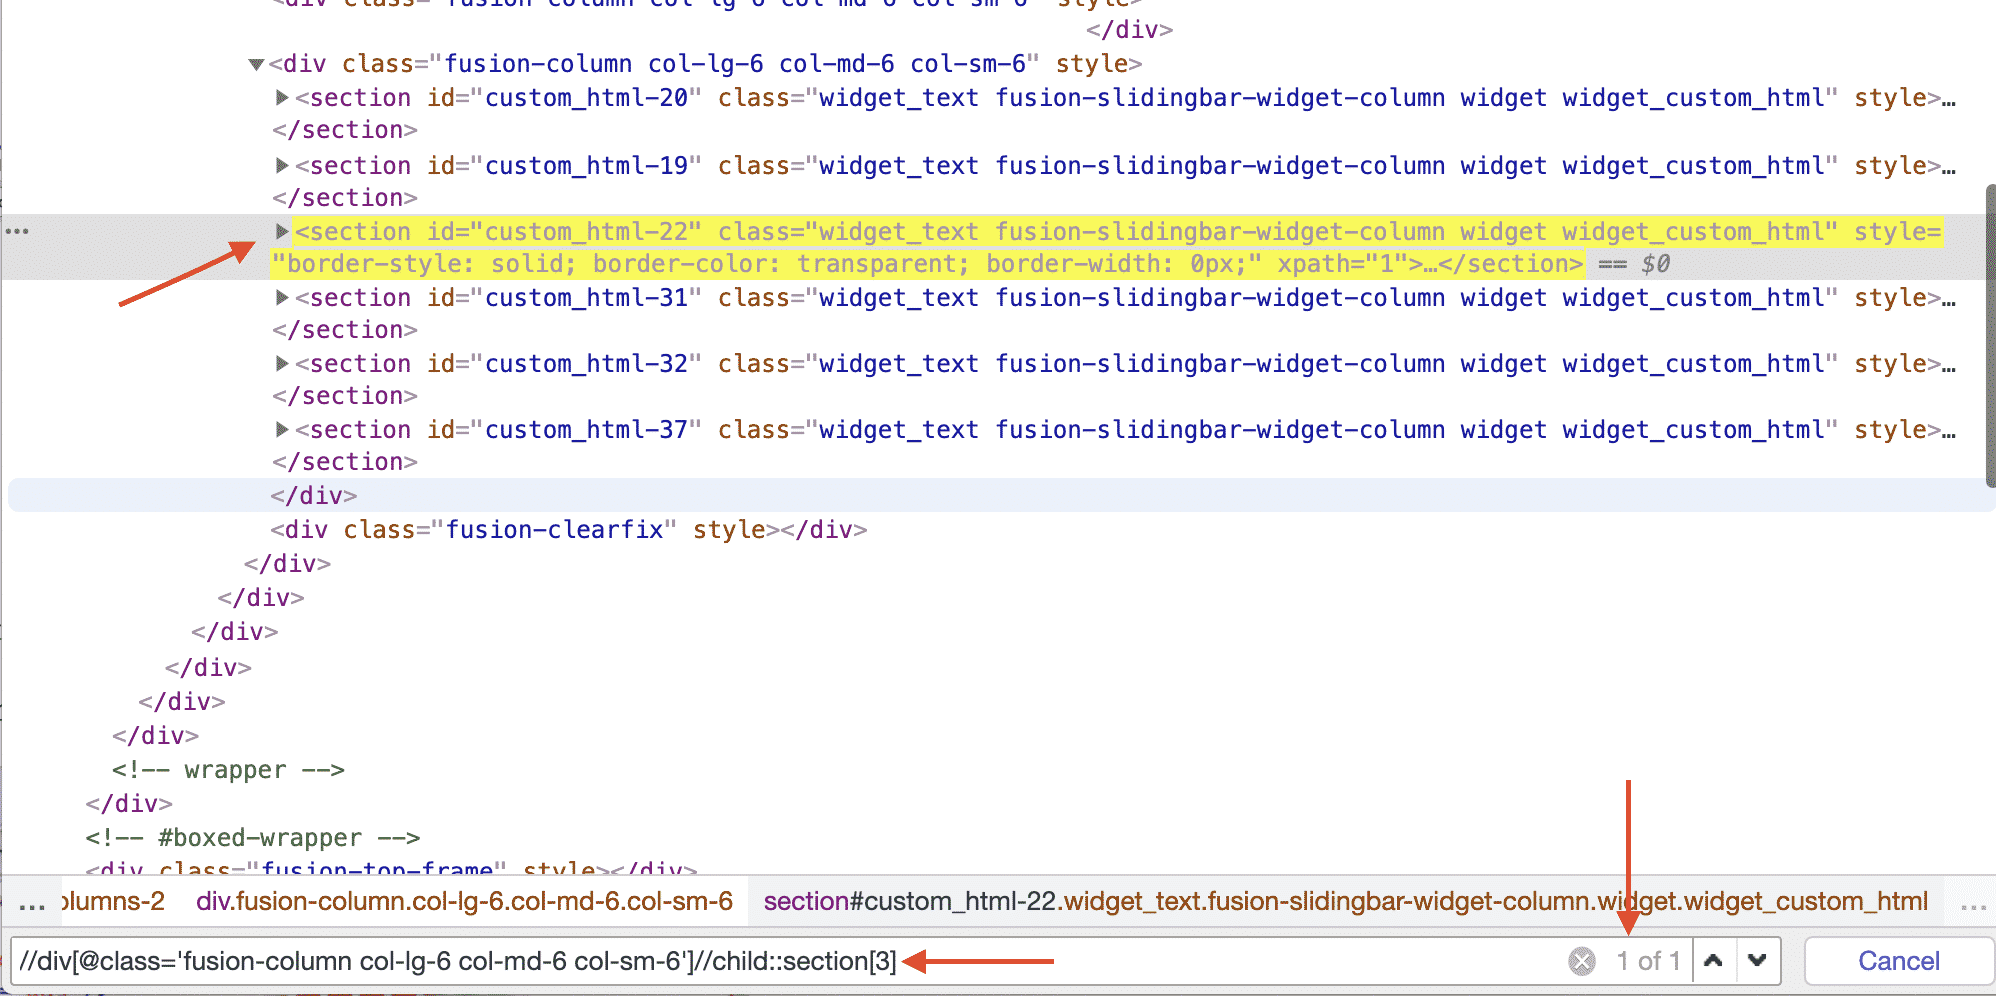
You can also select the required “section” element by using section[1], section[2], section[3], etc. syntax as shown below.
Preceding XPath Examples
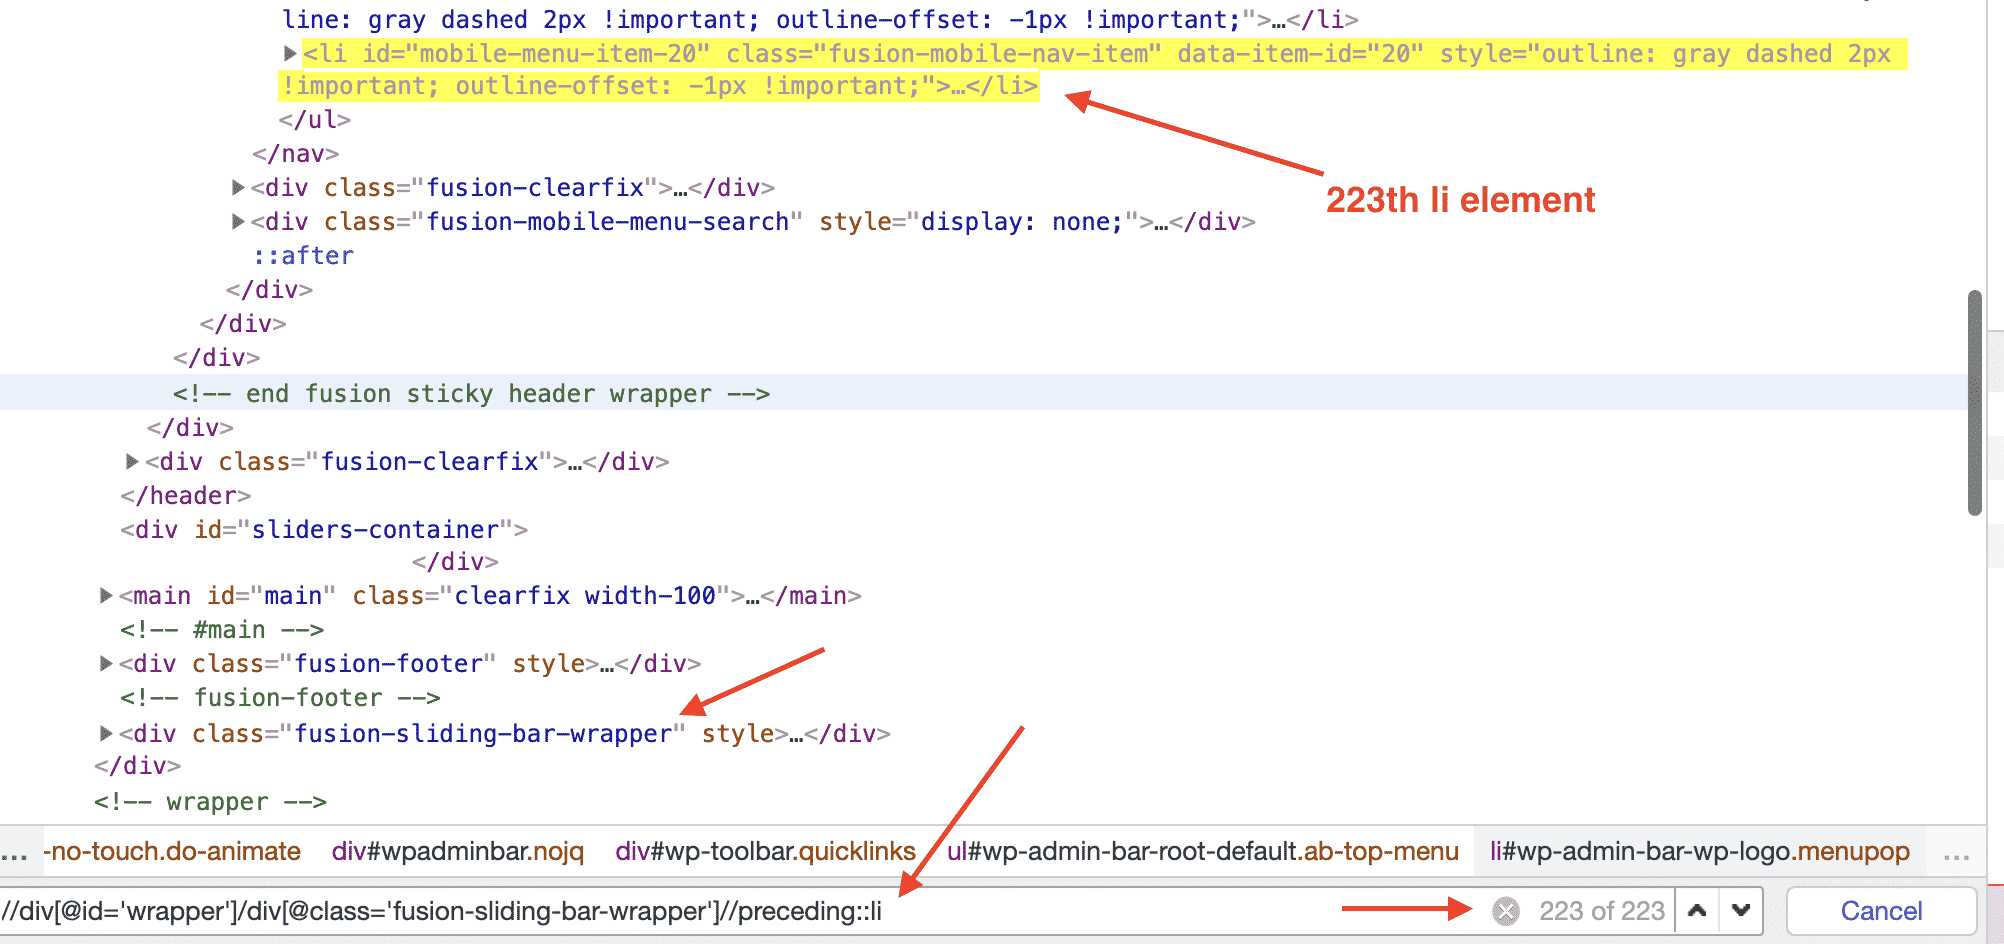
Select all nodes that come before the current node. I give an example on swtestacademy. We will find all “li” elements on the About page. First, we will locate the bottom element, then use the preceding with “li” to find all “li” elements, as shown below.
Example: //div[@id=’wrapper’]/div[@class=’fusion-sliding-bar-wrapper’]//preceding::li
Also, you can use [1], [2], etc., to select a specific element in the preceding element list.
Following-sibling XPath Examples
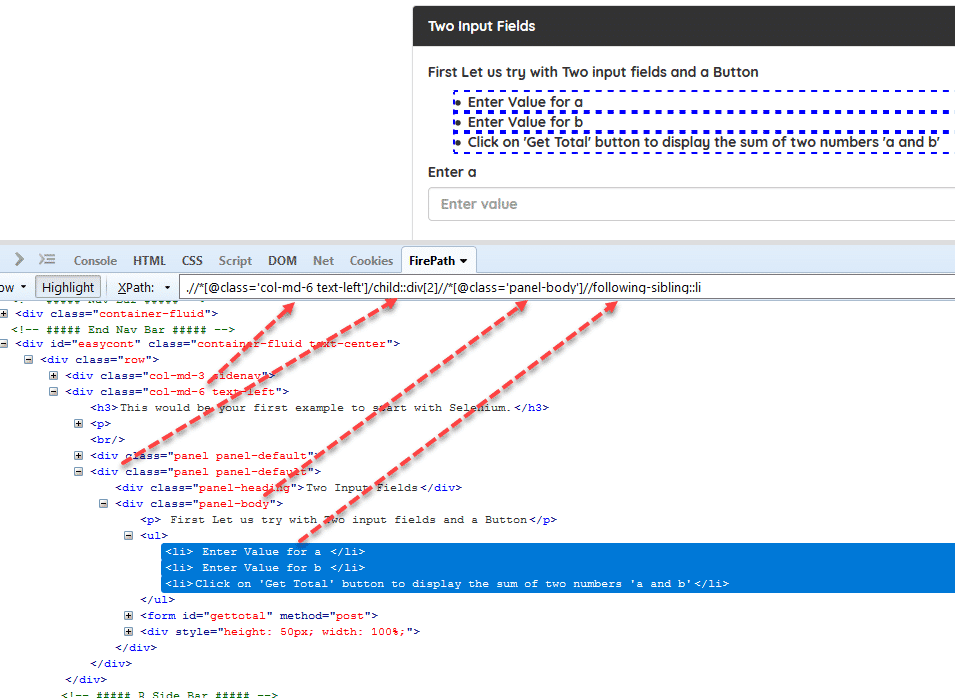
Select the following siblings of the context node.
Example: //*[@class=’col-md-6 text-left’]/child::div[2]//*[@class=’panel-body’]//following-sibling::li
Descendant XPath Examples
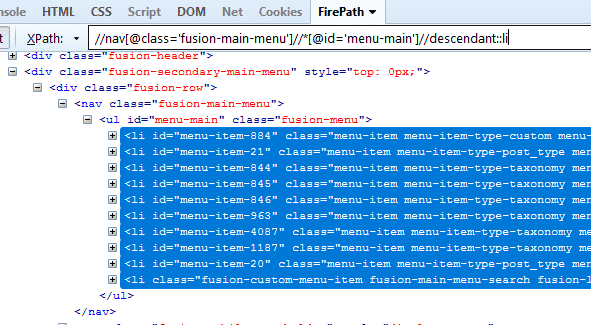
Identifies and returns all the element descendants to the current element, traversing down under the current element’s node. Below, the XPath returns all “li” elements under the “menu-main”.
Example: //nav[@class=’fusion-main-menu’]//*[@id=’menu-main’]//descendant::li
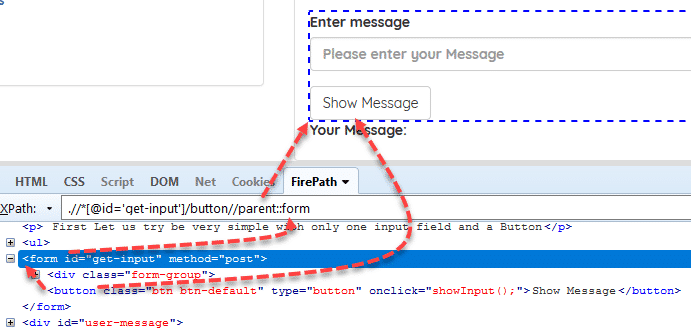
Parent XPath Examples
Returns the parent of the current node as shown in the below example.
Example: .//*[@id=’get-input’]/button//parent::form
Locate an Element inside an Array of Elements
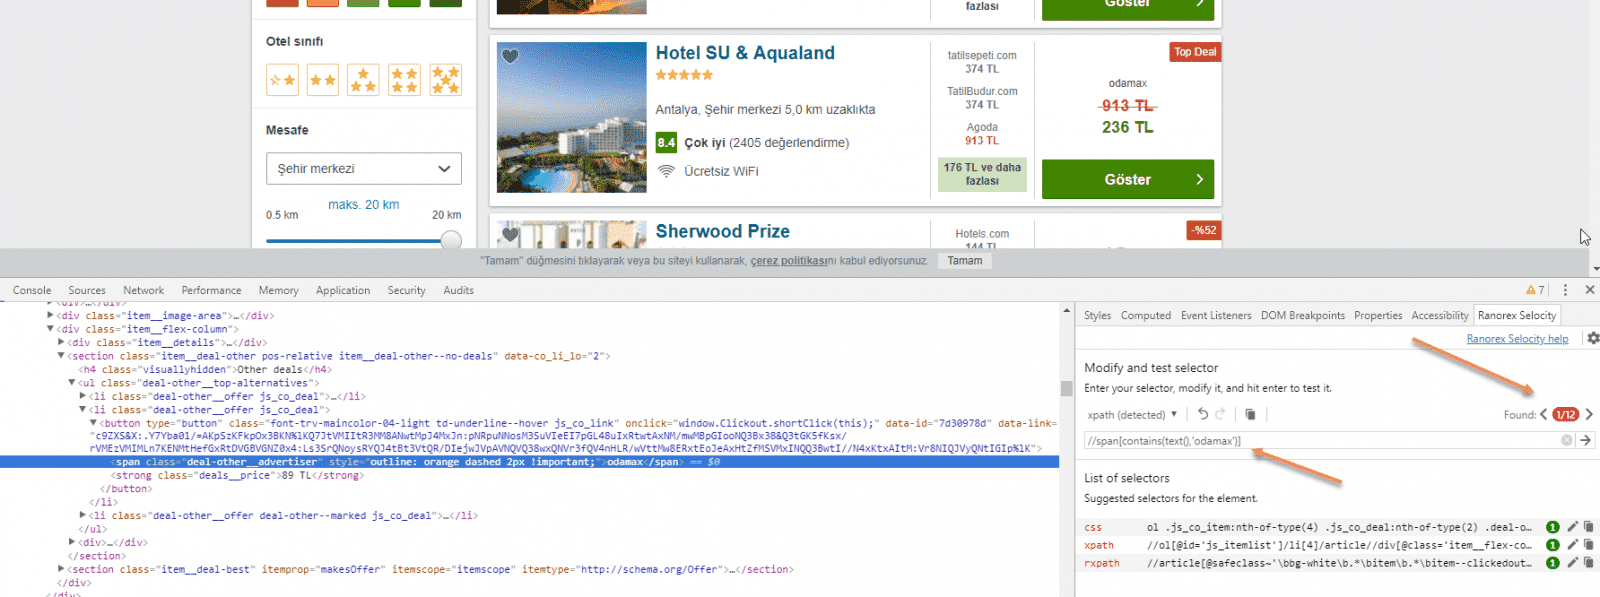
On the Trivago website, let’s search the “Antalya” keyword. Then, find the first Odamax hotel with XPath.
First, we can find all Odamax hotels by using the text below XPath:
//span[contains(text(),’odamax’)]
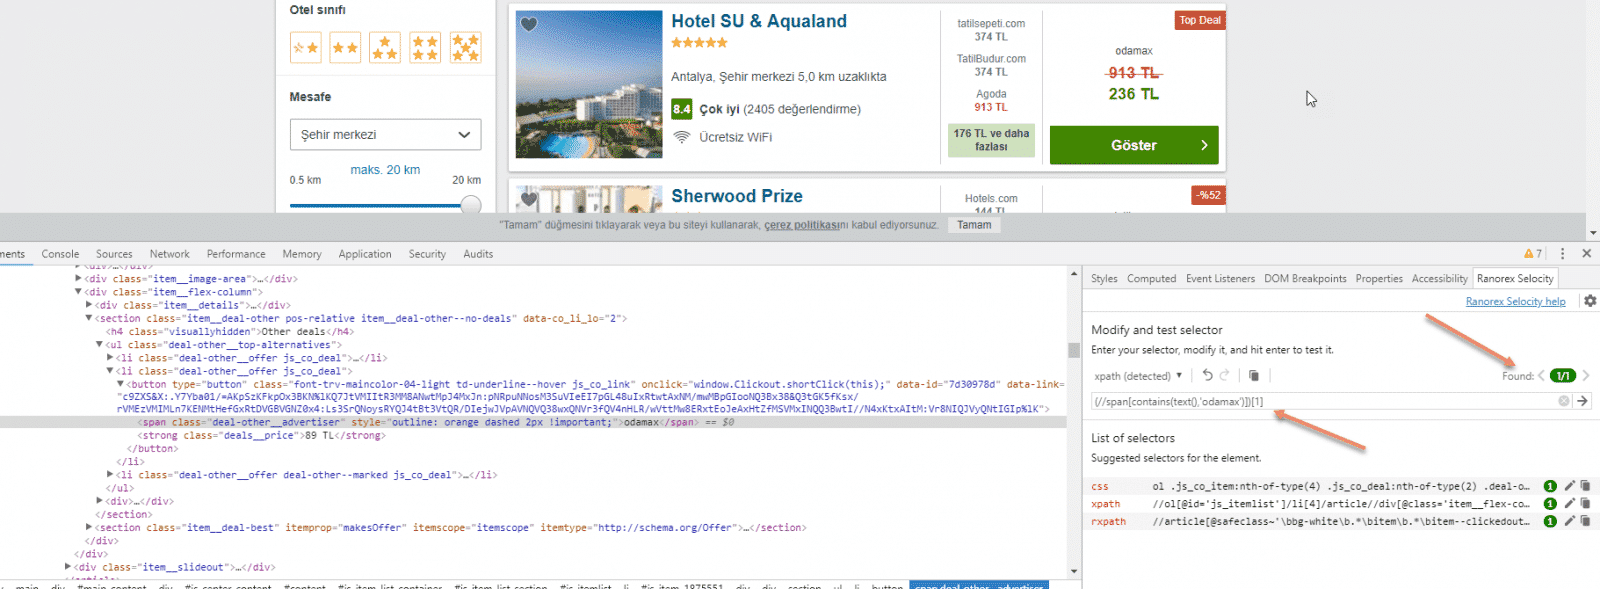
Above XPath returns many Odamax hotels; we can select the first one with the below XPath expression:
(//span[contains(text(),’odamax’)])[1]
You can also continue to search and find the related hotel’s price element with the below XPath:
(//span[contains(text(),’odamax’)])[1]/following-sibling::strong[@class=’deals__price’]
If you have any questions or queries, please write a comment. I will try to do my best to reply.
Also, you can learn how to write effective Selenium CSS locators in the below article.
Selenium CSS Selector Complete Reference – All Tactics Explained!
I also suggest saving and always using the below reference.
Thanks for reading,
Onur

Onur Baskirt is a Software Engineering Leader with international experience in world-class companies. Now, he is a Software Engineering Lead at Emirates Airlines in Dubai.






This is by far the best tutorial on using xpath. It clearly explains the structure of an xpath expression; it then describes the variety of usage, clearly and with great graphics.
Great work and thanks.
Kgething.
You are welcome Kelvin. I am glad that you liked the article. :)
Very clear and easily digestible tutorial.
Thank you.
You are welcome Aleksandar.
I agree. By far the best xpath tut I’ve seen.
I kind of panicked when I couldn’t find my bookmark anymore (turned out it was on another computer XD)
:)))
As others have commented, this is a great xpath tutorial. Thank you :)
Thanks for your kind comment. :) That makes me so happy. I am glad that it helps.
I’ve done Robot Framework tests with xpath now about 6 months. Now I learned much more after reading this tutorial. Thank a lot :-)
Welcome, Marko. Happy to hear your kind feedback.
superb tutorial keep updating about all the concepts
Thank you so much. :)
Fantastic effort to put this up for everyone to use. Thanks a lot
Welcome Ram :) Your comment makes my day. Thank you so much.
Hi Onur, please do you think you could write a tutorial that explains the difference between dot and text? I found this post but to be honest I’m more confused now than before reading it. Link: https://stackoverflow.com/questions/38240763/xpath-difference-between-dot-and-text
thanks
Hi Andrea, I did not use that but I will also check and try to add an section about this. Thank you for pointing out this topic.
Thanks for the answer Onur. I loved your tutorial and I hope to see more coming !
Awesome!
I appreciate this very much.
Welcome, Luke. Enjoy it ;) Happy Testing! :)
Excellent effort,very helpful thanks for sharing.
Thank you so much Katt. I am so happy to hear this lovely comment.
I’ve been looking something like this. Thank you for your hard work.
Thanks Murat.
Hi Onur
It is really a very nice explanation of XPath with different real time examples.
Thanks for all your efforts for preparing and sharing the concepts with examples.:)
Best Regards,
Sudhakara
Hi Sudhakara,
Thank you so much for your kind feedback.
Best Regards.
Onur
Thanks for the clear examples, I have been an automation engineer for 1 year+ and as I have a lot of project examples I always reverse engineer the xpaths.
Now I started a new project from scratch and found this, its a good damn time to learn how to create an xpaths for everything.
I’m doing xpath angular apps with selenium and with this I’m able to create them.
Thanks, keep the good work.
Welcome Jose, thank you so much for your positive feedback.
thankyou so much its very helpfull
Thank you so much, Onur. Excellent work.
Welcome.
The best tutorial I’ve ever read. So many contents that I had to bookmark it to get the whole thing processed ;)
Welcome, Felipe. Happy to hear that. :)
Hi Onur,
What is url you have used to test this xpath??
I just tried on selenium easy website.
Great Tutorial. Thanks Onur.
Welcome. :)
Hello ! Très bon article, même si il y faudrait rajouter quelques petits points à rajouter, l’article reste super intéressant.
This such a great tutorial which contains most combinations with examples. Haven’t seen such detailed explanations anywhere. Thank you for creating this. It would be great if you can add any links for practicing / demo links above as well.
Onur Abi, Teshekkur ederim Abi ALLAH razi olsun senden. Ellerine saglik.
Cok tesekkurler Murad. :) Rica ederim.
Thank you so much. it’s very helpful :)
Welcome :)
Thank you for creating this page . Very useful one.
Welcome. Thanks for your kind comment.
Can you please give more details on ancestor and child ?
Any idea when selenium will support xpath 2.0 or even 3.1?
Hi James, to be frank, I do not have any clue when will they move from 1.0 to 2.0 and 3.1. This question should go to Simon Stewart.
I also found a question here: https://stackoverflow.com/questions/1936301/can-i-use-xpath-2-0-with-firefox-and-selenium
Hello
I have a question:
Does relative Xpath fail
Example: //*[@class=’col-md-6 text-left’]/child::div[2]//*[@class=’panel-body’]//following-sibling::li
If website will change in the future? So we say if there will be another DIV? n the example above you have entered DIV [2]
Yes, it may be failing. The best is to have an XPath as generic as possible.
In which cases will relative Xpath fail?
As I see you have created a long path. As I understood correctly that it will fail if the website changes in the future?
Yes, it may fail. Better to have short and generic Xpaths as much as you can.
Thanks Much very helpful :) Keep up such good work
Welcome Aniket. :)
Great work mate! Very inspiring. Thanks.
Thank you so much, Big Boss! :)
Hi Onur, I was wondering if you have any tutorials related to passing parameters to the Xpath and using it multiple tables or multiple purposes?
For example: //div[@class=’multiple-table sortable’]/table[contains(@data-tablename,'” +tablename+”‘)]
how can we use tablename string for multiple table names?
I really appreciate any help you can provide.
Hi Elmar,
Would you share a real-life example if you have one, then we will try to solve the issue together?
As I understand the problem well, maybe we can create a method kind of utility method which has tablename parameter, and inside the code, based on the scenario, you can call that method with a specific table name argument.
Thanks a lot for the replay, Onur.
First step: Scenario.
i should navigate to printer table
2nd step: Step definitions.
@Then(“I should navigate to (.?) table$”)
public void methodName(String table){
productpage.verifyTable(table);
}
3rd steps logical java file
public void verifyTable(String tablename) {
String xpath = //div[@class=’multiple-table sortable’]/table[contains(@data-tablename,’” +tablename+”‘)];
WebElement element = driver.findElement(By.xpath(xpath));
}
The code works as expected but how does it find the table name(printer) without mentioning table name in the step definition and logical code?
then I should navigate to phones table
then i should navigate to TV table
all using the same method.
i hope you get what i try to explain.
Thank you.
Hi Elmar, as far as I see, this implementation is fine, and if I write the test with a dynamic table name, I may use the same approach. Here as I understand, you have many tables, and you need to distinguish each of them in the automation. You may either use enums, lists, etc. but somehow you need to mention to the XPath line which table you will use. If not, I am unsure how the XPath logic understands which table you want to work on. There are some workarounds like putting all table names in a collection like an array or list, and in the step file, you will iterate each of them until they find logic, find the element, etc., but IMO this implementation will be uglier than yours.
Onur, Thank you so much for your answer.
you got my point correctly, and I was trying to grasp the relationship between two scenarios: the tables’ names were mentioned feature file( i should navigate to “printer” table) and were replaced with a question mark on the step definition annotation(@Then(“I should navigate to (.?) table$”)) if that was the way pass name of the tables to the step definition method as a parameter. I totally understand your point of view and thank you for your clarification and contribution to the Selenium community.
Regards,
Elmar.
Thank you so much for your kind words Elmar. I wish you success in your project. :)
can you please help me i try to get this xpath :
/html/body/div[5]/div/company-result-0-1669630802/div[1]/div[2]/span[1]
but the task robot cant find it i think because of the custom element “company-result-0-1669630802”
how can click on that element by robot frame work
please help me necessary
thank you
If there are multiple results and if you want to click the first one maybe this Xpath will work:
(/html/body/div[5]/div/)[0]
Hello,
I think it should be: (/html/body/div[5]/div/)[1] because in all modern web browsers first node is [1] not [0].
Regards,
Arnul
Thanks for the feedback Arnul.
HI
I like your tutorial.
I am working on a automation i am unable to find xpath. Its there. but when i find its not coming. I have tried all what you have teach here.
i can find html web element, i can find /body and then the third one is macroponent-f51912f4c700201072b211d4d8c26010 . i can find this too. but after that, even i try relative or absolute path, next div it says its not there.
if you can help. it will be very helpful. i can send you my code and html code.
Thank you,
Harman
Thank you