Hi all, in Appium Parallel Testing and Wireless Mobile Device Lab article, I will explain to you how to set up a wireless mobile device farm or in other terms mobile device lab and how to run your mobile tests on multiple mobile devices. I will use Appium Desktop 1.20.2, Selenium Grid 3.141.59 So, Let’s get started!
You can also check the maven repository and try to use the latest versions of Selenium Grid, Selenium, TestNG, and Appium.
If you are getting started to Appium, please check this article first. http://www.swtestacademy.com/appium-tutorial/
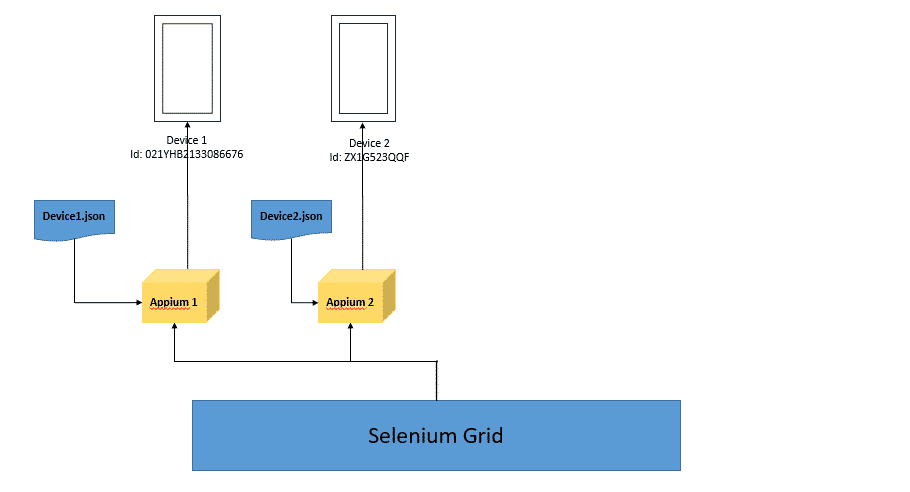
Appium Parallel Testing and Mobile Device Lab Architecture
We will have two devices, for each device, we will have Appium Servers. Also, we need to configure each device with a specific “.JSON” file. All nodes will be connected to Selenium Grid Hub. In our test code, our driver URL will be Hub’s URL. HUB will distribute all requests to the nodes/devices, get responses from nodes/devices, and then send them to us.
Install Selenium Grid for Appium Parallel Testing
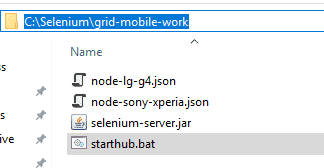
Selenium Grid is part of Selenium projects and it allows you to scale your tests by distributing them on several machines (parallel test execution). You will also run one Appium Server for each mobile device that you will connect to your mobile device farm. You can go and install Selenium Server Standalone 3.141.59 here. Save it into a folder such as “C:\Selenium\grid-mobile-work”.
Then, we need to configure our device’s (nodes) configurations and capabilities. I will have Sony-Xperia and Android-LG-G4 as an emulator device. Below, you can see their configuration and capabilities “.JSON” files.
- deviceName should be our device’s adress (ip:port) pair. We will learn how to get this info. Now, you can leave it empty.
- platformName is “Android“.
- browserName is “Pixel XL“. You can give any name you want.
- platformVersion is “11“. You can find this info in your phone settings.
- maxInstance is “1“. We have only one Pixel XL test device.
- url is “appium-ip:appium-port“. We will get this info when we start the Appium server for this node/device.
- host is “appium ip“.
- port is “appium port“.
- hubPort is “hub’s port“.
- hubHost is “hub’s ip“.
{
  "capabilities": [
    {
      "deviceName": "Sony-Xperia",
      "platformName": "Android",
      "browserName": "Android-Sony-Xperia",
      "platformVersion": "7.0",
      "maxInstances": 1
    }
  ],
  "configuration": {
    "cleanUpCycle": 2000,
    "timeout": 30000,
    "proxy": "org.openqa.grid.selenium.proxy.DefaultRemoteProxy",
    "url": "http://127.0.0.1:5000/wd/hub",
    "host": "127.0.0.1",
    "port": 5000,
    "maxSession": 1,
    "register": true,
    "registerCycle": 5000,
    "hubPort": "4444",
    "hubHost": "127.0.0.1"
  }
}
{
  "capabilities": [
    {
      "deviceName": "LG-G4",
      "platformName": "Android",
      "browserName": "Android-LG-G4",
      "platformVersion": "6.0",
      "maxInstances": 1
    }
  ],
  "configuration": {
    "cleanUpCycle": 2000,
    "timeout": 30000,
    "proxy": "org.openqa.grid.selenium.proxy.DefaultRemoteProxy",
    "url": "http://127.0.0.1:5001/wd/hub",
    "host": "127.0.0.1",
    "port": 5001,
    "maxSession": 1,
    "register": true,
    "registerCycle": 5000,
    "hubPort": "4444",
    "hubHost": "127.0.0.1"
  }
}
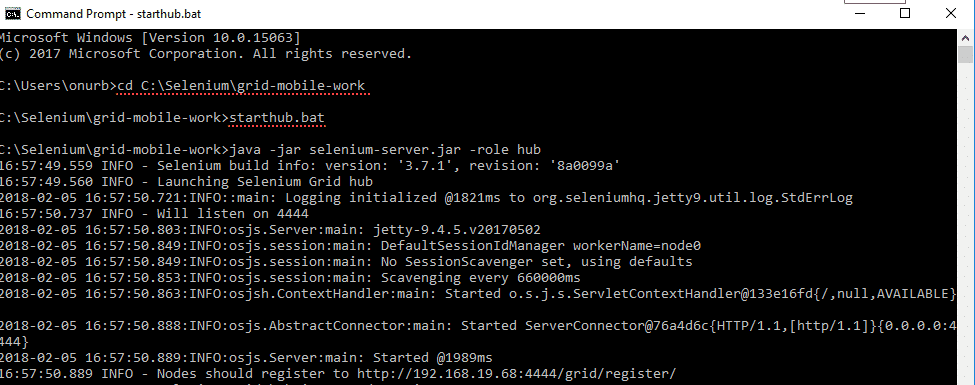
Also, create a “starthub.bat” file and copy and paste the below command for starting Selenium Grid’s hub.
java -jar selenium-server.jar -role hub
In the end, you will have the following file structure.
Now, you can run the hub as shown below. You need to go to your selenium-server.jar directory and run the “starthub.bat”.
For Mac selenium grid settings you can check here: https://www.swtestacademy.com/selenium-grid-on-mac/
Now, we can connect our devices via WIFI for appium parallel testing.
Connect Your Devices via Wi-Fi (Wireless) to your PC
In order to connect your devices to your PC via Wi-Fi, you need to install Android Studio first. You can check these steps in this article. Now, you can connect one of your test devices with the USB port of your PC and enable the USB debugging option in the Developer Settings of your mobile device. Then, open a command window and do the followings:
- Type “adb devices” and hit enter to see connected device UDID. (The first device UDID).
- Type “adb tcpip 5656” to assign a port to your first device. (If you want, you can give another unassigned port number to your device.)
- Then, unplug the first device and connect the second device via USB.
- Then, type “adb tcpip 5657” to assign a port to your second device. (If you want, you can give another unassigned port number to your device.)
- Unplug the second device.
- Go to the settings of your devices and find their IP addresses.
First Device: Sony Xperia assigned IP is 192.168.18.159
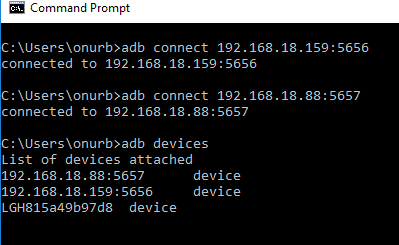
Second Device: LG G4’s assigned IP is 192.168.18.88 - Type “adb connect 192.168.18.159:5656” to connect your device via wireless (Wi-Fi).
- Type “adb connect 192.168.18.88:5657” to connect your device via wireless (Wi-Fi).
- Type again “adb devices” and see both your device UDID via USB and ip:port pair via Wireless.
Now, as you see above, our test devices are connected to our PC via Wi-Fi. Let’s go on with Appium Server Initializations.
Run Appium Desktop for Each Device
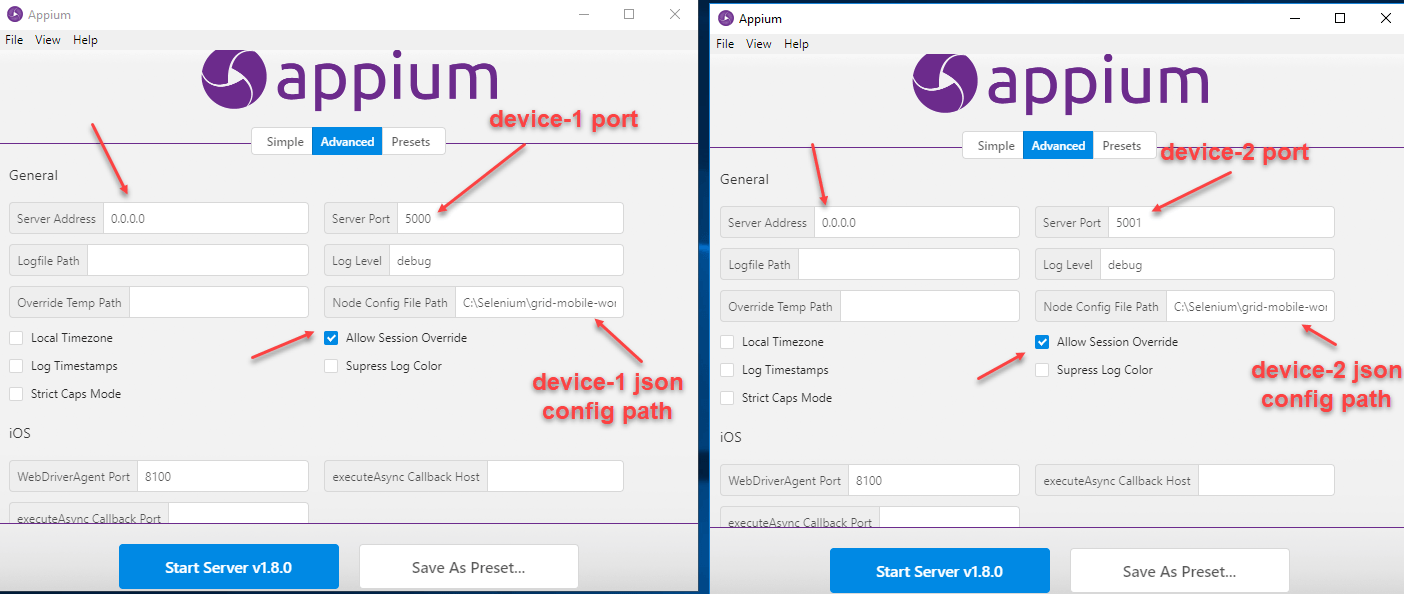
Now, you should open 2 Appium Desktop instance for appium parallel testing and do the following settings for each Appium instance:
- Set an Appium port.
- Set a device port.
- Allow session-override to override halted sessions.
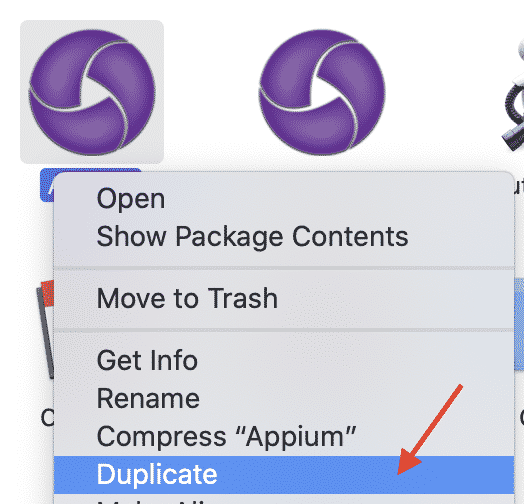
For Mac user, you need to go to the Application folder and Duplicate the appium as shown below.
Set bootstrap port.
then hit Start Server and start both Appium servers.
Check the Grid Console for Appium Parallel Testing
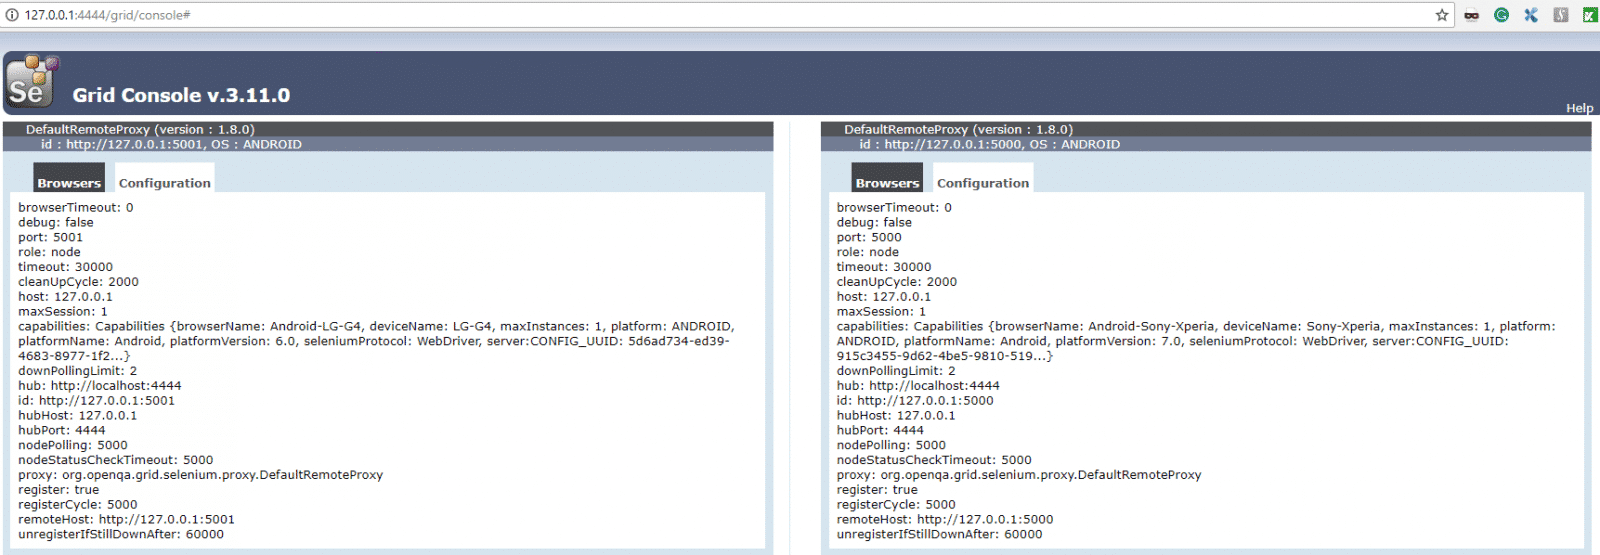
After hub and node configurations and initializations, open a browser and write “127.0.0.1:4444/grid/console” and hit enter. You should see that each node is connected to the hub as shown below.
Parallel Mobile Appium Test Project with TestNG
Now, it is time to create a sample test automation project with TestNG. We should write this code in a parallel test execution manner. We will use İsinOlsun application, and write a code for the following scenario:
- Open the app.
- Skip splash screen
- Select “İs Ariyorum” (It means I am looking for a job.)
- Then, accept notifications.
- Then, click the second job in the job list.
- Assert that we are on job’s detail page.
- Wait for a while
- Then, close the app. I do not want to apply for a job :-) It is a simple scenario.
It is a very basic scenario. Our main purpose is to set up our wireless device lab and run them in parallel. After this step, you can extend this project.
Project Structure
I do not want to copy and paste each test class’s code here. Rather than this, I will share the GitHub project of the project below. You can fork the repo and modify it based on your needs. If you have any questions related to the test codes, please write a comment. Also if you like this article please share your comments with us. Thanks a lot.
GitHub Project
https://github.com/swtestacademy/appium-parallel-tests/tree/appium-parallel-tests-with-emulators
In 2021, I do not have the test phones that’s why I have updated the code for emulators but the structure is the same for real devices. I will share the emulator set up in this article. ;-)
and that’s all! It is time to run our test! and Subscribe to our Youtube Channel for the latest news!
Do you want to learn how to add Cucumber support to this framework?
Let’s check the below article!http://www.swtestacademy.com/appium-cucumber-testng-parallel-testing/
Thanks for your the time to read this post. If you like it or if you have any questions or comments, please share with us!
-Onur

Onur Baskirt is a Software Engineering Leader with international experience in world-class companies. Now, he is a Software Engineering Lead at Emirates Airlines in Dubai.




This is impressive. Thanks Onur!
Welcome! :)
This is a great tutorial! Do you by any chance have the project hosted on github or anywhere?
Thank you. I could not put this on GitHub. But it is not hard to create a TestNG project with IntelliJ. You can do it in 3 minutes. ;)
Note: If you have MAC, then you should run the following command:
/Applications/Appium.app/Contents/Resources/node/bin/node /Applications/Appium.app/Contents/Resources/node_modules/appium/build/lib/main.js –session-override –full-reset –nodeconfig C:\Selenium\grid-mobile-work\node-lg-g4.json –port 5001 –bootstrap-port 2252
I guess the path should be changed in above command. C:\Selenium\grid-mobile-work\node-lg-g4.json .
Yes. you are right you need to use MAC’s path syntax. I don’t have MAC. But it is easy to modify.
Thanks Onur, I became fan of yours.
You are welcome. :)
Hi Onur,
Thanks for the much needed tutorial. I am running below error while trying to start appium with json files. Please look into this.
C:\Users\Siddharth>appium -session-override -full-reset -nodeconfig F:\Packages\AppiumGrid\Device1.json -port 5001 -bootstrap-port 2252
C:\Users\Siddharth\AppData\Roaming\npm\node_modules\appium\node_modules\argparse\lib\help\formatter.js:380
parts.forEach(function (part) {
^
TypeError: parts.forEach is not a function
at _getLines (C:\Users\Siddharth\AppData\Roaming\npm\node_modules\appium\node_modules\argparse\lib\help\formatter.js:380:15)
at HelpFormatter._formatUsage (C:\Users\Siddharth\AppData\Roaming\npm\node_modules\appium\node_modules\argparse\lib\help\formatter.js:418:17)
at C:\Users\Siddharth\AppData\Roaming\npm\node_modules\appium\node_modules\argparse\lib\help\formatter.js:67:17
at Array.map ()
at Section.formatHelp (C:\Users\Siddharth\AppData\Roaming\npm\node_modules\appium\node_modules\argparse\lib\help\formatter.js:61:26)
at HelpFormatter.formatHelp (C:\Users\Siddharth\AppData\Roaming\npm\node_modules\appium\node_modules\argparse\lib\help\formatter.js:300:32)
at ArgumentParser.formatUsage (C:\Users\Siddharth\AppData\Roaming\npm\node_modules\appium\node_modules\argparse\lib\argument_parser.js:1026:20)
at ArgumentParser.printUsage (C:\Users\Siddharth\AppData\Roaming\npm\node_modules\appium\node_modules\argparse\lib\argument_parser.js:1082:27)
at ArgumentParser.error (C:\Users\Siddharth\AppData\Roaming\npm\node_modules\appium\node_modules\argparse\lib\argument_parser.js:1156:8)
at ArgumentParser.parseArgs (C:\Users\Siddharth\AppData\Roaming\npm\node_modules\appium\node_modules\argparse\lib\argument_parser.js:239:10)
at ArgumentParser.parser.parseArgs (C:\Users\Siddharth\AppData\Roaming\npm\node_modules\appium\lib\parser.js:764:29)
at main$ (C:\Users\Siddharth\AppData\Roaming\npm\node_modules\appium\lib\main.js:118:4)
at tryCatch (C:\Users\Siddharth\AppData\Roaming\npm\node_modules\appium\node_modules\babel-runtime\regenerator\runtime.js:67:40)
at GeneratorFunctionPrototype.invoke [as _invoke] (C:\Users\Siddharth\AppData\Roaming\npm\node_modules\appium\node_modules\babel-runtime\regenerator\runtime.js:315:
at GeneratorFunctionPrototype.prototype.(anonymous function) [as next] (C:\Users\Siddharth\AppData\Roaming\npm\node_modules\appium\node_modules\babel-runtime\regene
at invoke (C:\Users\Siddharth\AppData\Roaming\npm\node_modules\appium\node_modules\babel-runtime\regenerator\runtime.js:136:37)
at enqueueResult (C:\Users\Siddharth\AppData\Roaming\npm\node_modules\appium\node_modules\babel-runtime\regenerator\runtime.js:185:17)
at new Promise ()
at new F (C:\Users\Siddharth\AppData\Roaming\npm\node_modules\appium\node_modules\core-js\library\modules\$.export.js:30:36)
at AsyncIterator.enqueue (C:\Users\Siddharth\AppData\Roaming\npm\node_modules\appium\node_modules\babel-runtime\regenerator\runtime.js:184:12)
at AsyncIterator.prototype.(anonymous function) [as next] (C:\Users\Siddharth\AppData\Roaming\npm\node_modules\appium\node_modules\babel-runtime\regenerator\runtime
at Object.runtime.async (C:\Users\Siddharth\AppData\Roaming\npm\node_modules\appium\node_modules\babel-runtime\regenerator\runtime.js:209:12)
at main (C:\Users\Siddharth\AppData\Roaming\npm\node_modules\appium\build\lib\main.js:214:30)
at asyncify (C:\Users\Siddharth\AppData\Roaming\npm\node_modules\appium\node_modules\asyncbox\lib\asyncbox.js:70:15)
at Object. (C:\Users\Siddharth\AppData\Roaming\npm\node_modules\appium\lib\main.js:155:2)
at Module._compile (module.js:635:30)
at Object.Module._extensions..js (module.js:646:10)
at Module.load (module.js:554:32)
at tryModuleLoad (module.js:497:12)
at Function.Module._load (module.js:489:3)
at Function.Module.runMain (module.js:676:10)
at startup (bootstrap_node.js:187:16)
at bootstrap_node.js:608:3
https://github.com/appium/appium/issues/9022 Please check here.
Kindly remove “” from port number
“hubPort”: “4444”
Why?
Hi Onur,
I have tried Grid execution but it seems to be executed on device after another not in parallel. Is there something I am missing? Please correct me.
Thanks again for your previous reply.
What is your TestNG version? Please use the latest one and try again.
Hi Siddharth, I have just updated the article. New code and settings are working now.
I am using Specflow, Visualstudio and writing test in C#
How do I implement this parallel execution on simulators and real devices for iOS native app automation?
Your help will be much appreciated.
I am not an expert on C# and SpecFlow solution but I suggest you to contact with Karthik K.K. Here is your answer: https://www.udemy.com/automation-framework-development-with-appium/ If it is not big deal, it is better to buy this course. ;)
Instead of real device, I want to run it on emulator/simulator. Can we setup multiple emulator/simulator in one machine?
I didn’t do it. It will be a huge burden for the host machine. If you will be successful, please share your experience with us. I wish you a good luck. I hope you will be successful without significant problems.
Hello Onur,
Thanks for the great article. I want to ask something. When I tried this before, I came accross some network problems. Devices were disconnected after a while. How did you handle this? How did you setup your network or wifi environment? Thanks.
Hi Emre,
Actually, establishing device lab via Wi-Fi is brittle. If you want to setup resilient infrastructure, I suggest you connect devices via USB. I used this setup for a prototype.
Hi Onur,
When run parallel test, one of my appium server get this error :
Encountered internal error running command: {“w3cStatus”:400,”jsonwp”:{“sessionId”:null,”status”:13,”value”:”java.lang.IllegalThreadStateException\n\tat java.lang.Thread.start(Thread.java:724)\n\tat io.appium.uiautomator2.model.NotificationListener.start(NotificationListener.java:32)\n\tat io.appium.uiautomator2.model.Session.(Session.java:23)\n\tat io.appium.uiautomator2.model.AppiumUiAutomatorDriver.initializeSession(AppiumUiAutomatorDriver.java:19)\n\tat io.appium.uiautomator2.handler.NewSession.safeHandle(NewSession.java:31)\n\tat io.appium.uiautomator2.handler.request.SafeRequestHandler.handle(SafeRequestHandler.java:56)\n\tat io.appium.uiautomator2.server.AppiumServlet.handleRequest(AppiumServlet.java:208)\n\tat io.appium.uiautomator2.server.AppiumServlet.handleHttpRequest(AppiumServlet.java:199)\n\tat io.appium.uiautomator2.http.ServerHandler.channelRead(ServerHandler.java:44)\n\tat io.netty.channel.AbstractChannelHandlerContext.invokeChannelRead(AbstractChannelHandlerContext.java:366)\n\tat io.netty.channel.AbstractChannelHandlerContext.invokeChannelRead(AbstractChannelHandlerContext.java:352)\n\tat io.netty.channel.AbstractChannelHandlerContext.fireChannelRead(AbstractChannelHandlerContext.java:345)\n\tat io.netty.handler.codec.MessageToMessageDecoder.channelRead(MessageToMessageDecoder.java:102)\n\tat io.netty.channel.AbstractChannelHandlerContext.invokeChannelRead(AbstractChannelHandlerContext.java:366)\n\tat io.netty.channel.AbstractChannelHandlerContext.invokeChannelRead(AbstractChannelHandlerContext.java:352)\n\tat io.netty.channel.AbstractChannelHandlerContext.fireChannelRead(AbstractChannelHandlerContext.java:345)\n\tat io.netty.channel.CombinedChannelDuplexHandler$DelegatingChannelHandlerContext.fireChannelRead(CombinedChannelDuplexHandler.java:435)\n\tat io.netty.handler.codec.ByteToMessageDecoder.fireChannelRead(ByteToMessageDecoder.java:293)\n\tat io.netty.handler.codec.ByteToMessageDecoder.channelRead(ByteToMessageDecoder.java:267)\n\tat io.netty.channel.CombinedChannelDuplexHandler.channelRead(CombinedChannelDuplexHandler.java:250)\n\tat io.netty.channel.AbstractChannelHandlerContext.invokeChannelRead(AbstractChannelHandlerContext.java:366)\n\tat io.netty.channel.AbstractChannelHandlerContext.invokeChannelRead(AbstractChannelHandlerContext.java:352)\n\tat io.netty.channel.AbstractChannelHandlerContext.fireChannelRead(AbstractChannelHandlerContext.java:345)\n\tat io.netty.channel.DefaultChannelPipeline$HeadContext.channelRead(DefaultChannelPipeline.java:1294)\n\tat io.netty.channel.AbstractChannelHandlerContext.invokeChannelRead(AbstractChannelHandlerContext.java:366)\n\tat io.netty.channel.AbstractChannelHandlerContext.invokeChannelRead(AbstractChannelHandlerContext.java:352)\n\tat io.netty.channel.DefaultChannelPipeline.fireChannelRead(DefaultChannelPipeline.java:911)\n\tat io.netty.channel.nio.AbstractNioByteChannel$NioByteUnsafe.read(AbstractNioByteChannel.java:131)\n\tat io.netty.channel.nio.NioEventLoop.processSelectedKey(NioEventLoop.java:611)\n\tat io.netty.channel.nio.NioEventLoop.processSelectedKeysOptimized(NioEventLoop.java:552)\n\tat io.netty.channel.nio.NioEventLoop.processSelectedKeys(NioEventLoop.java:466)\n\tat io.netty.channel.nio.NioEventLoop.run(NioEventLoop.java:438)\n\tat io.netty.util.concurrent.SingleThreadEventExecutor$2.run(SingleThreadEventExecutor.java:140)\n\tat io.netty.util.concurrent.DefaultThreadFactory$DefaultRunnableDecorator.run(DefaultThreadFactory.java:144)\n\tat java.lang.Thread.run(Thread.java:764)\n”}} ProxyRequestError: Could not proxy command to remote server. Original error: 500 – {“sessionId”:null,”status”:13,”value”:”java.lang.IllegalThreadStateException\n\tat java.lang.Thread.start(Thread.java:724)\n\tat io.appium.uiautomator2.model.NotificationListener.start(NotificationListener.java:32)\n\tat io.appium.uiautomator2.model.Session.(Session.java:23)\n\tat io.appium.uiautomator2.model.AppiumUiAutomatorDriver.initializeSession(AppiumUiAutomatorDriver.java:19)\n\tat io.appium.uiautomator2.handler.NewSession.safeHandle(NewSession.java:31)\n\tat io.appium.uiautomator2.handler.request.SafeRequestHandler.handle(SafeRequestHandler.java:56)\n\tat io.appium.uiautomator2.server.AppiumServlet.handleRequest(AppiumServlet.java:208)\n\tat io.appium.uiautomator2.server.AppiumServlet.handleHttpRequest(AppiumServlet.java:199)\n\tat io.appium.uiautomator2.http.ServerHandler.channelRead(ServerHandler.java:44)\n\tat io.netty.channel.AbstractChannelHandlerContext.invokeChannelRead(AbstractChannelHandlerContext.java:366)\n\tat io.netty.channel.AbstractChannelHandlerContext.invokeChannelRead(AbstractChannelHandlerContext.java:352)\n\tat io.netty.channel.AbstractChannelHandlerContext.fireChannelRead(AbstractChannelHandlerContext.java:345)\n\tat io.netty.handler.codec.MessageToMessageDecoder.channelRead(MessageToMessageDecoder.java:102)\n\tat io.netty.channel.AbstractChannelHandlerContext.invokeChannelRead(AbstractChannelHandlerContext.java:366)\n\tat io.netty.channel.AbstractChannelHandlerContext.invokeChannelRead(AbstractChannelHandlerContext.java:352)\n\tat io.netty.channel.AbstractChannelHandlerContext.fireChannelRead(AbstractChannelHandlerContext.java:345)\n\tat io.netty.channel.CombinedChannelDuplexHandler$DelegatingChannelHandlerContext.fireChannelRead(CombinedChannelDuplexHandler.java:435)\n\tat io.netty.handler.codec.ByteToMessageDecoder.fireChannelRead(ByteToMessageDecoder.java:293)\n\tat io.netty.handler.codec.ByteToMessageDecoder.channelRead(ByteToMessageDecoder.java:267)\n\tat io.netty.channel.CombinedChannelDuplexHandler.channelRead(CombinedChannelDuplexHandler.java:250)\n\tat io.netty.channel.AbstractChannelHandlerContext.invokeChannelRead(AbstractChannelHandlerContext.java:366)\n\tat io.netty.channel.AbstractChannelHandlerContext.invokeChannelRead(AbstractChannelHandlerContext.java:352)\n\tat io.netty.channel.AbstractChannelHandlerContext.fireChannelRead(AbstractChannelHandlerContext.java:345)\n\tat io.netty.channel.DefaultChannelPipeline$HeadContext.channelRead(DefaultChannelPipeline.java:1294)\n\tat io.netty.channel.AbstractChannelHandlerContext.invokeChannelRead(AbstractChannelHandlerContext.java:366)\n\tat io.netty.channel.AbstractChannelHandlerContext.invokeChannelRead(AbstractChannelHandlerContext.java:352)\n\tat io.netty.channel.DefaultChannelPipeline.fireChannelRead(DefaultChannelPipeline.java:911)\n\tat io.netty.channel.nio.AbstractNioByteChannel$NioByteUnsafe.read(AbstractNioByteChannel.java:131)\n\tat io.netty.channel.nio.NioEventLoop.processSelectedKey(NioEventLoop.java:611)\n\tat io.netty.channel.nio.NioEventLoop.processSelectedKeysOptimized(NioEventLoop.java:552)\n\tat io.netty.channel.nio.NioEventLoop.processSelectedKeys(NioEventLoop.java:466)\n\tat io.netty.channel.nio.NioEventLoop.run(NioEventLoop.java:438)\n\tat io.netty.util.concurrent.SingleThreadEventExecutor$2.run(SingleThreadEventExecutor.java:140)\n\tat io.netty.util.concurrent.DefaultThreadFactory$DefaultRunnableDecorator.run(DefaultThreadFactory.java:144)\n\tat java.lang.Thread.run(Thread.java:764)\n”}
at JWProxy.proxy$ (/usr/local/lib/node_modules/appium/node_modules/appium-base-driver/lib/jsonwp-proxy/proxy.js:152:13)
at tryCatch (/usr/local/lib/node_modules/appium/node_modules/babel-runtime/regenerator/runtime.js:67:40)
at GeneratorFunctionPrototype.invoke [as _invoke] (/usr/local/lib/node_modules/appium/node_modules/babel-runtime/regenerator/runtime.js:315:22)
at GeneratorFunctionPrototype.prototype.(anonymous function) [as throw] (/usr/local/lib/node_modules/appium/node_modules/babel-runtime/regenerator/runtime.js:100:21)
at GeneratorFunctionPrototype.invoke (/usr/local/lib/node_modules/appium/node_modules/babel-runtime/regenerator/runtime.js:136:37)
at
Do you know what cause this?
https://stackoverflow.com/questions/7315941/java-lang-illegalthreadstateexception
Hi, nice tutorials!!, but I am unable to to connect the 2nd device after connecting the 1st one it showing me the error: more than one device/emulator
please help
I did not use emulators but when I used two devices I did not get any error. In next week, at work, I will try again and get back to you. Please, write your error message. I don’t know what kind of error you got. “Error” is very generic. Please specify the details. Thank you.
C:\WINDOWS\system32>adb connect 192.168.0.102:5555
connected to 192.168.0.102:5555
C:\WINDOWS\system32>adb devices
List of devices attached
192.168.0.102:5555 device
AYH6DA4PWKUW7PGQ device
C:\WINDOWS\system32>adb devices
List of devices attached
192.168.0.102:5555 device
C:\WINDOWS\system32>adb tcpip 5556
error: more than one device/emulator
C:\WINDOWS\system32>
I was using the real devices
Please check this thread. https://stackoverflow.com/questions/14654718/how-to-use-adb-shell-when-multiple-devices-are-connected-fails-with-error-mor
Hi,
You disconnected the second device before typing adb tcpip 5556. Thus, you could not assign a port to “AYH6DA4PWKUW7PGQ ” device. Please do in this order.
Connect the first phone and do following:
adb devices
adb tcpip 5555
get your devices ip from the cell phone settings menu.
adb connect :5555
Type again “adb devices” and see both your device UDID via USB and ip:port pair via Wireless.
Then, unplug your device from your PC’s USB port.
Then unplug the first phone and plug the second phone and do the same things again.
adb devices
adb tcpip 5556
get your devices ip from the cell phone settings menu.
adb connect :5556
Type again “adb devices” and see both your device UDID via USB and ip:port pair via Wireless.
Then, unplug your device from your PC’s USB port.
I hope in this way, you will be successful.
Hi Tarun, I have just updated the article. New code and settings are working now.
Thank you so much Onur, your tutorials are like the treasures for me.
I head to some problems,
1- Send Keys and sendText commands crash app when sending a string.
2- if there is a string before on the that filed sendText will clean it first, but after sending text, the previous text also entered, I try to clear it before sending text but again it crashes!
do you have any solution? I checked the GitHub and StackOverflow but they are for more about sendkeys method input beyond textfield limit.
Hi Naseri,
First of all, I want to thank you so much for your comment. When I was writing this article, I used Appium Desktop 1.6.1 version and that example worked very well. In my last project, I used below versions. Would you change the version and try again, please? If it works, upgrade the Selenium and Appium version step by step and find out the problematic version. By the way, Thomas has been writing a comment that Appium version 1.8.1 is working without any problem. “Finally I found that Appium Node.js ver 1.8.1 works perfectly for me.” You can try 1.8.1 as well.
Appium: 6.0.0-BETA5
Selenium: 3.11.0
TestNG: 6.14.3
Hi Onur,
can this work with a few Android devices in parallel ?
and can it be done that the Appium server for each Android device will be started from the Java code ?
I don’t want open windows (cmd) ?
Thanks,
Eyal
Hi Onur,
Just to check here are you distributing the tests on different devices? Or is it the same test running on multiple devices
Hi Sumit, If you put your tests in TestNG.xml file and start the tests via TestNG.xml file, you will run the tests inside it in parallel. In this example, I just put only one test. You can refer here how to modify testng xml file https://www.swtestacademy.com/testng-tutorial/
How to parallel execution of opium script in the cucumber BDD framework