Espresso Android mobile testing solution helps us to do android unit testing. It is a google mobile test framework to automate android applications. You can create your test automation framework with the espresso mobile testing framework. Mobile automation testing is fun with espresso. Let’s deep dive into the article and learn magical marvels of Espresso Android Test Automation.
Hello all,
While Appium is a defacto solution for mobile automation there are unit test libraries for iOS and Android applications that we never mentioned on our website. Those unit test libraries are Espresso used for Android automation and XCUITest library used for an iOS application.
While Appium is mostly used by QA engineers, Espresso and XCUITest are used by the development team as those libraries work by using source code instrumentation. Instrumentation means that you need to inject some libraries into your app’s source code and you execute tests by using app’s internal structure.
In this tutorial, we are going to talk about Espresso Android Test Automation Tips.
While Appium test code might be located under a different project, Espresso test should be developed inside your project folder because of instrumentation issue.
In our example we have a “Book Search App” and we implement a test case for it. You can take a look at the example on this link: https://github.com/swtestacademy/espresso
How to Inject Espresso into Your Project
You need to add your Espresso dependencies into your build.gradle file located under app folder. By adding those configurations, we define our Test Runner plugin which is AndroidJunitRunner and dependencies with their versions.
testInstrumentationRunner “android.support.test.runner.AndroidJUnitRunner”
androidTestCompile ‘com.android.support:support-annotations:’ + rootProject.supportLibVersion; androidTestCompile ‘com.android.support.test:runner:’ + rootProject.runnerVersion; androidTestCompile ‘com.android.support.test:rules:’ + rootProject.rulesVersion; androidTestCompile ‘com.android.support.test.espresso:espresso-core:’ + rootProject.espressoVersion;
rootProject.supportLibVersion and other variables are located under the build.gradle file located under the root folder.
ext {
buildToolsVersion = “24.0.1”
supportLibVersion = “24.2.0”
runnerVersion = “0.5”
rulesVersion = “0.5”
espressoVersion = “2.2.2” }
Espresso Android Basic Interaction Commands
You need to implement your test by using a very different approach than Appium. You have access to all internal structure of the App. By using the R variable of Android you might perform any activity on any Activity window.
By using ActivityTestRule object, defined Activity under test will be launched.
@Rule public ActivityTestRule<BookListActivity> activiyObj = new ActivityTestRule<BookListActivity>(BookListActivity.class);
Below code allows you to interact with sendKeys and click functionalities. There are many other actions that you can do. Follow this link for the rest of them. https://developer.android.com/reference/android/support/test/espresso/action/ViewActions.html
In Espresso, you don’t need to worry about knowing the String representation of the UI element. R object lets you use them by their object name.
onView(withId(R.id.action_search)).perform(click());
onView(withId(R.id.search_src_text)).perform(typeText(“Martin Eden”),closeSoftKeyboard());
For more advanced action you can create complex structures like this example. You need to select an element from a DataAdapter.
onData(anything()) .inAdapterView(withId(R.id.lvBooks)) .atPosition(index) .onChildView(withId(R.id.tvTitle)) .perform(click());
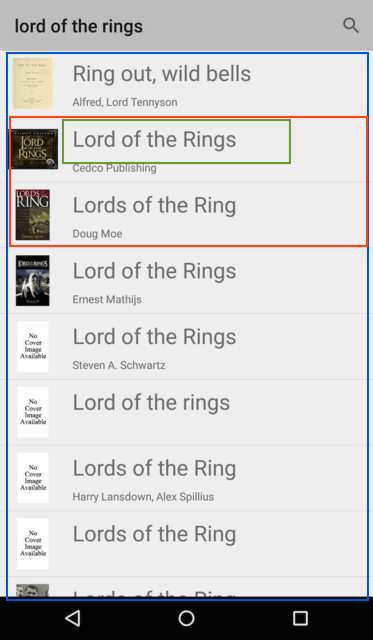
On below screenshot;
Blue Zone is presented by inAdapterView(withId(R.id.lvBooks)) command.
Red Zone is presented by .atPosition(2) or .atPosition(3) command
Green Zone is presented by .onChildView(withId(R.id.tvTitle)) command
Assertion Logic in Espresso Android
Espresso has its own Assertion logic. It resembles hamcrest matchers. Here’s an example.
onView(withId(R.id.tvTitle)).check(matches(withText(bookName)));
Blue Zone is presented by onView(withId(R.id.tvTitle)) command.
check(matches(withText(bookName))) do the assertion operation with given parameter bookName.
You can do Parametrized test or use @Before, @After annotation in case you need them. They totally have the same behavior on JUnit or TestNG.
Finally, you might run your test via gradle or adb (Android Debug Bridge) by using following commands.
Gradle : ./gradlew connectedAndroidTest
Adb : adb shell am instrument -w -r -e class com.codepath.android.booksearch.LibraryTest com.codepath.android.booksearch.test/android.support.test.runner.AndroidJUnitRunner
Thanks.
-Canberk

Canberk Akduygu is a Test Lead working in the Netherlands


Hi Canberk, thanks for the tips!
I have a question about using espresso vs Appium in CI. Currently our developers doesn’t wanna use Appium since it takes lot of time to build and increase the time of CI cycle.
Our main purpose for automation is use it part of CI and also add some regression tests on top for production. Do you think its a good idea to use Espresso for that ?
Thanks!
Hello Diego,
If your developers are the ones to build test scenarios, you should definitely go with Espresso or XCUITest according to the platform. It’s going to be easier for them to identify selectors, objects, etc. But QA teams might have difficulty while maintaining the test code if you work with White box test libraries. But if that team is a “technical team” go with espresso. In case not It would be best to use Appium when it comes to regression testing.