Hi all, in this article, I will describe how to integrate Allure Reporting Framework with Appium and TestNG based mobile test automation project. So, Let’s get started!
First of all, I want to summarize the tools and the frameworks that I used in this project:
- Programming Language: Java
- Mobile Test Automation Framework: Appium
- Test Runner Framework: TestNG
- Reporting Framework: Allure Report
- Build Tool: Gradle
- Loggin Framework: Log4j
Step-1: Gradle Declaration build.gralde
In order to extend Allure, we need to declare below lines.
For UTF-8 encoding while JAVA compilation, we need to add below lines:
tasks.withType(JavaCompile) {
    options.encoding = 'UTF-8'
}
Dependencies:
dependencies {
    agent "org.aspectj:aspectjweaver:1.8.10"
    classpath 'com.android.tools.build:gradle:2.3.0'
    compile group: 'org.testng', name: 'testng', version: '6.9.5'
    compile group: 'io.appium', name: 'java-client', version: '4.1.2'
    compile group: 'com.googlecode.json-simple', name: 'json-simple', version: '1.1.1'
    compile group: 'log4j', name: 'log4j', version: '1.2.17'
    compile group: 'com.relevantcodes', name: 'extentreports', version: '2.41.2'
    compile group: 'ru.yandex.qatools.ashot', name: 'ashot', version: '1.5.4'
    compile group: 'io.qameta.allure', name: 'allure-testng', version: '2.0-BETA20'
    compile group: 'org.springframework.amqp', name: 'spring-amqp', version: '1.0.0.RELEASE'
}
Plugin:
plugins {
    id 'java'
    id 'ru.vyarus.quality' version '2.2.0'
    id "io.qameta.allure" version "2.5"
}
Declaration of TestNG Suite and Test Task:
test {
    useTestNG() {
        scanForTestClasses = false
        suites 'TestNG.xml'
        ignoreFailures = true
    }
    testLogging {
        events "PASSED", "STARTED", "FAILED", "SKIPPED"
    }
    systemProperty 'env', System.getProperty('env', 'all')
}
For “allureServe” Command, we need to add below line:
allure {
    autoconfigure = true
    version = '2.5.0'
    useTestNG {
        version = '2.0-BETA15'
    }
}
Step-2: Device Settings
To test an App with Appium, an IOS or Android devices must be identified and their settings should be declared, and these devices should be up and running before each test, after the tests they should be turned off. In your tests, you can use real devices as well as emulators. There is no difference in the definition phase. In the prepareDevice function, the path of the application to be tested is given as app.apk under the application folder. You can define the app path according to your own project structure.
static AppiumDriver prepareDevice(String deviceName, String version, String url) throws MalformedURLException {
     File appDir = new File("/application");
     File app = new File(appDir, "app.apk");
     DesiredCapabilities capabilities = new DesiredCapabilities();
     capabilities.setCapability(MobileCapabilityType.PLATFORM_NAME, MobilePlatform.ANDROID);
     capabilities.setCapability(MobileCapabilityType.DEVICE_NAME, deviceName);
     capabilities.setCapability(MobileCapabilityType.NO_RESET, false);
     capabilities.setCapability(MobileCapabilityType.PLATFORM_VERSION, version);
     capabilities.setCapability(MobileCapabilityType.APP, app.getAbsolutePath());
     capabilities.setCapability(MobileCapabilityType.NEW_COMMAND_TIMEOUT, 60000);
     capabilities.setCapability("--session-override", true);
     driver = new AndroidDriver(new URL(url), capabilities);
     return driver;
}
For both, the device’s Name, Version, and the URL information of the Appium Server should be defined. In this project, we declared this information in env.json file. Device information should be read from build parameter when tests are running in both local and remote environments.
env.json File:
Here, the information of the Device is defined and it is passed to the prepareDevice function as a parameter.
{
  "local": {
    "device": "192.168.56.101:5555",
    "version": "6.0",
    "appVersion": "v.1.0.0",
    "url": "http://127.0.0.1:4723/wd/hub"
  },
  "remote": {
    "device": "remoteDevice",
    "version": "remoteDeviceVersion",
    "appVersion": "appVersion",
    "url": "remoteAppiumServerUrl"
  }
}
Step-3 : BasePage.class Definition
In the BasePage class, we define the common functions that we will use in the project. Page classes extend BasePage class, and they will use the common functions inside PageBase class. Such as, click(); getText(), sendText(), etc.
class BasePage {

    public AppiumDriver driver;
    public WebDriverWait wait;

    By closeButton = By.id("com.testm.app:id/back_cancel_button");

    //Constructor
    public BasePage(AppiumDriver driver) {
        this.driver = driver;
        wait = new WebDriverWait(driver,15);
    }

    void click(By element) throws InterruptedException {
        wait.until(ExpectedConditions.elementToBeClickable(element));
        driver.findElement(element).click();
    }
ChargerTestFunction extends BasePage class and use its click() function. Thus, we can use the common functions in page classes by extending BasePage class and just call them. This is the main advantage of inheritance in Object Oriented Design.
public class ChargerTestFunction extends BasePage {

    private By hardwareButton = By.id("com.testm.app:id/hardware_pb");
    private By startButton = By.id("com.testm.app:id/startTestTv");
    /**
     * Charger Test
     */
    private By chargerButton = By.id("com.testm.app:id/charger_bt");
    private By chargerTestResult = By.id("com.testm.app:id/test_details");
    /**
     * Hardware Button Control
     */
    private By hardwareButtonControlResult = By.id("com.testm.app:id/test_details");
    private By hardwareButtonControl = By.id("com.testm.app:id/hardwareButtons_bt");

    public ChargerTestFunction(AppiumDriver driver) {
        super(driver);
    }


    @Step("Click hardware button and charger is tested")
    public void chargerTest() throws InterruptedException {
        click(hardwareButton);
        click(chargerButton);
        click(startButton);
        String chargerTestSuccsessMsg = "The Charger check passed the test";
        Assert.assertEquals(getText(chargerTestResult), chargerTestSuccsessMsg);
        click(closeButton);
    }

    @Step("Click hardware button and hardware button is tested")
    public void hardwareButtonControlTest() throws InterruptedException {
        click(hardwareButton);
        click(hardwareButtonControl);
        click(startButton);
        ((AndroidDriver) driver).pressKeyCode(AndroidKeyCode.KEYCODE_VOLUME_UP);
        ((AndroidDriver) driver).pressKeyCode(AndroidKeyCode.KEYCODE_VOLUME_DOWN);
        ((AndroidDriver) driver).pressKeyCode(AndroidKeyCode.KEYCODE_POWER);
        ((AndroidDriver) driver).pressKeyCode(AndroidKeyCode.KEYCODE_POWER);
        String hardwareButtonControlSuccessMsg = "The Hardware Buttons check passed the test";
        Assert.assertEquals(getText(hardwareButtonControlResult), hardwareButtonControlSuccessMsg);
        click(closeButton);
    }
Step-4: Writing Test Cases
In this project, we write tests in Java scope as a function and then we use them in test scope to create the test cases. I add screenshots to make this process clearer. The first screenshot is the function that we write the test flow, the second screenshot shows an upper-level test function that we use the test flow function.
@Step("Click hardware button and charger is tested")
  public void chargerTest() throws InterruptedException {
      click(hardwareButton);
      click(chargerButton);
      click(startButton);
      String chargerTestSuccsessMsg = "The Charger check passed the test";
      Assert.assertEquals(getText(chargerTestResult), chargerTestSuccsessMsg);
      click(closeButton);
}
@Test
@Description("Test Description: Is charger plugin check of your mobile device")
@Story("Charger Plugin Test")
public void chargerTest() throws InterruptedException {
    ChargerTestFunction chargerTestFunction = new ChargerTestFunction(driver);
    chargerTestFunction.chargerTest();
}
All test classes extend BaseTest Class. In BaseTest class we use prepareDevice function which we defined in step-2. Before the test execution, the device is turned up and after the test execution, the device is turned off.
In BaseTest class, we can declare common variables that we use in all test classes. All test classes extend the BaseTest class and in this way we don’t write extra codes for common variables and functions. It is the advantage of inheritance.
private void setDevice(String device) {
    this.device = device;
}

private String getVersion() {
    return version;
}

private void setVersion(String version) {
    this.version = version;
}

private String getUrl() {
    return url;
}

private void setUrl(String url) {
    this.url = url;
}


@BeforeSuite()
public void setUp() throws MalformedURLException, InterruptedException, FileNotFoundException {
    GetEnvironment environment = new GetEnvironment();
    setDevice(environment.getEnvironment("device"));
    setVersion(environment.getEnvironment("version"));
    setUrl(environment.getEnvironment("url"));
    DeviceSetup.prepareDevice(getDevice(), getVersion(), getUrl());
    wait = new WebDriverWait(driver,15);
    SkipAppFunction skipAppFunction = new SkipAppFunction(driver);
    skipAppFunction.clickNextButton();
}

@AfterSuite
public void tearDown() {
    driver.quit();
}
The setDeivce, setVersion, setUrl functions in the above sets the Device parameters that we defined in step 2, and the Device turns up according to these parameters. Again we see above, the common variables are defined in this class. We will use them in test classes or TestListener class by extending BaseTest Class.
Step-5: Test Listener
The purpose of the Test Listener is to define what action will be taken in case of success or failure statuses and in the beginning and end of the tests. This class extends BaseTest class. In addition, this class implements ITestListener to manage the test statuses. We can add test listener by typing @Listener annotation in test classes.
Step-6: Creation an Allure Report and Allure Report Annotations
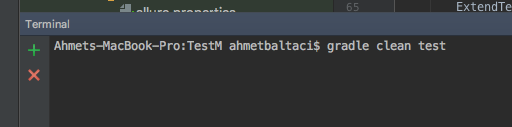
In the project directory, we should write “grade clean test“. The project is started the build process, the device is turned up, and tests are started to run.
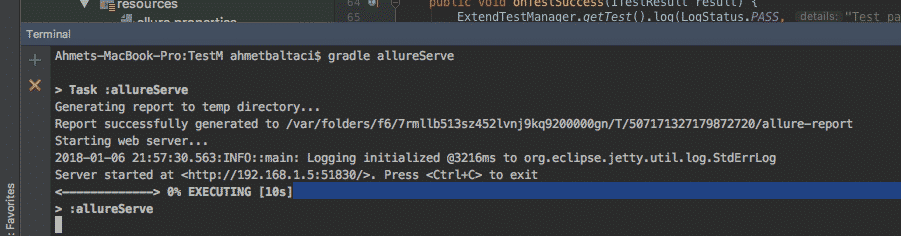
When tests are started to run, ExtendTestManager is started in TestListener’s onStart method. After all test executions this process is stopped in onFinish method. Then “Gradle allureServe” is written and executed in the terminal. The report opens in the browser.
Report Output:
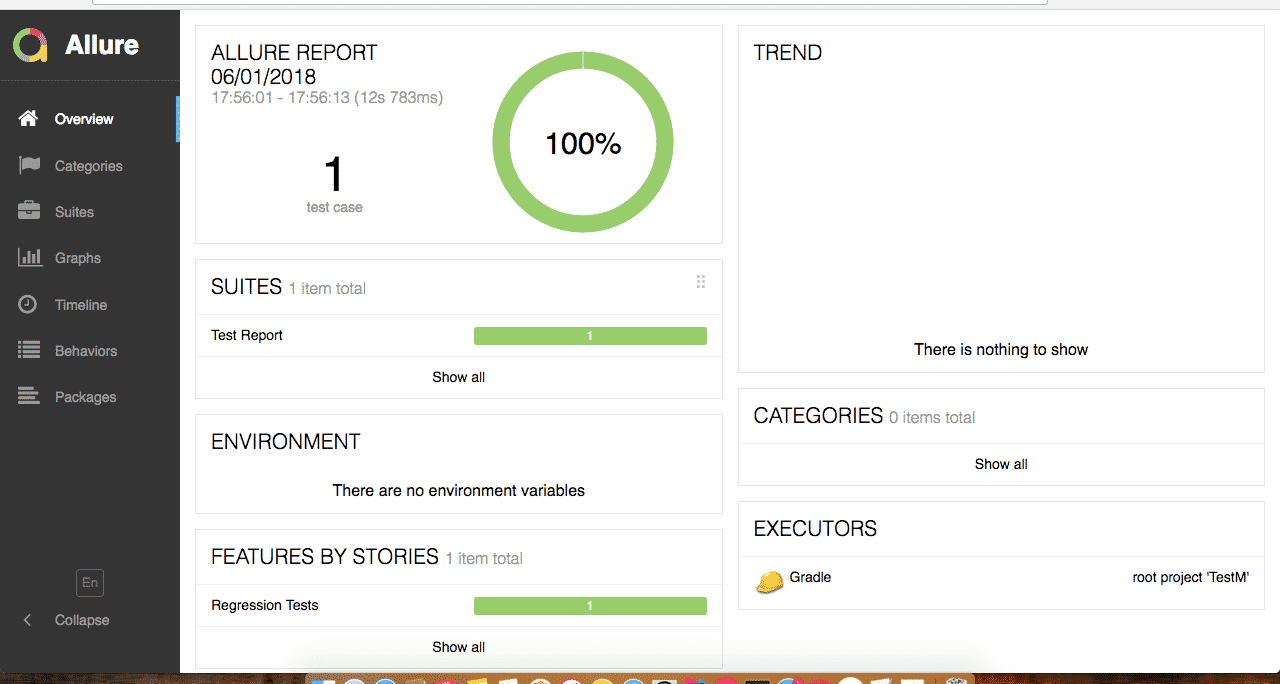
To create the Allure Report in the project, “gradle allureReport” is written and executed to the terminal and the report specified in the allure.properties file is created.

Annotations
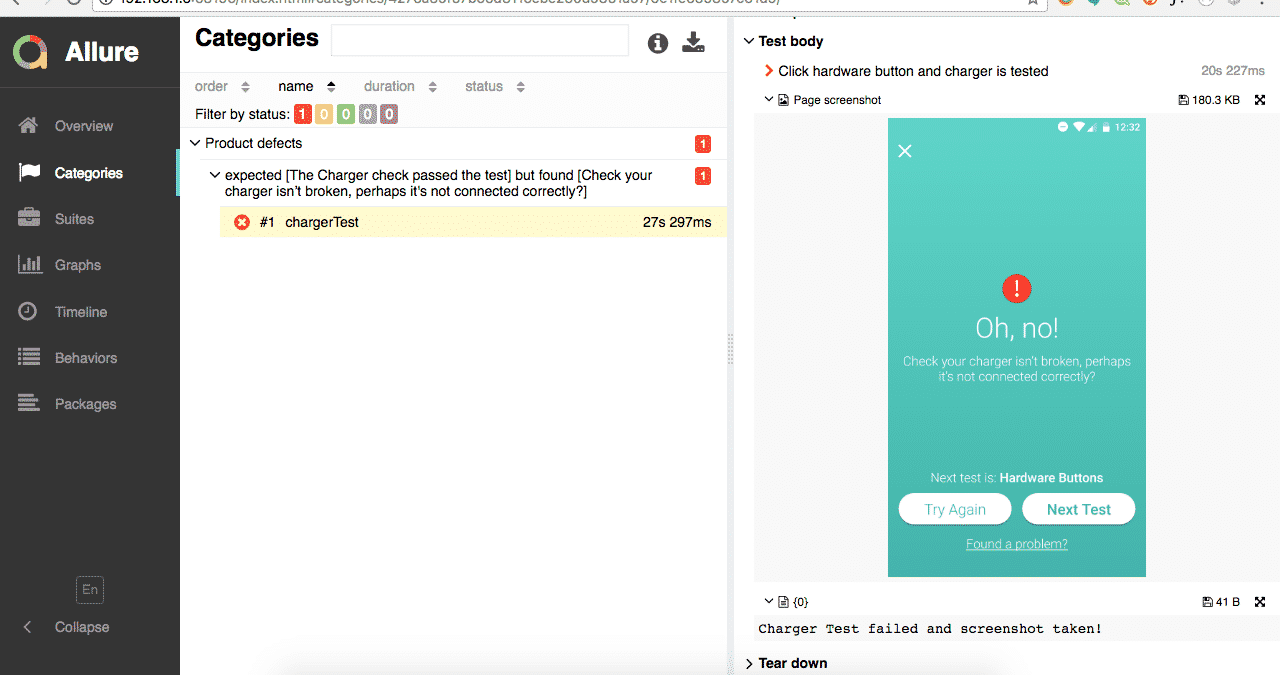
@Attachment
With this annotation, we can add a screenshot, file or text to the Allure report. In the project, the attachment definition was declared in the Test Listener and used in the onTestFailure function. The intent is to automatically add a screenshot, message, or file for unsuccessful tests.
@Attachment(value = "{0}", type = "text/plain")
private static String saveTextLog(String message) {
    return message;
}

@Attachment(value = "{0}", type = "text/html")
public static String attachHtml(String html) {
    return html;
}

private String getTestResult() {
    return testResult;
}

private void setTestResult(String testResult) {
    this.testResult = testResult;
}

@Attachment(value = "Page screenshot", type = "image/png")
private byte[] saveScreenshotPNG(WebDriver driver) {
    return ((TakesScreenshot) driver).getScreenshotAs(OutputType.BYTES);
}
@Override
public void onTestFailure(ITestResult result) {
    setTestResult("FAILED");
    setTestFailedMsg(result.getThrowable().getMessage());
    Object testClass = result.getInstance();
    WebDriver driver = ((BaseTest) testClass).getDriver();
    //Allure ScreenShotRobot and SaveTestLog
    if (driver != null) {saveScreenshotPNG(driver);}
    //Save a log on allure.
    saveTextLog(getTestCaseName() + " failed and screenshot taken!");
    //Take base64Screenshot screenshot for extent reports
    assert ((TakesScreenshot) driver) != null;
    String screenshot = "data:image/png;base64," + ((TakesScreenshot) driver).getScreenshotAs(OutputType.BASE64);
    //Extentreports log and screenshot operations for failed tests.
    ExtendTestManager.getTest().log(LogStatus.FAIL, "Test Failed",ExtendTestManager.getTest().addBase64ScreenShot(screenshot));
}
Attachment View on Report:
@Listeners
It is defined in the Test Class. It performs the actions to be taken before and after the test, in case of a successful or fail conditions. You can define the listener in each test class as well as in the <listener> tag inside the TestNG suite.xml. In below code snippet, I used @Listeners, @Epic, @Feature, @Severity annotation and I will describe them with screenshots.
@Listeners({TestListener.class})
@Epic("Regression Tests")
@Feature("Hardware")
@Severity(SeverityLevel.BLOCKER)
public class ChargerTest extends BaseTest {

    @Test
    @Description("Test Description: Is charger plugin check of your mobile device")
    @Story("Charger Plugin Test")
    public void chargerTest() throws InterruptedException {
        ChargerTestFunction chargerTestFunction = new ChargerTestFunction(driver);
        chargerTestFunction.chargerTest();
    }
}
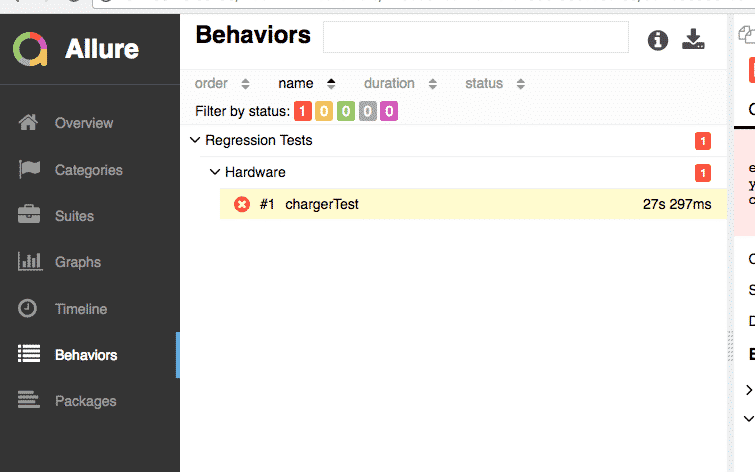
@Epic
This annotation is used to gather the tests under an epic. For example, if you use the @Epic (“Regression Tests”), you can see all the tests under the “Regression Tests” on the Behaviors tab of the Allure Report.
@Feature
In this section, we describe what features of the application will be tested. The screenshot below will give you more detailed information about these two annotations.
@Severity
This feature of the Allure report is used to define the importance level of the test case. What is the point of our test? Blocker, Critical, Minor, Normal etc.
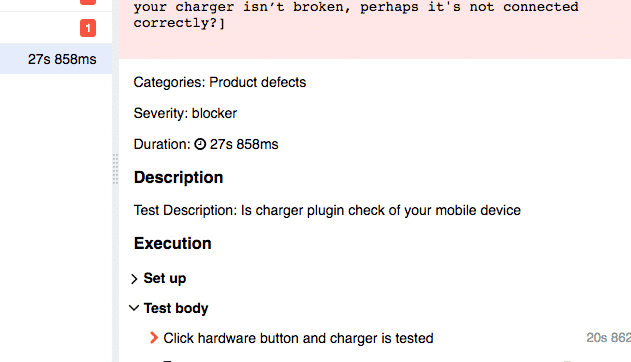
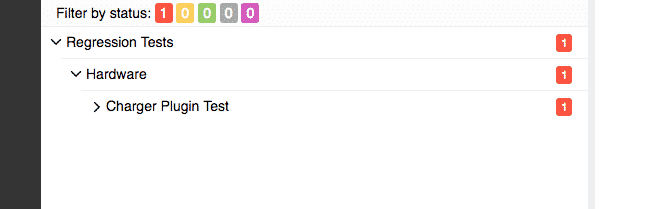
@Story
Here the test scenario is defined. Which scenario we are testing can be defined here.
@Decsription
Here we define the test. We can give more detailed information to the user about the test.

@Issue
One of the most beautiful features of Allure Report is @Issue and @Issues annotations. Here, if the test case is testing an issue in the JIRA, we define the JIRA code to associate it with it. At this point, you will see that the report contains the JIRA link in the test case. @issues annotation is used if the case is associated with multiple JIRA tasks.
Examples:
@Issues ({
@Issue(“MT-500”),
@Issue(“MT-501”)
})
To associate JIRA with test cases, you can define the JIRA URL in the allure.properties file.
Project’s GitHub Page:
https://github.com/ahmetbaltaci/AppiumAndroid
Thank you!
Ahmet Samet Baltacı
QA / Test Automation Engineer
Foreks Bilgi İletişim Hizmetleri A.Ş.

He is a QA / Test Automation Engineer Foreks Bilgi İletişim Hizmetleri A.Ş.
Thank you very much Ahmet Samet Baltacı for the tutorial.
As appium going to release Java client 6, can you please share the codes for gesture handling like scroll,swipe,zoom,pinch,page scroll, swipe without using objects etc?
Waiting for your response.
Hi Siddharth,
I will prepare a document about swipe,tap,zoom,pinch for appium after than share document .
Thanks Ahmet, it will be awesome for all of the software testing community. I really appreciated your contribution.
https://github.com/appium/java-client/releases There will be awesome new features are coming.
Hi, I am using appium with android studio. Is there any way to generate test report?