In this article, we will talk about Kubernetes security. When we are using Kubernetes, we sometimes would like to limit the access of the network or limit some users to see and/or run some commands, etc. for security reasons.
For these purposes, we have to use different Kubernetes concepts.
Network Policy
If we want to limit the network traffic from or to a Pod, we need to define a NetworkPolicy.
For instance, if we want to limit traffic on a specific port ( let’s say 80 ) to our nginx Pod and if we want to limit traffic from our nginx Port ( let’s say 8080 ), we need to define Ingress and Egress definitions respectively. Network policies are matched to the Pods with labels.
apiVersion: networking.k8s.io/v1
kind: NetworkPolicy
metadata:
  name: nginx-network-policy
spec:
  podSelector:
    matchLabels:
      role: lb
  policyTypes:
  - Ingress
  - Egress
  ingress:
  - from:
    ports:
    - protocol: TCP
      port: 80
  egress:
  - to:
    ports:
    - protocol: TCP
      port: 8080
So this NetworkPolicy will be applied to any Pod that has the label “role: lb”, limit in traffic on port 80, and out traffic on 8080.
RBAC
Role-based access control (RBAC – you can read it as ARBAC) is a method of regulating access to a computer or network resources based on the roles of individual users within your organization.
Imagine in your company, you have 50 people working in the IT department, grouped as developers, testers, and DevOps. If some resources are only for DevOps people ( for instance controlplane resources so developers and testers won’t make any mistake on those ) and that resource(s) should not be visible to other roles then we can limit their access by defining an RBAC.
We can either define a Role or ClusterRole.
The role is only for a specific Namespace.
ClusterRole is, as the name suggests, cluster-wide, and it is non-namespaced.
So if you need access control for a specific namespace define Role, if not define ClusterRole.
After creating roles, we have to bind them to either RoleBinding or ClusterRoleBinding according to our needs and/or usage.
The actions that users/roles may be allowed should be provided on the “verb” parameter, which can be any of the ones listed below:
[get, list, watch, create, update, patch, delete]
Please note that Kubernetes suggests usage of service accounts ( which are non-human accounts that are trying to authenticate ), so we have to create service accounts as well.
RBAC can be defined as both imperative and declarative.
For learning purposes, let’s create 3 different roles as mentioned above, developers, testers, and admins. Developers will have the rights to get, list, and update over Deployments and Pods on the “developers” namespace, testers will have rights to list the Pods on the “testers” namespace and DevOps will have the right for listing all pods cluster-wide.
Let’s start with creating a namespace called “developers”:
kubectl create namespace developers
![]()
And then let’s create the role developers using the imperative method:
kubectl create role dev-role --verb=get,list,create --resource=deployments,pods -n developers
![]()
In a declarative way, we can create as:
apiVersion: rbac.authorization.k8s.io/v1
kind: Role
metadata:
  namespace: developers
  name: dev-role
rules:
- apiGroups: [""]
  resources: ["pods","deployments"]
  verbs: ["get", "list", "create"]
Now if we want to use it with a single user we would have created a role binding for just one user “ege”:
kubectl create rolebinding dev-rb --role=developers --user=ege -n developers

This was only for showing you how it would have done. But as I mentioned, Kubernetes suggests using a service account, and this will only be applied to user “ege” but actually, we don’t want it to be for only a user but for the entire role. So we need to create a service account for that:
kubectl create serviceaccount dev-sa -n developers
![]()
Important note: Role and RoleBinding should be created on the specific namespace that they will be used but service accounts can be on different namespaces.
Now let’s bind our role developer once again this time with the service account created.
kubectl create rolebinding dev-sa-rb --role=dev-role --serviceaccount=developers:dev-sa
![]()
As you can see when we are binding with a service account we first write the namespace and then the name of the service account, as in developers:dev-sa.
apiVersion: rbac.authorization.k8s.io/v1
kind: RoleBinding
metadata:
  name: dev-sa-rb
  namespace: developers
subjects:
- kind: ServiceAccount
  name: dev-sa
  namespace: developers
roleRef:
  kind: Role
  name: dev-role
  apiGroup: rbac.authorization.k8s.io
Now let’s move on to creating a test role and role binding.
First the namespace:
kubectl create namespace testers
![]()
Now let’s create the role with “list” permission on Pods at the “testers” namespace.
kubectl create role tester-role --verb=list --resource=pods -n testers
![]()
A new service account for testers:
kubectl create serviceaccount tester-sa
![]()
kubectl create rolebinding tester-rb --role=tester-role --serviceaccount=testers:tester-sa -n testers
![]()
On to creating a cluster role for devops:
kubectl create clusterrole devops-role --verb=list --resource=pods
Create a service account for devops:
kubectl create serviceaccount devops-sa
![]()
kubectl create clusterrolebinding devops-rb --clusterrole=devops-role --serviceaccount=default:devops-sa
![]()
Now we can check out existing roles by:
kubectl get roles
![]()
No roles in the default namespace but you may see the roles in the specific namespaces:
kubectl get roles -n developers

kubectl get roles -n testers

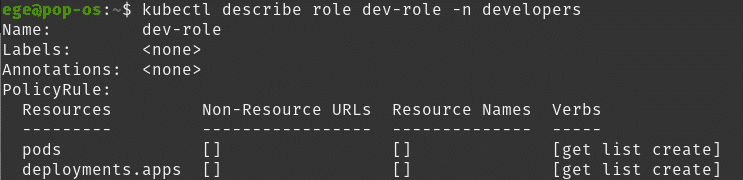
And describe any of them:
kubectl describe role dev-role -n developers
You may check access by using:
kubectl auth can-i create deployments
![]()
The answer is yes because we are an admin of our own cluster. To check with other users we need to add “–as <userName>
kubectl auth can-i list pods --as dev-sa
![]()
We can list the pods with dev-sa let’s see we can delete deployments with tester-sa:
kubectl auth can-i delete deployments --as tester-sa
![]()
This user as you can see does not have permission.
Security Context
A security context defines privilege and access control settings for a Pod or Container.
We use security context when we want to run a Pod or a Container as a specific user. So we can define the user that runs the Pod by adding the security context.
The path is “.spec.securityContext”.
This is the demo YAML file taken from Kubernetes documentation:
apiVersion: v1
kind: Pod
metadata:
  name: security-context-demo
spec:
  securityContext:
    runAsUser: 1000
    runAsGroup: 3000
    fsGroup: 2000
  volumes:
  - name: sec-ctx-vol
    emptyDir: {}
  containers:
  - name: sec-ctx-demo
    image: busybox
    command: [ "sh", "-c", "sleep 1h" ]
    volumeMounts:
    - name: sec-ctx-vol
      mountPath: /data/demo
    securityContext:
      allowPrivilegeEscalation: false
We can check if it works by sshing into the Pod and checks the user:
kubectl exec -it nginx -- sh
and inside the container:
ps

We can define a security context on the container level. Please note, container-level security context will override the Pod level. For example:
apiVersion: v1
kind: Pod
metadata:
  name: busybox
spec:
  securityContext:
    runAsUser: 1000
    runAsGroup: 2000
  containers:
  - name: busybox
    image: busybox
    command: ["sh", "-c", "sleep 1h"]
    securityContext:
      runAsUser: 2000
and if we check the user inside cluster:
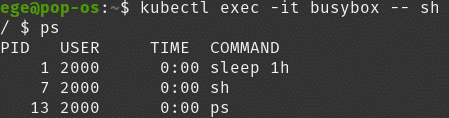
we will observe that it is user 2000.
Kubernetes Series
- Episode 1: Introduction to Kubernetes
- Episode 2: How to Create a Kubernetes Cluster
- Episode 3: Kubectl
- Episode 4.1: Kubernetes Objects
- Episode 4.2: Kubernetes Workloads
- Episode 4.3: Kubernetes Services
- Episode 4.4: Kubernetes Storage
- Episode 4.5: Kubernetes Configuration Objects
- Episode 5: Scheduling in Kubernetes
- Episode 6: Kubernetes Upgrade and Deployment Strategies
- Episode 7: Kubernetes Security
- Episode 8: Deploy a Full Stack Application in Kubernetes
Thanks for reading,
Ege Aksoz

Holding a BSc in Mechatronics, Ege loves to automate. He is now working as a Software Development Engineer In Test at XebiaLabs, Amsterdam.