In this tutorial, we will learn how to use BrowserMobProxy in Selenium to record network activities for Selenium Tests.
During our manual testing process, we always check the Chrome console if there are errors that we don’t notice on UI. That’s a painful issue when it comes to regression testing. You always hurry to finish the manual testing. You may forget or discard network errors. So we said why not implement it into our automation tests!
We used BrowserMobProxy for this tutorial and we’ll share with you a basic example, it’s up to you how to implement it into your automation project. Let’s do it step by step as swtestacademy way. ;)
Step 1: Adding BrowserMobProxy Dependency
We use the 2.1.5 version of the library. Never forget to use the latest. https://mvnrepository.com/artifact/net.lightbody.bmp/browsermob-core
Step 2: Create a BrowserMobProxy Object
This is a very straight forward process. After creating the proxy, we start the proxy.
 BrowserMobProxy proxy = new BrowserMobProxyServer();
   proxy.setTrustAllServers(true);
   proxy.start();
Step 3: Create a Selenium Proxy Object
BrowserMobProxy allows you to convert its proxy to Selenium Proxy object. So, we can pass the proxy to our WebDriver’s Desired Capabilities.
Proxy seleniumProxy = ClientUtil.createSeleniumProxy(proxy);
try {
   String hostIp = Inet4Address.getLocalHost().getHostAddress();
   seleniumProxy.setHttpProxy(hostIp + ":" + proxy.getPort());
   seleniumProxy.setSslProxy(hostIp + ":" + proxy.getPort());
} catch (UnknownHostException e) {
   e.printStackTrace();
   Assert.fail("invalid Host Address");
}
Step 4: Create a Selenium Driver with Proxy Object
You need to create a DesiredCapabilities object and pass previously created Selenium Proxy object to it. After this step, we can create our WebDriver.
DesiredCapabilities capabilities = new DesiredCapabilities();
capabilities.setCapability(CapabilityType.PROXY, seleniumProxy);

System.setProperty("webdriver.chrome.driver","drivers/chromedriver");
ChromeOptions options = new ChromeOptions();
options.merge(capabilities);
WebDriver driver = new ChromeDriver(options);
Step 5: Start Creating HAR File and Execute Test
This is a basic command. Then you do whatever you want to do with the webdriver. For this example, I just browsed swtestacademy’s homepage.
proxy.newHar();
driver.get("http://www.swtestacademy.com");
Step 6: Stop Recording and Print the Result
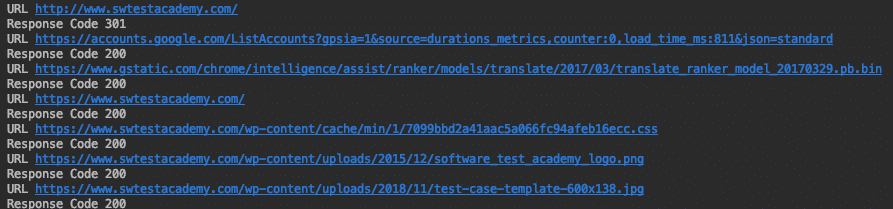
Your proxy instance will let you analyze the HAR file. HAR file contains HTTP Requests, Responses, and many other things. Below, we get all the requests(HarEntyr Objects) in the HAR file. Then iterate over it and print what we captured. Then we stop our proxy.
List<HarEntry> entries = proxy.getHar().getLog().getEntries();
for (HarEntry entry : entries) {
   System.out.println("URL "+entry.getRequest().getUrl());
   System.out.println("Response Code "+entry.getResponse().getStatus());
}
proxy.stop();
driver.close();
That was an easy one. Hope that you will implement it into your automation suites.
We added an analyzer function to report all HTTP 401, 403 and 500 status.
Not: Sometimes HTTP requests are executed a few seconds later as the web page is not loaded in a sec. So increase the waiting time on the page and you’ll see that other requests are also captured.
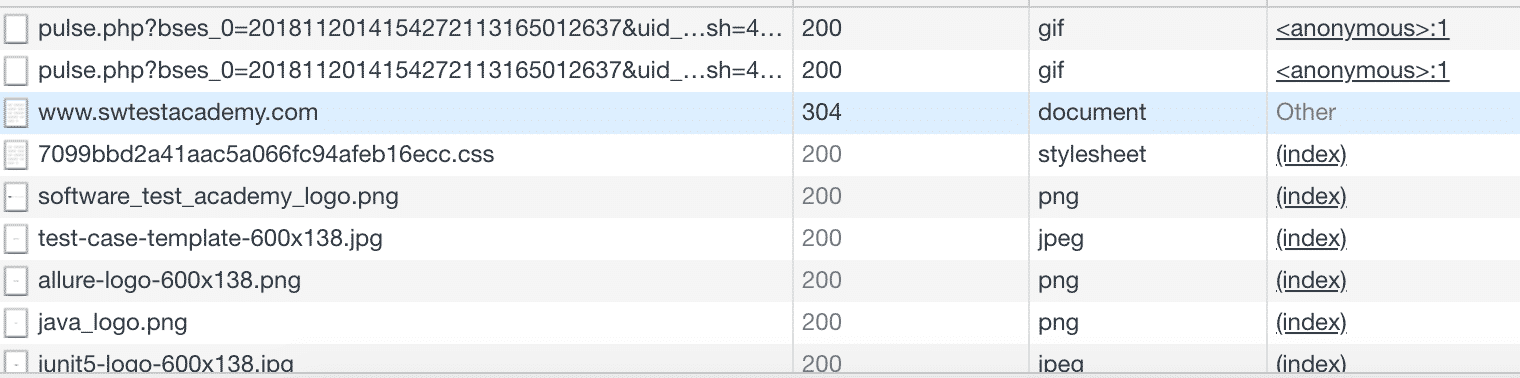
Chrome Network Tab
What we have captured
Thanks.
Canberk

Canberk Akduygu is a Test Lead working in the Netherlands