Selenium Webdriver Tutorial by using JAVA and TestNG article is a perfect starting point for Selenium Test Automation with TestNG. In this article, I will explain how to start to Selenium Webdriver with JAVA and TestNG step by step. If you want to start Selenium with JUnit, you can also read this article. Let’s start to Selenium Automation with TestNG and JAVA.
The Tool Belt for Selenium Webdriver Tutorial with JAVA and TestNG
Web Automation Framework: Selenium Webdriver
Development Kit: JAVA JDK
Add-On For CSS and XPath Selection: Ranorex Selocity
Test Framework: TestNG (The other popular test runner framework is JUnit)
IDE: IntelliJ Community Edition
Build System: Maven
Environment Editor (Optional): Rapid Environment Editor (RapidEE)
Selenium Webdriver Tutorial Step by Step Installations
- Install Firefox and Chrome
- Install Ranorex Selocity
- Install RapidEE
- Install JAVA JDK
- Install Maven
- Install IntelliJ, Download Firefox Driver, Download Chrome Driver
You can check this article for setup instructions.
Selenium Webdriver and TestNG
We will setup lastest settings and start to Selenium Webdriver Automation with TestNG with a basic example. After your first project, you will improve your skills by reading our other selenium webdriver tutorials.
Setup Drivers for Selenium 3.X
After Selenium 3.X, we need to declare browser drivers in our test codes. The easiest solution is to download all drivers in a folder and add this folder’s path in environmental path variable and after restart our PC, our tests will see the browser drivers.
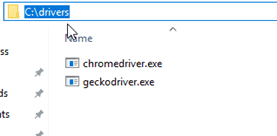
– Download Chrome and Firefox Drivers and save them under C:\drivers folder.
– Then, add this folder in system path variable:
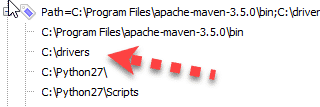
– Then, Restart your PC!
– For Mac users, you can learn how to change paths here.
Maven and POM.XML File
Maven is used to defining project structure, dependencies, build, and test management. Using pom.xml you can configure dependencies needed for building testing and running code. Maven automatically downloads the necessary files from the repositories while building the project.
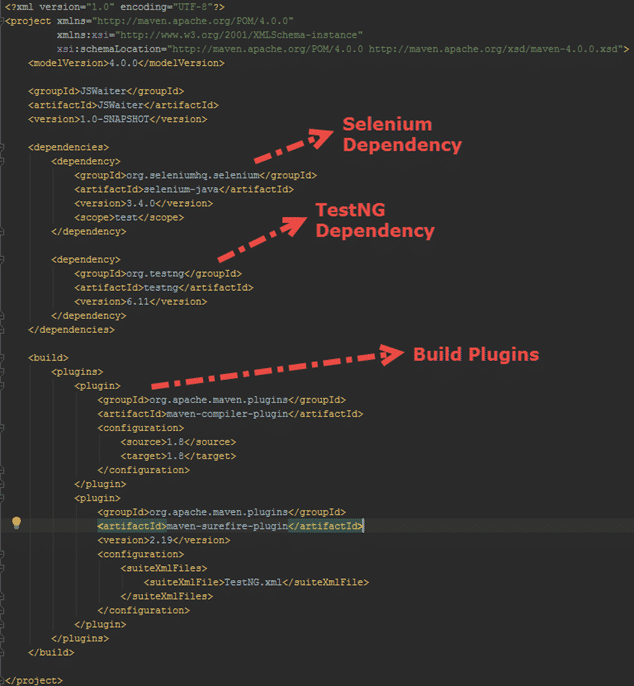
This pom.xml comprises of:
- Selenium Dependency is needed to use Selenium browser automation framework in our project.
- TestNG Dependency is needed to use TestNG test runner framework in our project.
- Maven-surefire-plugin is used to configure and execute tests. Here plugin is used to configure the TestNG.xml for TestNG test and generate test reports.
- Maven-compiler-plugin is used to help in compiling the code and using the particular JDK version for compilation.
You can also add several libraries with their maven dependencies.
TestNG XML File
TestNG is a testing framework and we can run our Selenium Tests by using its annotations such as @BeforeMethod, @Test, @AfterMethod, etc.
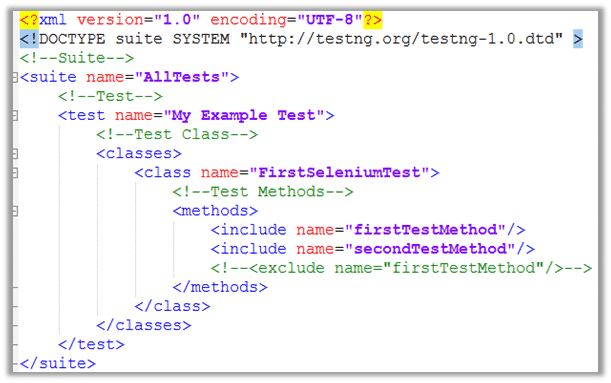
We can structure and control our test classes with TestNG.xml file. We should add class names, methods, groups, parameters, in this file to run our test with specific configurations.
The basic structure of TestNG.xml file as shown below:
TestNG Annotations and Their Meaning
@BeforeSuite: The annotated method runs before all tests in this suite.
@BeforeTest: The annotated method runs before test classes.
@BeforeGroups: The annotated method runs before the group’s tests.
@BeforeClass: The annotated method runs before the first test method which belongs to any of the test groups.
@BeforeMethod: The annotated method runs before each test method.
@Test: The annotated method is a test method. It executes the test.
@AfterMethod: The annotated method runs after each test method.
@AfterClass: The annotated method runs after all the test methods in the current test class.
@AfterGroups: The annotated method runs after the last test method which belongs to any of the test groups.
@AfterTest: The annotated method runs after test classes.
@AfterSuite: The annotated method runs after all tests.
Suite > Test > Class > Method
Test Automation Project with Selenium JAVA and TestNG
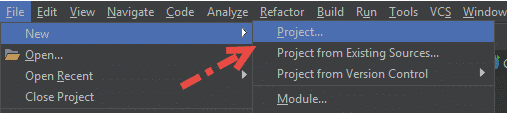
Open IntelliJ and create a New Project as shown below:
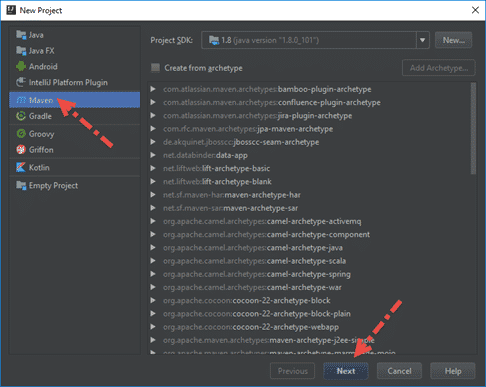
Select Maven and click Next.
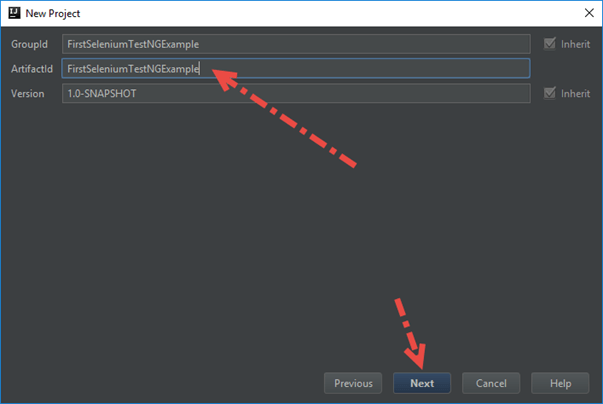
Fill GroupId and ArtifactId as “FirstSeleniumTestNGExample” and click Next.
Write your project name as FirstSeleniumTestNGExample and select your project folder and click Finish button.

Click Enable Auto-Import (This option automatically imports maven dependencies into your project.)

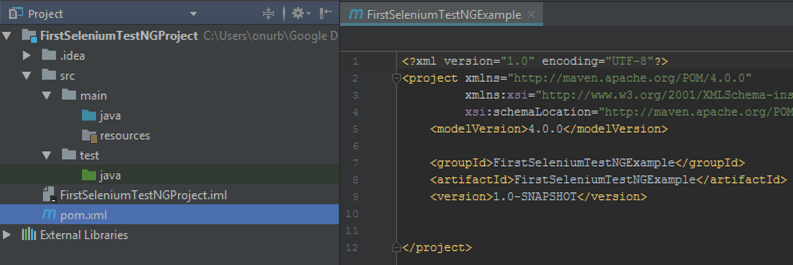
The project structure is shown below.
Now, we need to add Selenium and TestNG libraries in our project by using their dependencies. In order to get those dependencies, we can go to https://mvnrepository.com/artifact/org.testng/testng and https://mvnrepository.com/artifact/org.seleniumhq.selenium/selenium-java
We should add TestNG and Selenium Dependencies in pom.xml as follows. Maven will automatically download the required files into our project.
<?xml version="1.0" encoding="UTF-8"?>
<project xmlns="http://maven.apache.org/POM/4.0.0"
         xmlns:xsi="http://www.w3.org/2001/XMLSchema-instance"
         xsi:schemaLocation="http://maven.apache.org/POM/4.0.0 http://maven.apache.org/xsd/maven-4.0.0.xsd">
    <modelVersion>4.0.0</modelVersion>

    <groupId>FirstSeleniumTestNGExample</groupId>
    <artifactId>FirstSeleniumTestNGExample</artifactId>
    <version>1.0-SNAPSHOT</version>

    <dependencies>
        <!-- https://mvnrepository.com/artifact/org.seleniumhq.selenium/selenium-java -->
        <dependency>
            <groupId>org.seleniumhq.selenium</groupId>
            <artifactId>selenium-java</artifactId>
            <version>3.12.0</version>
        </dependency>

        <!-- https://mvnrepository.com/artifact/org.testng/testng -->
        <dependency>
            <groupId>org.testng</groupId>
            <artifactId>testng</artifactId>
            <version>6.14.3</version>
        </dependency>
    </dependencies>

 </project>
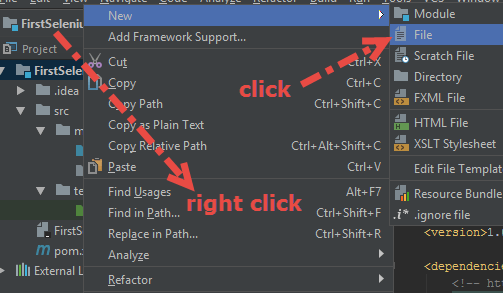
Then, right-click the project, select “New”, then click “File”.
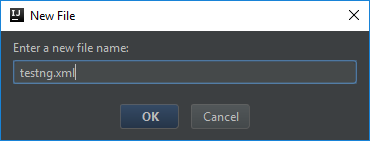
Write “testng.xml” as a file name and click “OK”.
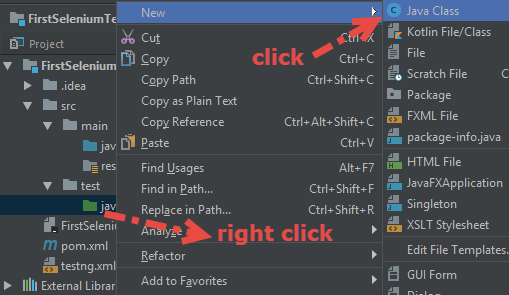
In order to create a test file, right click “java” folder under the “test” folder and select “New” and click “Java Class”.
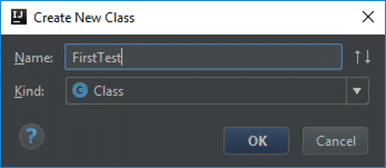
Give a name to your test as “FirstTest”.
Test Scenario:
– Open www.swtestacademy.com
– Get it’s title, prints it on the console, and check that it is correct or not.
import org.openqa.selenium.WebDriver;
import org.openqa.selenium.chrome.ChromeDriver;
import org.testng.Assert;
import org.testng.annotations.AfterMethod;
import org.testng.annotations.BeforeMethod;
import org.testng.annotations.Test;

/*****************************************************************************
 * Author:      Onur Baskirt
 * Description: This is the first Selenium TestNG test.
 *              It opens swtestacademy homepage and prints and checks its title.
*******************************************************************************/

public class FirstTest {

    //-----------------------------------Global Variables-----------------------------------
    //Declare a Webdriver variable
    public WebDriver driver;

    //Declare a test URL variable
    public String testURL = "http://www.swtestacademy.com/";

    //-----------------------------------Test Setup-----------------------------------
    @BeforeMethod
    public void setupTest (){
        //Create a new ChromeDriver
        driver = new ChromeDriver();

        //Go to www.swtestacademy.com
        driver.navigate().to(testURL);
    }

    //-----------------------------------Tests-----------------------------------
    @Test
    public void firstTest () {
        //Get page title
        String title = driver.getTitle();

        //Print page's title
        System.out.println("Page Title: " + title);

        //Assertion
        Assert.assertEquals(title, "Software Test Academy", "Title assertion is failed!");
    }

    //-----------------------------------Test TearDown-----------------------------------
    @AfterMethod
    public void teardownTest (){
        //Close browser and end the session
        driver.quit();
    }
}
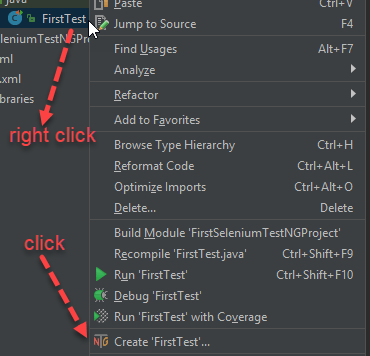
Now, we need to construct our testng.xml file. We can do it by using IntelliJ or manually. If you use IntelliJ, right-click your test file and click “Create ‘FirstTest’… icon as shown below.
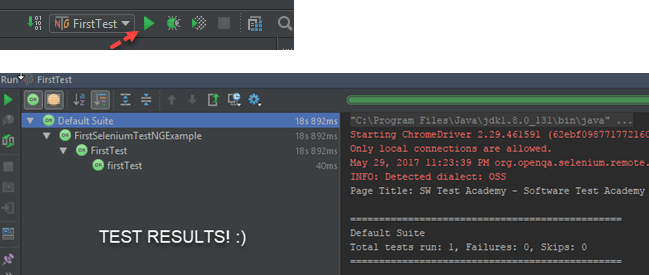
After you click “OK” button, you will see below icon on the right top corner of IntelliJ and if you click Run icon, your selenium testng test will start.
If you want to use manually configured testng.xml file, you need to open our testng.xml file and modify it as shown below.
<?xml version="1.0" encoding="UTF-8"?>
<!DOCTYPE suite SYSTEM "http://testng.org/testng-1.0.dtd" >

<suite name="AllTestsSuite">
    <test name="My First Selenium TestNG Test">
        <classes>
            <class name="FirstTest"/>
        </classes>
    </test>
</suite>
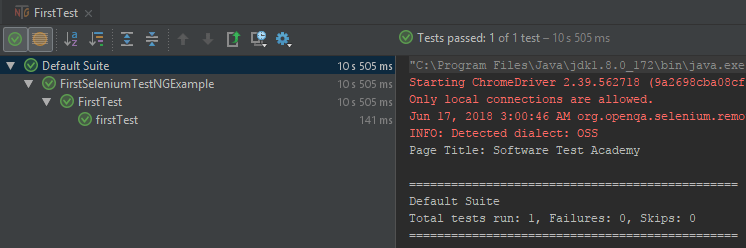
After, right-click to testNG.xml file and run it.

Test Result:
You can find a sample project’s code here: https://github.com/swtestacademy/sampletestngproject
For more information about TestNG please visit here.
[fusion_widget_area name=”avada-custom-sidebar-seleniumwidget” title_size=”” title_color=”” background_color=”” padding_top=”” padding_right=”” padding_bottom=”” padding_left=”” hide_on_mobile=”small-visibility,medium-visibility,large-visibility” class=”” id=””][/fusion_widget_area]
Thanks for reading Selenium Webdriver Tutorial by using JAVA and TestNG Tutorial article.
Onur Baskirt

Onur Baskirt is a Software Engineering Leader with international experience in world-class companies. Now, he is a Software Engineering Lead at Emirates Airlines in Dubai.
Thank you for your tutorial.
I got Failure which is because of this line: “at FirstTest.setupTest(FirstTest.java:27) ”
driver = new ChromeDriver();
I have Chromedriver and added it to my Environment variable.
Could you please help me with this? thank you
it works with Firefox driver but not chrome driver!
I really do not figure out why that is happening. I suggest you put some breakpoints and debug your project Mahsa.
Would you please check this article? It is written for marionette (gecko) driver but instructions are also the same for chrome driver. http://www.swtestacademy.com/gecko-marionette-firefox-selenium/