-
Preparations
- What is Affiliate Marketing?
- Required Tools
- E-commerce tool selection
- Importance Notice before you are going on
- Performing necessary data analysis
-
Prestashop Configuration
- PrestaShop API Learning
- Connection with PrestaShop API
-
Let’s Start JMeter Automation
- Create a JMeter Project
- Connection with Ecommerce Shop’s Database using JDBC
- Define Your Jmeter Variables
- Discover & Collect target website’s product data
- Understanding Regex
- For Each Controller usage
- BeanShell Scripting for getting and setting parameter values
- Brand matching and insertion with SQL
- Product Insertion
- Product Picture Insertion
-
Attributes Matching with Jmeter JDBC Request
-
Category Matching with Jmeter BeanShell Sampler
-
Mark the Existing Products Before and Set to Inactive Them After the Operation
-
Monitoring for any Failures and Performance Issues
-
Schedule it for Being Up to Date
-
Test like an End User
-
Test Project Links, Materials, Github link.
I have heard some fashion websites like vitringez.com, stilgiyin.com, modasor.com. They are telling that they are fashion search engine. They are not selling products, redirecting you to Who sales the original product’s website. If you buy the product, they make some money(commission) and then I think If I could create a new one without any person needed except a test automation guy (me).
I know it sounds hard to do with millions of products, attributes and there will be performance issues and some architectural difficulties. But I did it partially after one month hard working at nightly works. I know JMeter will help me to find any functional and performance issues on this website. There will be some bugs and You know I am a tester :)
I have summarized all of my technical works on swtestacademy.com. Due to technical problems, I’ve erased the website maybe 20 times and made it again. When you visit the website it can work a little bad. Because I’m taking a break for doing it again and again with supporting millions of products with another e-commerce tool. Please visit and give your feedbacks!
1. Preparations
1.a) What is Affiliate marketing?
Basic Explanation, Sell or promote someone else’s stuff and get paid for doing it.
- Online shoppers decide to buy an item.
- He lands on an affiliate site. (We are Affiliate Site in this example)
- He is now redirected to the merchant’s site
- The shopper finally makes the purchase and the merchant rewards the affiliate for his effort.
1.b) Required Tools:
- JMeter (latest stable version)
http://jmeter.apache.org/download_jmeter.cgi
- JMeter mysql-connector-java plugin. Copy the plugin’s JAR file to the JMeter’s lib folder.
https://mvnrepository.com/artifact/mysql/mysql-connector-java
- A Website Domain.
- Hosting Service like GoDaddy with a free e-commerce tool that has already been installed on hosting service. Basically, you should use Prestashop, OpenCart, Woo Commerce. Advanced users should prefer using Magento. You should buy a new domain and cloud hosting service with the following URL on GoDaddy.
https://tr.godaddy.com/pro/cloud-applications
1.c) E-commerce tool selection:
You will need a free e-commerce website for showing the affiliate products. These tools have lots of features like Admin, Registration, My Account, Basket, Checkout, Admin, SEO, API. For an affiliate website, you don’t need Basket and Checkout modules. So you should disable these features on your e-commerce tool.
How many products do you planning to host? This is the critical path for tool selection. If total product count is not bigger than 50K you should use PrestaShop. It has a Restful API. It’s simple, but getting slow with more than 50K products insertion.
If your products are over 50K products you should use a lightweight tool like OpenCart. It has not an API but you should insert your products with Jmeter POST requests. I will explain, how to capture product insertion requests easily.
The last tool that I will recommend that using the most popular e-commerce tool is Magento. It’s very complicated and not necessary for this example.
I will use Prestashop 1.7 with this example. Because simple is the best.

1.d) Important Notice before you are going on:
You should think about the following possible next steps before you are going on.
- Categorization
- Mobile web responsive
- SEO and Google Analytics
- Mobile application support
- Product insertion performance
- Product data and synchronization
- Server and Client side caching
- Hosting and AdWords costs
- Beautiful Logo and Theme for your website
1.e) Performing necessary data analysis
We will do an affiliate website about fashion. Man, Woman, Child will be the main menus for us. You need to create them manually. And then the submenus Shoes, Clothes, Bags, Sunglasses etc..You must define your basic category hierarchy with e-commerce tool.
We need the following data from the other original website(s). You should capture these, from catalog/boutique/product pages with Regular Expression (Regex) using Jmeter.
- Product Name (Nike Air Zoom model 123)
- Product Picture (http://…../picture1.jpg)
- Product Price (169.90 TL)
- Product Brand Name (Nike)
- Product Category Name(Shoes)
- Product Gender(Male)
- Product Size (39,40,41, 44,45)
- Product Color(OPTIONAL) (White)
- Product Page URL for Redirection
- Seller Shop Name (Trendyol)

2. Prestashop Configuration
2.a) PrestaShop API Learning
First of all, you have to enable Restful API, generate an API user-key and authorize it. There is a helpful document in the following URL.
http://doc.prestashop.com/display/PS17/Webservice
You should find some helpful information about Rest API usage with the following URL.
http://doc.prestashop.com/display/PS14/Using+the+REST+webservice
You should get blank XML schemes with “?schema=blank” query string. So the major or minor versions of Prestashop may have some differences.
http://mystore.com/api/customers?schema=blank
You must enable Developer mode on Prestashop for any detailed error displaying. Go to Prestashop root folder and find the file config > defines.inc.php change the following line:
define(‘_PS_MODE_DEV_’, false);
to true value and you’re done.
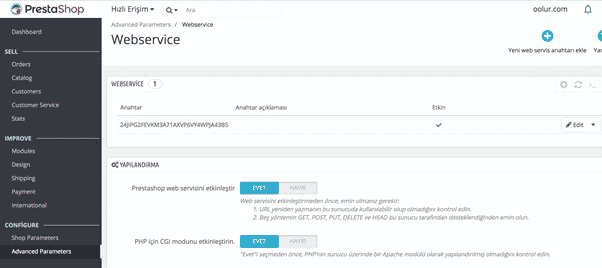
2.b) Connection with Ecommerce Shop’s API
You must enable PrestaShop Web service and create a web service API user-key. And You have to authenticate this API user with view-edit-insert permissions.
3. Let’s start JMeter Automation
I will collect H&M Woman product data. When I collect a product data completely, I will insert it to PrestaShop immediately. We will not collect them to a CSV file, but you should.
3.a) Create a JMeter project
Create a new JMeter project or you should use my example JMX file which has been stored on GitHub
I used the following Jeter objects;
- User Defined Variables
- JDBC Connection Configuration
- JDBC Requests
- Thread Group
- HTTP Cookie Manager
- HTTP Header Manager
- HTTP Requests
- Regular Expression Extractors
- BeanShell Samplers
- Simple Controllers
- If Controller
- ForEach Controllers
- Save responses to a file
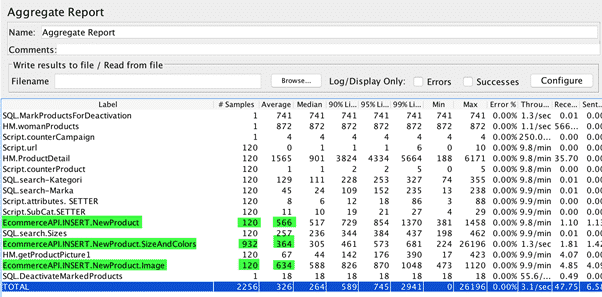
- Aggregate Report
- View Results Tree
The following picture shows the whole Jmeter test scenarios.

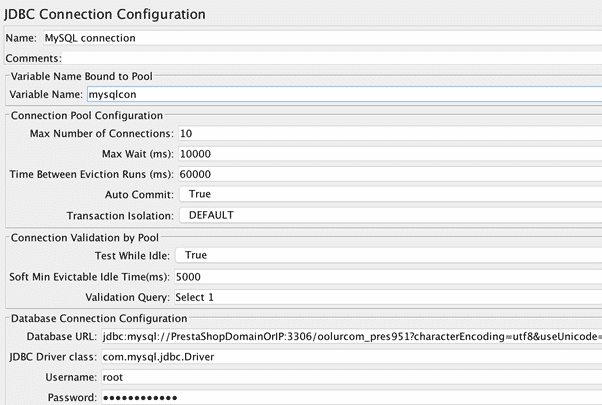
3.b) Connection with Ecommerce Shop’s Database using JDBC
You should use the following connection string for any MySQL Database connection. If you don’t use this strings, you should have some language problems.
Database URL:
jdbc:mysql://PrestaShopMysqlDomainOrIP:3306/databaseName?characterEncoding=utf8&useUnicode=true&characterSetResults=utf8&connectionCollation=utf8_general_ci
JDBC Driver class: (MySQL)
com.mysql.jdbc.Driver
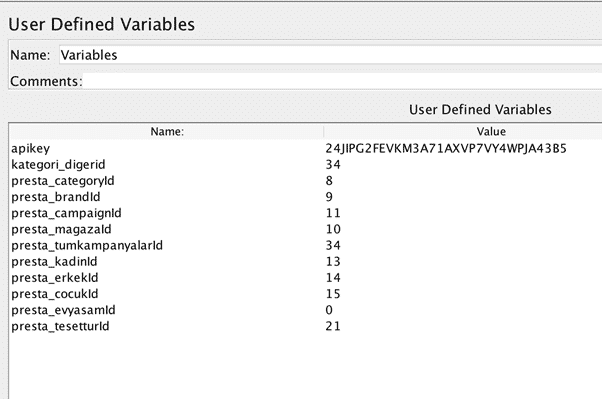
3.c) Define Your Jmeter Variables
You must define your variables in JMeter’s “User Defined Variables” object. Because We will use them again and again. If you will need the same thing again, you should parameterize it.
3.d) Discover & Collect target website’s product data
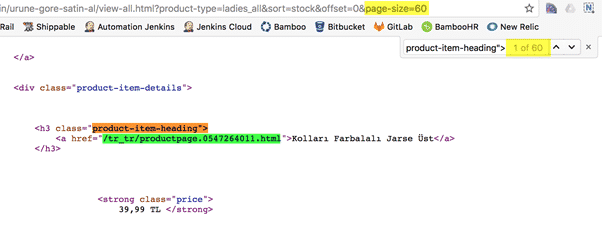
I discovered a link that’s listing all woman fashion products. So I should able to collect Product URLs, Category Names, Product Titles, Product Pictures and Product Sale Prices with Regex (Regular Expression Extractor)
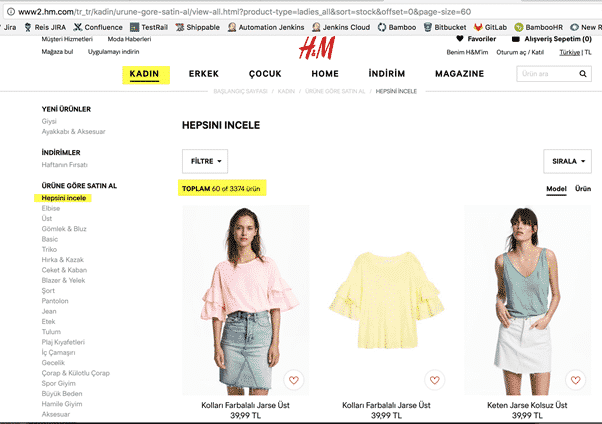
I inspect the 60 products from the website’s HTML source and found something like the following. I need the green URLs.
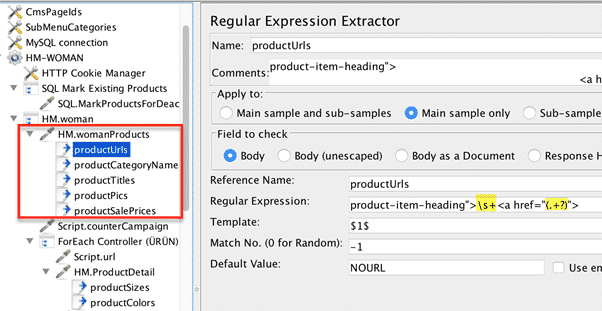
3.e) Understanding Regex
We need to do some tricks on this regex for successful outputs like the following.
1- How should we ignore whitespaces and new lines with JMeter?
The answer is using \s+ instead of it in Regular Expression field.
2- How should we select any text beginning with abc and ending with klm?
The answer is using (.+?) between them in Regular Expression field.
(.+?)abc(.+?)
3- How should we get that 60 product URLs in product URLs variable?
You should use -1 value for “Match No” for selecting all of them. For random you should use 0, For the first value 1, For the second value 2,..
4- How should we collect multi data from a regex variable, when we are using more than once like this example.
You should set Regular Expression Extractor’s Template field to $1$ for collecting the first data only,
Set template to $2$ for collecting the second regex’s data only.
Set template to $1$$2$ for collecting multi data.
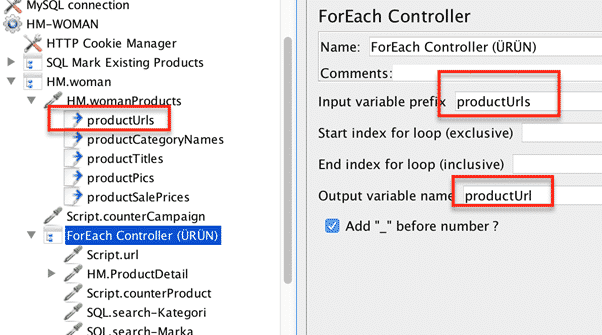
3.f) For Each Controller usage
We are adding a ForEach Controller to the project. You should return for each product. If you want to limit the total product insertion count, you should set End of an index for loop to any integer value. For example, the example URL will return 120 products, but if I want to collect only the top 10 products, So I should set to 10 this field.
3.g) BeanShell Scripting for getting and setting parameter values
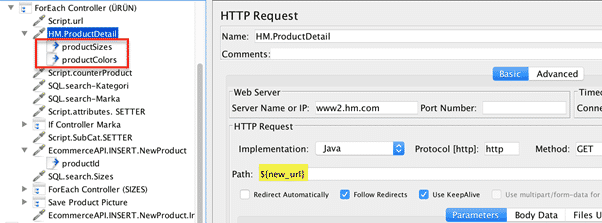
For getting each product URL, you should use ${__V(productUrls_${counter_url}_g1)} variable. Counter_url is our index variable and we are incrementing it +1 for each product. Also, we are setting the current product URL with Beanshell scripting, its name is new_url.
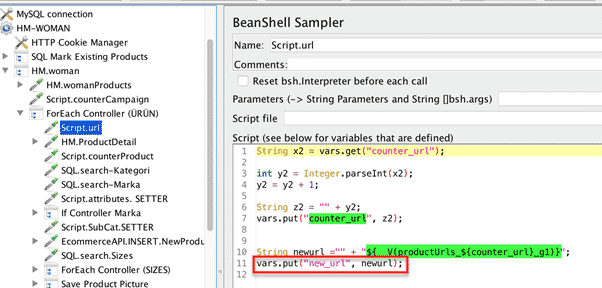
We are getting product detail page for collecting the current product’s size, color information, Which there does not exist on product listing page on the ecommerce website.
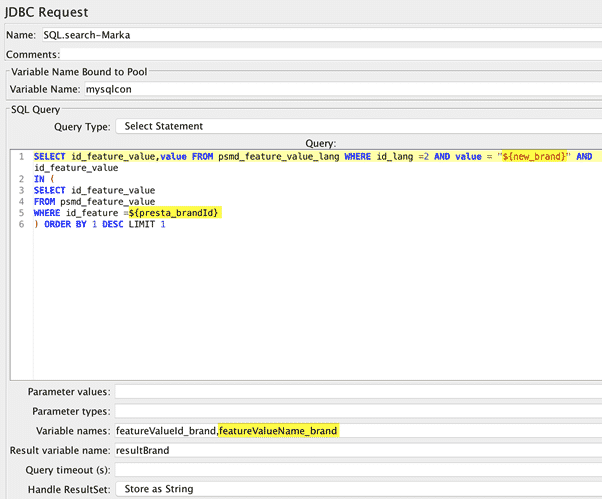
3.h) Brand matching and insertion with SQL
We have the product brand information and have to match if it exists in our PrestaShop database. If there is a SQL result, it will set the returning variables with these values.
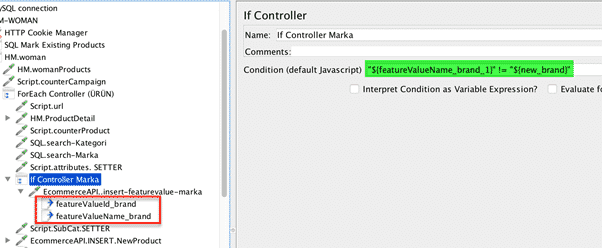
We are adding an if controller. And writing a basic script for controlling if the current product’s brand name has matched with the database. If there is no matching brand, it will add the new brand to Prestashop with API call. If there is a match, it will use it for inserting the product to your website.
3.i) Product Insertion
We are creating a new product on our e-commerce system with all data except sizes, colors, and images. It will return a productId and we will get it with regex.

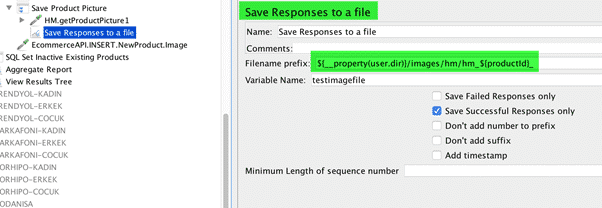
3.j) Product Picture insertion
We are using a save responses to a file and HTTP image request within the same simple controller. You should use filename prefix for saving the file to your local destination. Calling Prestashop API for adding the picture for our current productId.
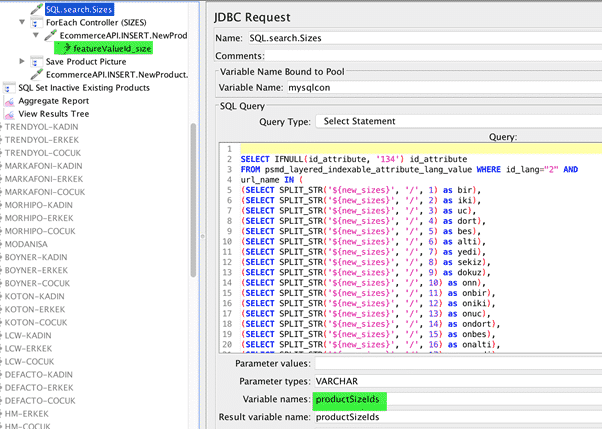
4) Attributes matching with Jmeter JDBC Request:
I have written a SQL function named with SPLIT_STR. You should access function from Github. I’m recording product sizes like this /S/M/L/XL/ and want to slipt by “/” character one by one. Setting “productSizeIds” JMeter variable with returning SQL statement.
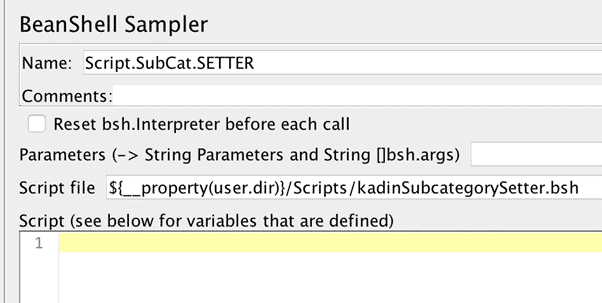
5) Category Matching with Jmeter BeanShell Sampler
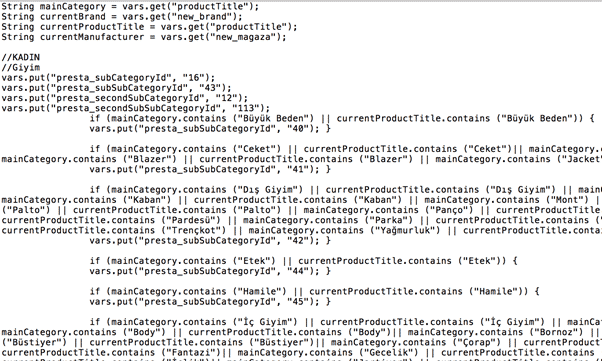
We are creating 3 BeanShell files with bsh extension. Woman.bsh, Man.bsh and child.bsh. You should access BeanShell files from Github that I have written. We have decided our categorization and have to match for the other e-commerce websites’ categories. You should find category information on e-commerce websites and should match. But if you didn’t find anything, You should use product title information.
Example 1: There is no category information on the e-commerce website and product title is “green shirt” and you also have a “shirt” category. You should match that with BeanShell script like that if (productTitle.contains (“shirt”))..
Example 2: Categories are not matching, So you should set to a default category for the product.
Example 3: You want to set for two different categories matching for Adidas products. These are Shoes and Sports Shoes. You know this is shoes and want to know if it’s a sports shoes? You should write a second matching BeanShell script like that
if (productBrand.contains (“adidas”) || (productTitle.contains (“adidas”)))..
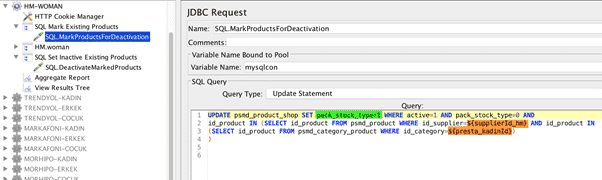
6) Mark the existing products before and Set to Inactive them after the operation
Deleting the old data is not effective. You should slow down your all system and should get SEO problems on google indexing. For that reasons, we are marking the target old product data and after the new products insertion operation, we are marking inactive for front office application. If you have 60.000 active + inactive products on your system, Your system should get slow. Maybe need some table’s truncate operations.
7) Monitoring for any Failures and Performance Issues
We have inserted 120 products with 932 features and 120 images to Prestashop. We should insert 1 product to Prestashop with 0,56 seconds delay. This is one thread’s aggregate report. You should clone this thread and modify for the other websites and genders for faster product insertion.
8) Schedule it for being up to date:
You must know that how often do the e-commerce website’s products change? You should use 3rd party open source programs which have scheduled task capable.
You could schedule with this command without Jmeter GUI:
java -jar “../../apache-jmeter-3.0/bin/ApacheJMeter.jar” -n -t
“$WORKSPACE/PrestashopProductIntegration.jmx” -l
“$WORKSPACE/PrestashopProductIntegration.jtl”
9) Test like an End User
Finally, You should see the products on the test affiliate website.
Category Pages
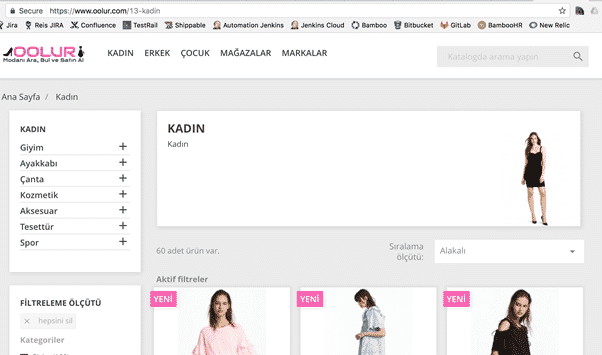
Menu – Category

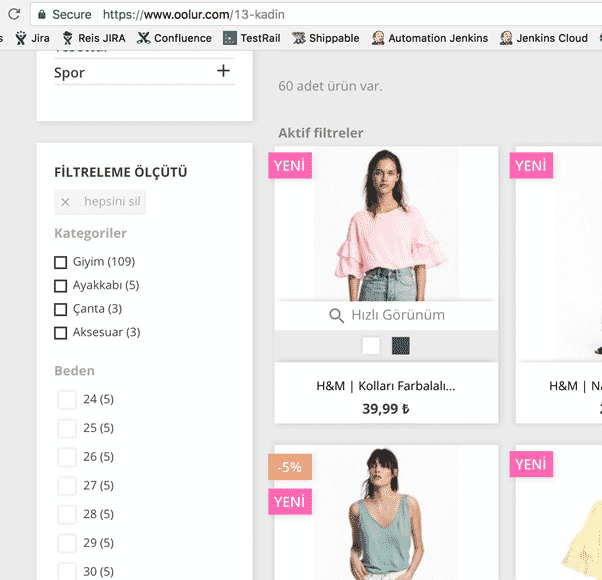
Filters
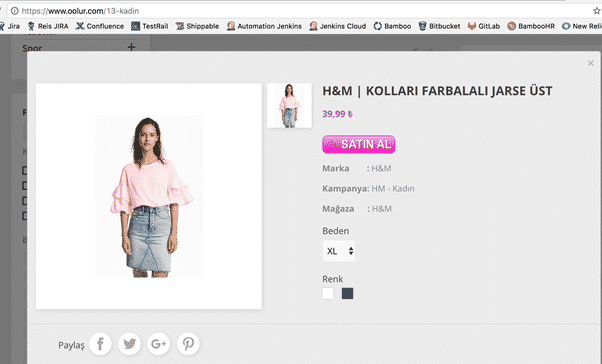
Product Popup window:
When You click the pink button with text “SATIN AL”, You should redirect to product owner’s product detail page(H&M).
10) Test Project Links, Materials, Github link.
Project Github link:
https://github.com/ozgurkayaist/Jmeter.AffiliateWebsite.Prestashop
Test Affiliate Website Link:
Please visit and give your feedback.
[fusion_widget_area name=”avada-custom-sidebar-performancetestingwidget” title_size=”” title_color=”” background_color=”” padding_top=”” padding_right=”” padding_bottom=”” padding_left=”” hide_on_mobile=”small-visibility,medium-visibility,large-visibility” class=”” id=”” /]
Thanks.
-Ozgur

Özgür KAYA is a Senior Software Testing and DevOps professional with 10+ years of experience. He has worked at Turkcell Global Bilgi, Veripark, Turkcell, N11, Trendyol, Emirates Airlines, and Arute Solutions, and Mobven.