How to create a test automation report with Allure Report and JUnit 5? Yes, in this article we will learn this! Allure Report is a very popular reporting tool all around the world. We used Allure Framework in the companies where I worked. Before, I wrote a comprehensive article on Allure Report TestNG. In this article, I will explain JUnit 5 integration instead of TestNG. Let’s start to do the integration of Allure Framework and Junit 5.
Step-1: Download Allure Command-Line Interpreter
In order to generate a report, we should install the Allure command-line interpreter.
- Download the latest version as a zip archive from bintray.
- Unpack the archive to the allure-command-line directory.
- Navigate to the bin directory.
- Add allure to system PATH.

For Mac, you can install Allure with brew.
brew install allure
Here is the installation link: https://formulae.brew.sh/formula/allure
Step-2: Modify Maven pom.xml
You should add JUnit 5, Allure, and Selenium libraries in your pom.xml as shown below.
<?xml version="1.0" encoding="UTF-8"?>
<project xmlns="http://maven.apache.org/POM/4.0.0"
         xmlns:xsi="http://www.w3.org/2001/XMLSchema-instance"
         xsi:schemaLocation="http://maven.apache.org/POM/4.0.0 http://maven.apache.org/xsd/maven-4.0.0.xsd">
    <modelVersion>4.0.0</modelVersion>

    <groupId>junit5-allure-report</groupId>
    <artifactId>junit5-allure-report</artifactId>
    <version>1.0-SNAPSHOT</version>

    <properties>
        <java.version>11</java.version>
        <selenium.version>4.0.0-beta-3</selenium.version>
        <junit.jupiter.version>5.8.0-M1</junit.jupiter.version>
        <junit.platform.version>1.8.0-M1</junit.platform.version>
        <allure-maven.version>2.10.0</allure-maven.version>
        <allure-junit5.version>2.14.0</allure-junit5.version>
        <maven-surefire-plugin.version>3.0.0-M3</maven-surefire-plugin.version>
        <maven-compiler-plugin.version>3.8.1</maven-compiler-plugin.version>
        <aspectj.version>1.9.6</aspectj.version>
        <junit-platform-surefire-provider.version>1.3.1</junit-platform-surefire-provider.version>
    </properties>

    <dependencies>
        <!--Selenium Dependency-->
        <dependency>
            <groupId>org.seleniumhq.selenium</groupId>
            <artifactId>selenium-java</artifactId>
            <version>${selenium.version}</version>
        </dependency>
        <!--JUNIT 5 Dependencies-->
        <dependency>
            <groupId>org.junit.jupiter</groupId>
            <artifactId>junit-jupiter-api</artifactId>
            <version>${junit.jupiter.version}</version>
        </dependency>
        <dependency>
            <groupId>org.junit.jupiter</groupId>
            <artifactId>junit-jupiter-engine</artifactId>
            <version>${junit.jupiter.version}</version>
        </dependency>
        <dependency>
            <groupId>org.junit.platform</groupId>
            <artifactId>junit-platform-engine</artifactId>
            <version>${junit.platform.version}</version>
        </dependency>
        <dependency>
            <groupId>org.junit.platform</groupId>
            <artifactId>junit-platform-launcher</artifactId>
            <version>${junit.platform.version}</version>
        </dependency>
        <dependency>
            <groupId>org.junit.platform</groupId>
            <artifactId>junit-platform-runner</artifactId>
            <version>${junit.platform.version}</version>
        </dependency>
        <!--Allure Reporting Dependencies-->
        <dependency>
            <groupId>io.qameta.allure</groupId>
            <artifactId>allure-junit5</artifactId>
            <version>${allure-junit5.version}</version>
        </dependency>
    </dependencies>

    <build>
        <plugins>
            <plugin>
                <groupId>org.apache.maven.plugins</groupId>
                <artifactId>maven-surefire-plugin</artifactId>
                <version>${maven-surefire-plugin.version}</version>
                <configuration>
                    <properties>
                        <property>
                            <name>listener</name>
                            <value>io.qameta.allure.junit5.AllureJunit5</value>
                        </property>
                    </properties>
                    <includes>
                        <include>**/tests/**.java</include>
                    </includes>
                    <argLine>
                        -javaagent:"${settings.localRepository}/org/aspectj/aspectjweaver/${aspectj.version}/aspectjweaver-${aspectj.version}.jar"
                    </argLine>
                    <systemProperties>
                        <property>
                            <name>allure.results.directory</name>
                            <value>${project.basedir}/allure-results</value>
                        </property>
                        <property>
                            <name>junit.jupiter.extensions.autodetection.enabled</name>
                            <value>true</value>
                        </property>
                    </systemProperties>
                    <reportFormat>plain</reportFormat>
                </configuration>
                <dependencies>
                    <dependency>
                        <groupId>org.aspectj</groupId>
                        <artifactId>aspectjweaver</artifactId>
                        <version>${aspectj.version}</version>
                    </dependency>
                    <dependency>
                        <groupId>org.junit.jupiter</groupId>
                        <artifactId>junit-jupiter-api</artifactId>
                        <version>${junit.jupiter.version}</version>
                    </dependency>
                    <dependency>
                        <groupId>org.junit.jupiter</groupId>
                        <artifactId>junit-jupiter-engine</artifactId>
                        <version>${junit.jupiter.version}</version>
                    </dependency>
                </dependencies>
            </plugin>
            <plugin>
                <groupId>io.qameta.allure</groupId>
                <artifactId>allure-maven</artifactId>
                <version>${allure-maven.version}</version>
            </plugin>
            <plugin>
                <groupId>org.apache.maven.plugins</groupId>
                <artifactId>maven-compiler-plugin</artifactId>
                <version>${maven-compiler-plugin.version}</version>
                <configuration>
                    <source>${java.version}</source>
                    <target>${java.version}</target>
                </configuration>
            </plugin>
        </plugins>
    </build>
</project>
Step-3: Add Allure Report Annotations in Your Project
Now, we are ready to use Allure annotations in our project. The detailed explanations of Allure Annotations are explained in Allure TestNG article. Here, I will skip those explanations and use allure annotations in my test class. A sample test class is shown below.
package tests;

import static org.junit.jupiter.api.Assertions.assertTrue;

import io.qameta.allure.Description;
import io.qameta.allure.Epic;
import io.qameta.allure.Feature;
import io.qameta.allure.Story;
import org.junit.jupiter.api.Test;
import pages.HomePage;

@Epic("Login Tests Epic")
@Feature("Invalid Login Features")
public class LoginTest extends BaseTest {
    @Test
    @Story("User tries to login the system with invalid username and invalid password.")
    @Description("Invalid Login Test with Invalid Username and Invalid Password.")
    public void invalidLoginTest_InvalidUserNameInvalidPassword() {
        page.getPage(HomePage.class)
            .givenIAmAtHomePage()
            .whenIGoToLoginPage()
            .andILoginToN11("[email protected]", "11223344")
            .thenIVerifyLogEntryFailMessage();
    }

    @Test
    @Story("User tries to login the system with empty username and invalid password.")
    @Description("Invalid Login Test with Empty Username and Invalid Password.")
    public void invalidLoginTest_EmptyUserEmptyPassword() {
        page.getPage(HomePage.class)
            .givenIAmAtHomePage()
            .whenIGoToLoginPage()
            .andILoginToN11("", "")
            .ThenIVerifyLoginUserNameErrorMessage("Lütfen e-posta adresinizi girin.")
            .thenIVerifyPasswordErrorMessage("Bu alanın doldurulması zorunludur.");
    }

    @Test
    @Story("This is a Fail Story.")
    @Description("This is a Fail Story Description.")
    public void failTest() {
        assertTrue(false);
    }
}
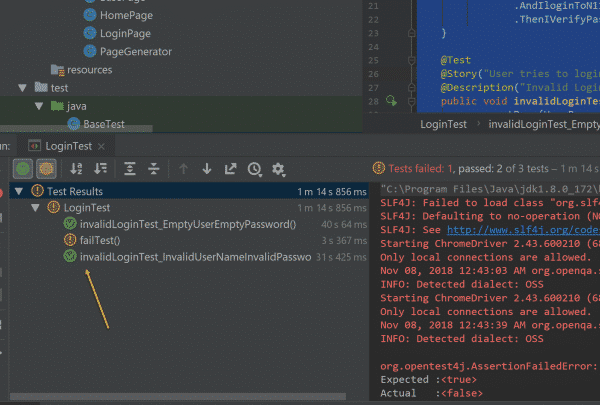
As you see in the above code, we used @Epic, @Feature, @Story, and @Description annotations. Now, let’s run our test class. We will expect 2 passes and 1 fail as shown below.
Step-4: Generate Allure Report
In order to generate a report, you should open a command prompt on Windows or terminal on Mac or just use IntelliJ’s terminal section and type the below command and hit enter.
open a command prompt screen, go to the project directory, and write the below command!
allure serve allure-results

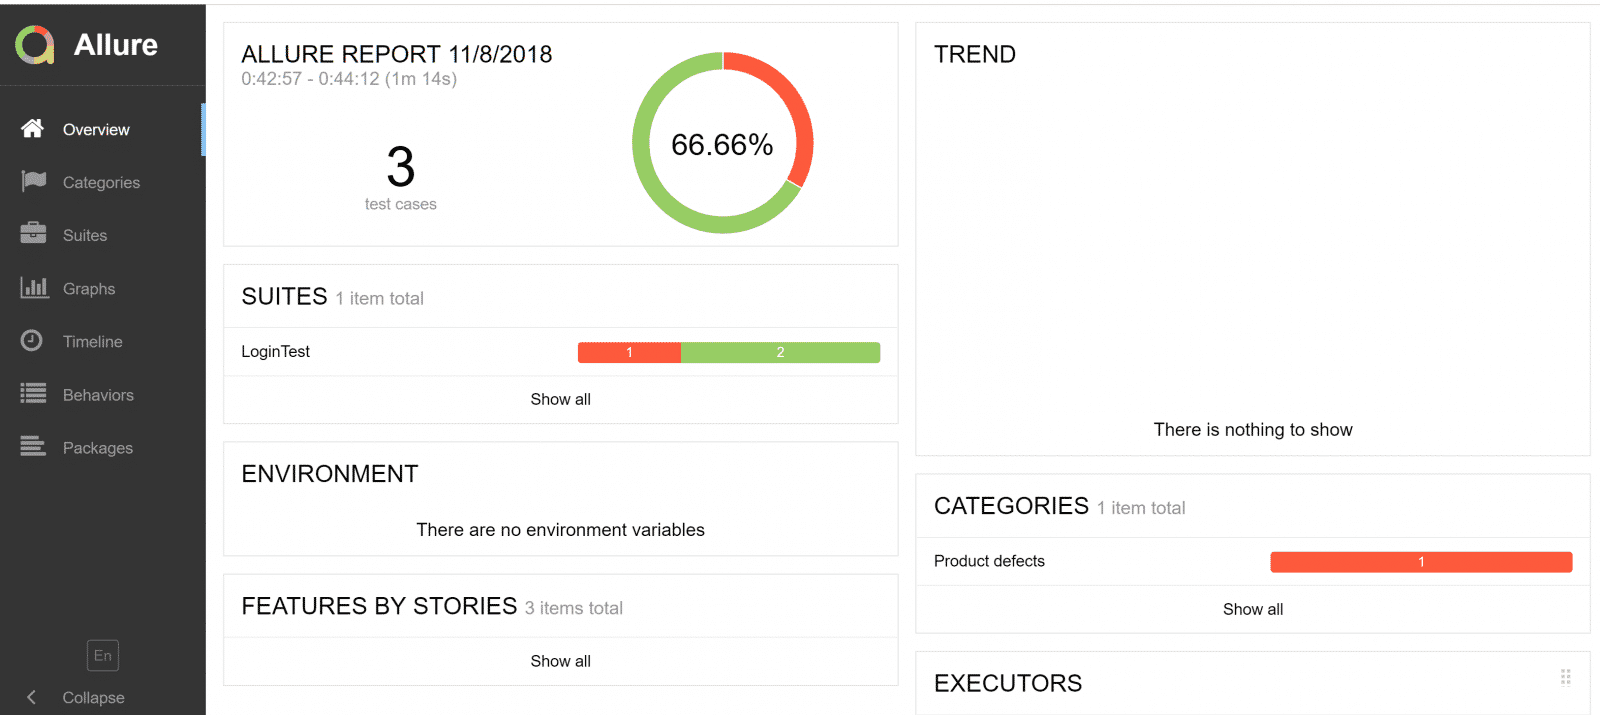
After this operation, the Allure report created and displayed as shown below.
As you see in this article, we learned how to create a test automation report Allure and JUnit 5. You will find more details of Allure in the Allure TestNG article. In this article, I did not want to repeat the same stuff again.
GitHub Project
https://github.com/swtestacademy/allure-junit5-example
You can fork the repo and do your changes based on your requirements. If you have any comments or questions, please write them in the comment section.
Thanks.
Onur Baskirt

Onur Baskirt is a Software Engineering Leader with international experience in world-class companies. Now, he is a Software Engineering Lead at Emirates Airlines in Dubai.
Can you explain how implement attachments in junit5 ?
Hi, I hope it helps: https://stackoverflow.com/questions/52075223/log-file-per-junit-5-test-in-order-to-attach-it-to-the-allure-report
How can I up this history count here ?I want to maintain it for at least 20 builds but by default it only shows 5 . We run tests at least 10-15 times a day. sometimes more so last 5 past run dont help.https://imgur.com/a/ACEkuIk
It is an issue of allure.
https://github.com/allure-framework/allure2/issues/347
https://github.com/allure-framework/allure2/issues/906
They still did not make it confifurable.
Is it possible to use @Step in @BeforeAll with junit5 and Allure?